This how to article is my way of saying thank you to everyone who shares their time, talents and posted on this site. I have benefited so much from your posts I felt it was time I gave back.
Upper control arms (UCA)....here we go!
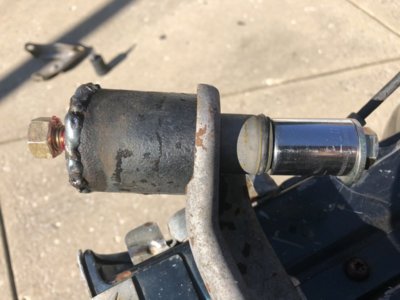
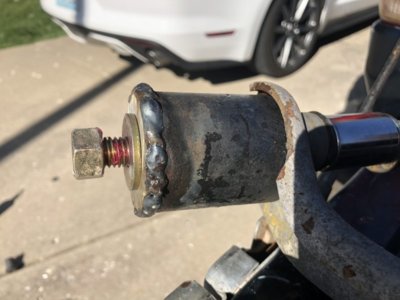
I purchased a spare set of small UCA from Craigslist and I’m in the process of refurbishing them. I was told by the seller they would not achieve tourqe on the ball joints. I read on this site where it is commonplace to tackweld loose ball joints to the UCA. Here are the steps I went thru to get them back into service.
I read that Vinagar does wonders on rust. So off the Walmart and I picked up 2 gallons of apple cider vinegar. I first degreased the arms with dish soap and a stiff brush and then soaked them in vinegar for a week (I started a new job and I got busy)

Just coming out of the vinegar the rust was falling off to bare metal to the touch.


A quick rinse by the garden hose and 80% of the rust rinsed off. The better you degrease the nooks and crannies the better the vinegar works.


I made my own bushing tool from instructions found on this site. I used a grade 8 bolt, an old piece of 2 1/4” dia exhaust pipe, stacked and welded 2 fender washers and a got a 21mm socket to act at the support on the back of the bushing. The socket is only needed if you can’t find full threaded bolts otherwise, like mine, you run out of threads before the bushing comes out. Look for full threaded bolts if you can find them.


The removal of the bushings was a snap with the bushing press. Use grease to minimize the effort needed to turn the bolt and to reduce the stress on the threads. Grease the threads and flat surfaces where the bolt spins on the tool. You can strip out the threads if your bushings are really stubborn if you don’t use a high grade bolt. Consider having a spare bolt since you will have 4 bushings to remove and 4 more to install.

Make sure your tool is flat, square and fully seated on the surface of the control arm. I had to contour my tool with a grinder to match the profile about the bushing.
Don’t think you can press the bushings out with a traditional bearing press without knowing what you are doing. The arms on the UCA will deflect before the bushings come out and your end up bending the UCA.
You can use a press but be sure to support the inside of the UCA arm but the home-made tool is so much easier and insures you don’t deform the arm.


The tool doesn’t have to be pretty, but make sure the pipe sits flush and flat inside the formed edge of the UCA.


I could not find full thread bolts so I used a hammer to pop the bushing out the last little bit.

Here are the reassembly pictures I promised.
I just reversed the tool to the inside of the UCA and added a bunch of fender washers to allow me to pull the bushing into its mated slot. I greased the UCA and wiped out the majority of the grease to make sure I didn’t have any dirt or grit on the bushing and part.
I used the offset bushings from Moog part number K7103. Here is what was in the box. I like the caps/bushed washers for the ends of the bushings. They will help distribute the load, control the rubber inside the offset bushings and the VCI (volatile corrosion inhibitor) paper added to the bushing bags to stop rust while they are in the box is a nice touch.


I ignored the instructions that were in the box, per recommendations from others on this site and I followed their directions for maximum Caster.
(Skip the Moog instructions you find in the box. One member posted on this site he believed the offset bushings were invented to help mechanics with cars with front end damage to get them to align...see next photo)

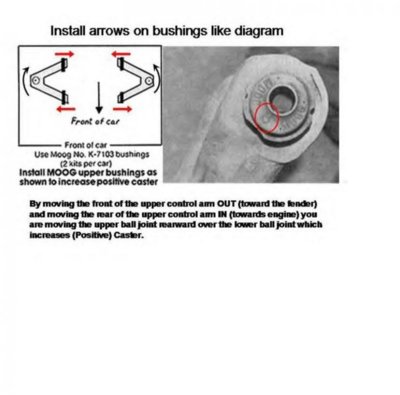
Since most of us are only interested in increasing caster use this one found on FABO (thank you 72bluNblu) just in case you can’t determine which arm is the drivers or passenger side UCA
the provision in the stamping for the bump stop goes to the front of the car.

Now set the orientation of the arrows per the FABO instructions and just tighten the tool to fully seat the bushings.


Now we move on to the ball joint section.
The guy I purchased the used UCA arms shipped me his new Mevotech small ball joint (MK704) with the arms. I was not impressed with the grease boot supplied with the Mevotech ball joints. Mevotech a good company and they sell to NAPA direct but the boot was thinner than Moog, the grease zert was tiny compared to the Moog part K704 and the Mevotech threads were not as tall and as well designed in shape and diameter as the Moog product.
Moog made in North America/Mexico (white/yellow box and Mevotech (blue box) from Taiwan

Difference in the ball joint boot

Cheaper hardware in the Mevotech box

Close up of the boot metal ring on the Moog. Moog used a large “chrome” ring that snapped over the ball joint and the Mevotech has a metal ring molded into the bottom of the boot. I guess both can be argued which one is better. The Moog substantial exposed metal ring that may rust or the rubberized metal ring that will seal to the ball joint helping to keep dirt out. You can choose but I liked the Moog better.

Moog threads

Mevotech threads

Side by side. Moog bottom and Mevotech top

I liked the Moog product better although the Moog didn’t achieve torque in the worn and streatched UCAs. I did notice the Moog were easier to thread over the Mevotech part with their rounded profile thread pitch.
This is my first rebuild of Upper control arms. Everything has been pretty straight forward except for not achieving torque and having to welding the ball joints to the UCA.


As for choices between brands I’m sure all of the metal in metal ball joints are all comparable coming out of the box. In my opinion the #1 cause of early failure to a ball joint is contamination that is why I like the HD boots on the Moog’s.
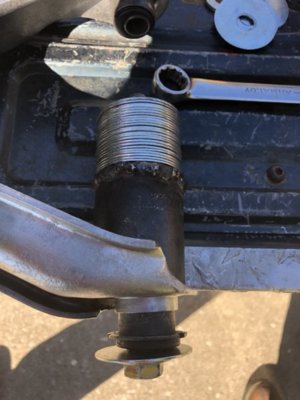
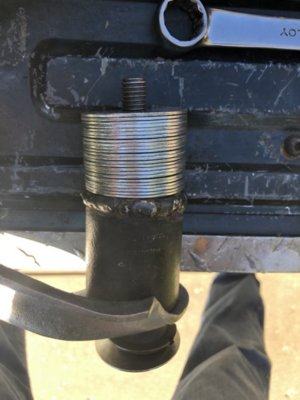
This is the tool I purchased from the internet for $12 bucks to remove the ball joints. It was much less expensive than the specialized ball joint socket sold for $50-100. For a tool I plan on using 10 times thoughout my lifetime it worked just fine. I did use a torch on the sheetmetal to loosen the grip the sheetmetal had on the balljoint prior to removal.


Just in case you can’t tell if you have large or small ball joint UCA small ball joint diameter measures 1.612” and large measure 1.830”

This tool will remove large ball joints too. I removed the large ball joints on this back up set of UCA I own for use if I ever change over to Large Ball joints in the future use.
Finished assembled product.
I used PPG paints. I started with an epoxy based two part primer for two coats and then three coats of satin black mixed the 8:1:1 ratio for pigment, hardener and thinner. The “satin” looks pretty glossy to me. Probably has something to do with the hardener, my mix might have been off and that is why they have so much gloss.

I still have to snug up the grease zerts and I may hit the top of the ball joint with clear while I’m waiting for more parts to arrive. It is like Mopar-UPS Christmas all the time at my house.

I like how the metal at the bottom of the Moog dust boot snapped on to the base of the ball joint. Makes for a clean install.


Some time has passed and I’m getting ready to install the UCA on the car. To get ready for the install I have attached an image from the maintenance manual to show the orientation of the parts and the snips from the Moog web page detailing the part numbers I used what comes in the box.


K7103

K8243A

K7030
I found the full set cheaper on Amazon that included the stock bushings and it was cheaper than getting k8243a alone. Go figure.
Once I started to pre-assemble, I became a little concerned about how loose the cam bolt and the offset bushings fit together. There is .085 of slop when they are installed without the flanged washers. The following pictures detail the pre-assembly and how the components work together to solve my “gap” problem to make a very tight and well thought out assembly with dimensions.

Just remember the small washer goes to the inside and the large washer to the outside.

I choose not to use the standard bushings but they were nice to have on hand to measure tolerances for this how to artical.


Pressing the flanged washers.

Lay out all of your parts. 2 washers were not enough. The nut bottomed out before things got tight

Lubricate the parts you are about to press together. I used silicone grease but anything will do.

I lubricated the inside of the bushing, bolt and washer flanges inside and out

I started tightening the nut and bolt with (2) 3/4” wrenches

I had to add several additional washers to get the washers to fully press into the bushings


The bushings with washers have very little play. The stock bushing ID is .025” and the “caster” set of bushings ID only has .010” that is 60% less gap. With that said I feel the standard bushings are more robust solution and the K7103’s will have to be replaced at a higher frequency depending on how you drive and how many miles you put on your car.

Fully assembled arms ready to go on the car
Upper control arms (UCA)....here we go!
I purchased a spare set of small UCA from Craigslist and I’m in the process of refurbishing them. I was told by the seller they would not achieve tourqe on the ball joints. I read on this site where it is commonplace to tackweld loose ball joints to the UCA. Here are the steps I went thru to get them back into service.
I read that Vinagar does wonders on rust. So off the Walmart and I picked up 2 gallons of apple cider vinegar. I first degreased the arms with dish soap and a stiff brush and then soaked them in vinegar for a week (I started a new job and I got busy)
Just coming out of the vinegar the rust was falling off to bare metal to the touch.
A quick rinse by the garden hose and 80% of the rust rinsed off. The better you degrease the nooks and crannies the better the vinegar works.
I made my own bushing tool from instructions found on this site. I used a grade 8 bolt, an old piece of 2 1/4” dia exhaust pipe, stacked and welded 2 fender washers and a got a 21mm socket to act at the support on the back of the bushing. The socket is only needed if you can’t find full threaded bolts otherwise, like mine, you run out of threads before the bushing comes out. Look for full threaded bolts if you can find them.
The removal of the bushings was a snap with the bushing press. Use grease to minimize the effort needed to turn the bolt and to reduce the stress on the threads. Grease the threads and flat surfaces where the bolt spins on the tool. You can strip out the threads if your bushings are really stubborn if you don’t use a high grade bolt. Consider having a spare bolt since you will have 4 bushings to remove and 4 more to install.
Make sure your tool is flat, square and fully seated on the surface of the control arm. I had to contour my tool with a grinder to match the profile about the bushing.
Don’t think you can press the bushings out with a traditional bearing press without knowing what you are doing. The arms on the UCA will deflect before the bushings come out and your end up bending the UCA.
You can use a press but be sure to support the inside of the UCA arm but the home-made tool is so much easier and insures you don’t deform the arm.
The tool doesn’t have to be pretty, but make sure the pipe sits flush and flat inside the formed edge of the UCA.
I could not find full thread bolts so I used a hammer to pop the bushing out the last little bit.
Here are the reassembly pictures I promised.
I just reversed the tool to the inside of the UCA and added a bunch of fender washers to allow me to pull the bushing into its mated slot. I greased the UCA and wiped out the majority of the grease to make sure I didn’t have any dirt or grit on the bushing and part.
I used the offset bushings from Moog part number K7103. Here is what was in the box. I like the caps/bushed washers for the ends of the bushings. They will help distribute the load, control the rubber inside the offset bushings and the VCI (volatile corrosion inhibitor) paper added to the bushing bags to stop rust while they are in the box is a nice touch.
I ignored the instructions that were in the box, per recommendations from others on this site and I followed their directions for maximum Caster.
(Skip the Moog instructions you find in the box. One member posted on this site he believed the offset bushings were invented to help mechanics with cars with front end damage to get them to align...see next photo)
Since most of us are only interested in increasing caster use this one found on FABO (thank you 72bluNblu) just in case you can’t determine which arm is the drivers or passenger side UCA
the provision in the stamping for the bump stop goes to the front of the car.
Now set the orientation of the arrows per the FABO instructions and just tighten the tool to fully seat the bushings.
Now we move on to the ball joint section.
The guy I purchased the used UCA arms shipped me his new Mevotech small ball joint (MK704) with the arms. I was not impressed with the grease boot supplied with the Mevotech ball joints. Mevotech a good company and they sell to NAPA direct but the boot was thinner than Moog, the grease zert was tiny compared to the Moog part K704 and the Mevotech threads were not as tall and as well designed in shape and diameter as the Moog product.
Moog made in North America/Mexico (white/yellow box and Mevotech (blue box) from Taiwan
Difference in the ball joint boot
Cheaper hardware in the Mevotech box
Close up of the boot metal ring on the Moog. Moog used a large “chrome” ring that snapped over the ball joint and the Mevotech has a metal ring molded into the bottom of the boot. I guess both can be argued which one is better. The Moog substantial exposed metal ring that may rust or the rubberized metal ring that will seal to the ball joint helping to keep dirt out. You can choose but I liked the Moog better.
Moog threads
Mevotech threads
Side by side. Moog bottom and Mevotech top
I liked the Moog product better although the Moog didn’t achieve torque in the worn and streatched UCAs. I did notice the Moog were easier to thread over the Mevotech part with their rounded profile thread pitch.
This is my first rebuild of Upper control arms. Everything has been pretty straight forward except for not achieving torque and having to welding the ball joints to the UCA.
As for choices between brands I’m sure all of the metal in metal ball joints are all comparable coming out of the box. In my opinion the #1 cause of early failure to a ball joint is contamination that is why I like the HD boots on the Moog’s.
This is the tool I purchased from the internet for $12 bucks to remove the ball joints. It was much less expensive than the specialized ball joint socket sold for $50-100. For a tool I plan on using 10 times thoughout my lifetime it worked just fine. I did use a torch on the sheetmetal to loosen the grip the sheetmetal had on the balljoint prior to removal.
Just in case you can’t tell if you have large or small ball joint UCA small ball joint diameter measures 1.612” and large measure 1.830”
This tool will remove large ball joints too. I removed the large ball joints on this back up set of UCA I own for use if I ever change over to Large Ball joints in the future use.
Finished assembled product.
I used PPG paints. I started with an epoxy based two part primer for two coats and then three coats of satin black mixed the 8:1:1 ratio for pigment, hardener and thinner. The “satin” looks pretty glossy to me. Probably has something to do with the hardener, my mix might have been off and that is why they have so much gloss.
I still have to snug up the grease zerts and I may hit the top of the ball joint with clear while I’m waiting for more parts to arrive. It is like Mopar-UPS Christmas all the time at my house.
I like how the metal at the bottom of the Moog dust boot snapped on to the base of the ball joint. Makes for a clean install.
Some time has passed and I’m getting ready to install the UCA on the car. To get ready for the install I have attached an image from the maintenance manual to show the orientation of the parts and the snips from the Moog web page detailing the part numbers I used what comes in the box.
K7103
K8243A
K7030
I found the full set cheaper on Amazon that included the stock bushings and it was cheaper than getting k8243a alone. Go figure.
Once I started to pre-assemble, I became a little concerned about how loose the cam bolt and the offset bushings fit together. There is .085 of slop when they are installed without the flanged washers. The following pictures detail the pre-assembly and how the components work together to solve my “gap” problem to make a very tight and well thought out assembly with dimensions.
Just remember the small washer goes to the inside and the large washer to the outside.
I choose not to use the standard bushings but they were nice to have on hand to measure tolerances for this how to artical.
Pressing the flanged washers.
Lay out all of your parts. 2 washers were not enough. The nut bottomed out before things got tight
Lubricate the parts you are about to press together. I used silicone grease but anything will do.
I lubricated the inside of the bushing, bolt and washer flanges inside and out
I started tightening the nut and bolt with (2) 3/4” wrenches
I had to add several additional washers to get the washers to fully press into the bushings
The bushings with washers have very little play. The stock bushing ID is .025” and the “caster” set of bushings ID only has .010” that is 60% less gap. With that said I feel the standard bushings are more robust solution and the K7103’s will have to be replaced at a higher frequency depending on how you drive and how many miles you put on your car.
Fully assembled arms ready to go on the car