The Great Pumpkin - '71 Duster
So feels like I've cleared a few hurdles and I'm knocking some stuff off the list.
Got the brake push rod thing figured out, turns out it was operator error. After chasing my tail the other day, I finally took the master cylinder off the firewall and had a look to see what was happening, I figured I had to be doing something wrong. Turns out it takes a good amount of effort to get the tip of the rod to seat in the back of the piston with the retainer, it's kinda tough to get it to pop in all the way when you're under the dash. I stuck the M.C. in the vise, put a little lube on the tip and worked it in. I've done a few of these now but I failed to remember this little tidbit for some reason. Oh well. It's in and stays in. Cost me a few bucks for an adjustable push rod but its a cool piece and I can adjust the pedal height now if needed.
Also got the column issues figured out. After taking the whole thing out again, I learned there was no hole for the retaining pin in the coupler body. I thought it may have been hiding under the ridge where the cover gets crimped to (which was bent over) but there was no hole. I pried it back to see but again, no hole. :dontknow:
The problem seems to be with the back of the key release collar - it was rubbing/binding on the bottom of the cluster. Because of this, the lower column cover could not be installed correctly. I pried the column bracket forward and back to see I could adjust it but there was no spot where everything would fit and not pull the shoes out of the coupler.
The decision was made to ditch the lower cover for now and not have it pull the shoes out of the coupler. The lower cover I have is broken anyway. Might have to modify one to get it to fit without interfering with the key release collar. Doesn't seem right to me but it's working OK and the shaft is not collapsed. Maybe there is a specific collar for a Tuff Wheel/floor shift/manual column? Dunno.
Finished up some more wiring in the engine bay, mostly in regards to the neutral safety switch and a ground strap from the driver's side head to the frame. I am 95% done with all the wiring at this point, just a few odds and ends to take care of. I will be stoked to stop measuring/crimping/soldering/heat shrinking/wire-tying.
Finished up the Line Lock too and the remainder of the brake lines. The L.L. pipe fittings were coated with Teflon paste and installed for good. The rear lines were cinched down, as well as the rear flex line and axle vent fitting. I'm happy with how it came out.
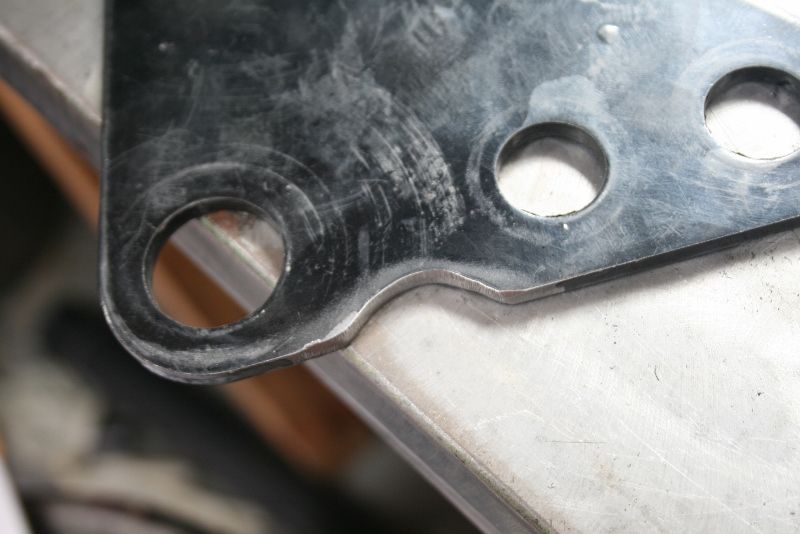
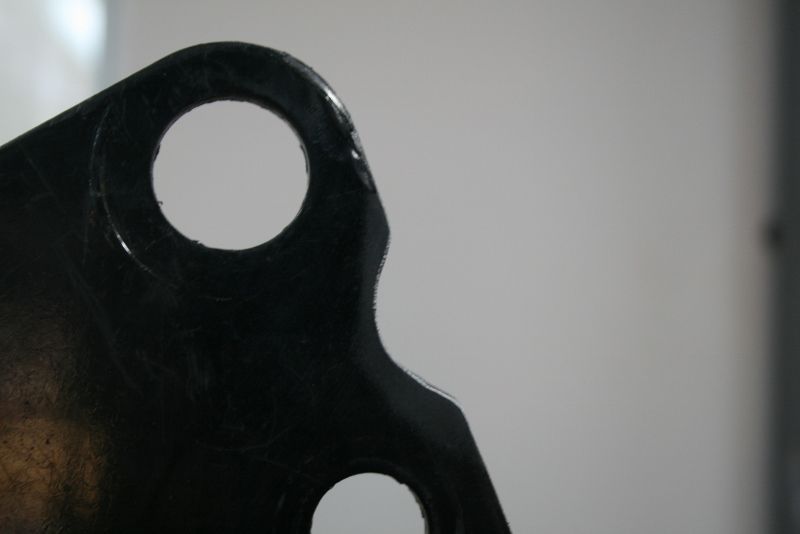
The rear end is finished and the rear wheels are back on the ground which means the Cal Tracs are installed. Since the car has offset springs, there are some clearance issues with the front spring hangers that needed to be dealt with. The inside Calvert triangulated pivot bracket needs to be trimmed under the spring eye hole to allow full forward swing motion without hitting and thus binding on the inside bottom of the offset hanger. So much for the nice powder coated finish! I am using Cass's offset hanger kit which is WAY nicer and lighter than the old Mopar Performance set but the pivot bracket still needs to be trimmed. See pics below.
I finally got to install my fancy Summit aluminum trans pan. This thing is beefy. Got a lovely, modern Mopar steel'n'silicone gasket from a later 42 to prevent leaks. The trans fluid was red and clear. There were traces of shiny stuff in the pan but I'm not concerned, the trans was working good.
While the old pan was off, I learned I have a Cheetah valve body, #17680. This is their 'race' FMVB which does not have the low band apply. The theory with this valve body is that it makes the 1-2 shift quicker. There are a few caveats with this part though. At the track, you must do your burnout in 2nd, shift into third and let off slowly when the tires bite. The other issue is driving on the street. Since there is no engine braking in first, it can be a little tricky. You have to be on your toes and need to be ready to upshift or coast if you let off. You can't get off and on the throttle in low quickly or you will kill the sprag. 2nd and third are 'OK' since those gears have engine braking but I try not to hammer it if I let off. I don't spend a whole lot of time in low so I'm used to it but you definitely need to be aware of it in traffic.
Unfortunately though, I've encountered another road block with the shifter cable. When it was first installed, there was a bench seat in the car and it was mounted almost a foot forward of where it is now. I moved it back to a more comfortable position with the buckets in it which effectively altered the length of the cable. Initially it was looped around the starter and secured to the trans-to-engine brace. But now since it's further back, there is not enough length to reach around the starter and it lays right on the header tube.
The original hole for the cable to go through the floor is now too far forward so I will have to drill another one closer to the shifter. I've been looking at it trying to figure out how to route it, I've seen where guys run it towards the passenger side first then loop around the bell and back to the selector lever. Might have to get a different length cable to make it work but we'll see how it goes. I think I can make it work somehow.
And to whoever has been reading through this - thanks for sticking with me! I know I can get a bit wordy with the descriptions, hope I'm not boring everyone to death with all the little details. I always think it might be helpful to someone who runs into the same situation. I also do it for myself to have a document of what I did.
OK, on to some pics. I didn't get images of all the issues I described this time, just the ground wire I made and the Cal Trac bracket trimming.
The ground strap is 00 wire. I use my Grainger hammer crimp tool for big cable ends.
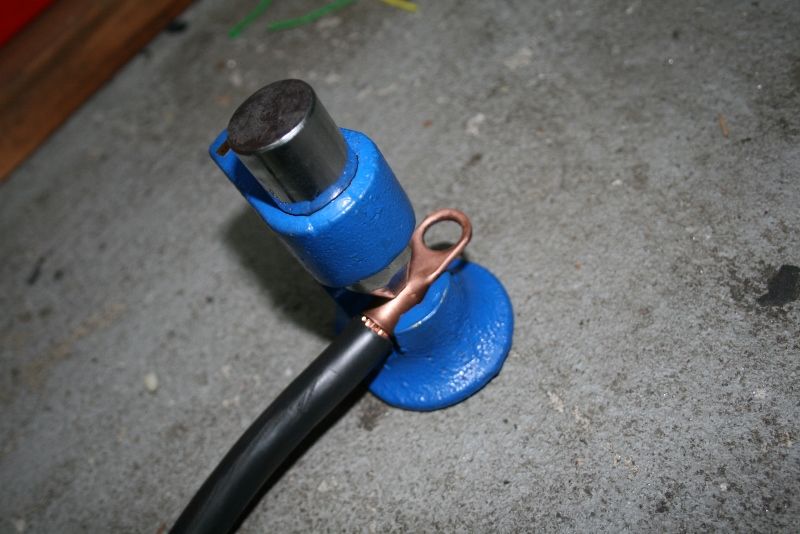
Here's the crimp job. It's solid.
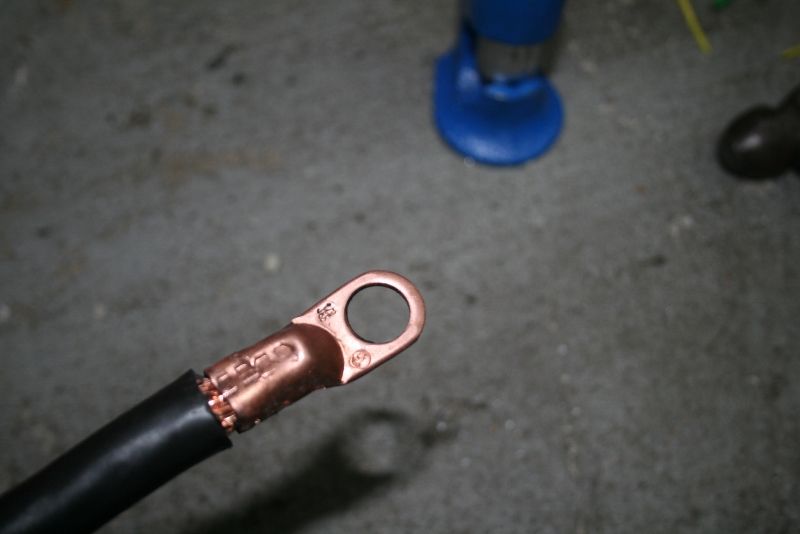
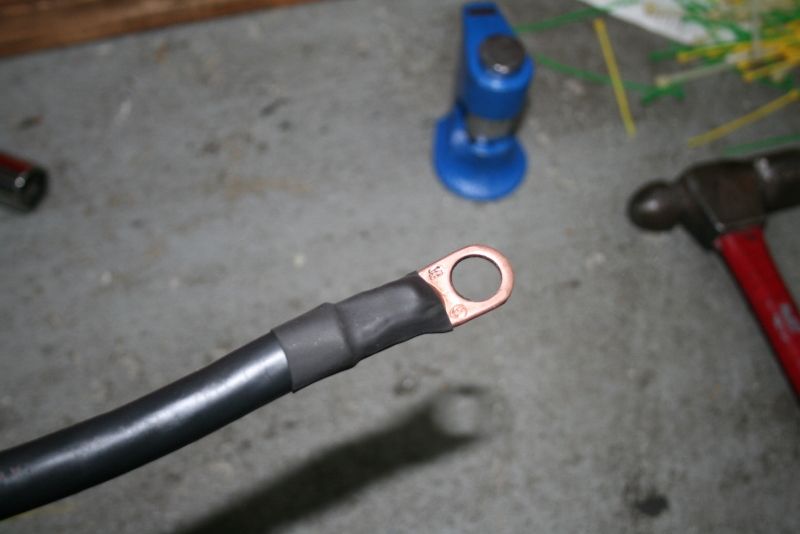
Final step is to heat shrink. I'm just realizing now that I forgot to solder it. It attaches from the left cylinder head to the bottom of the frame between the K member. I made sure to leave enough slack for movement.
OK, here are pics of how the Calvert bracket needs to be trimmed. The half-moon relief is where it hits the inside/bottom of the offset spring hanger. If you can picture where this part is installed, you can probably see how it could bind.
Here's another pic from a different angle.
Here's the triangle pivot bracket. You can see only the inside needs to be trimmed, there's plenty of room on the outside for full swing motion.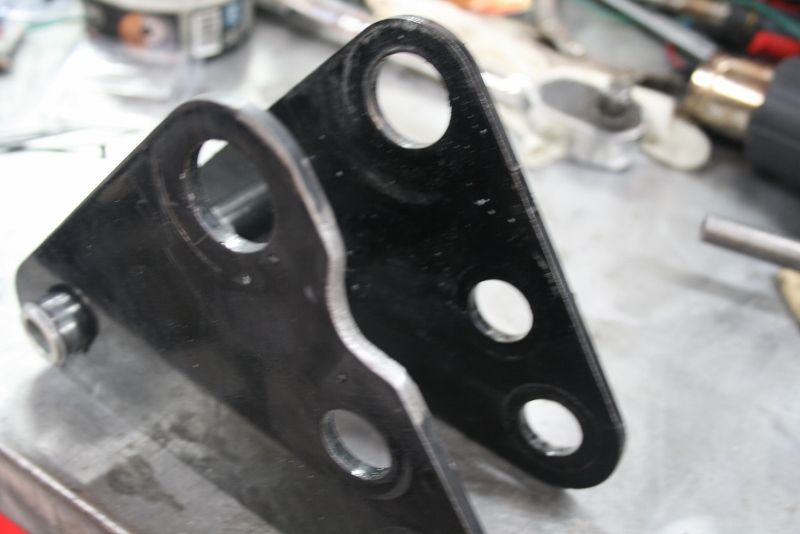
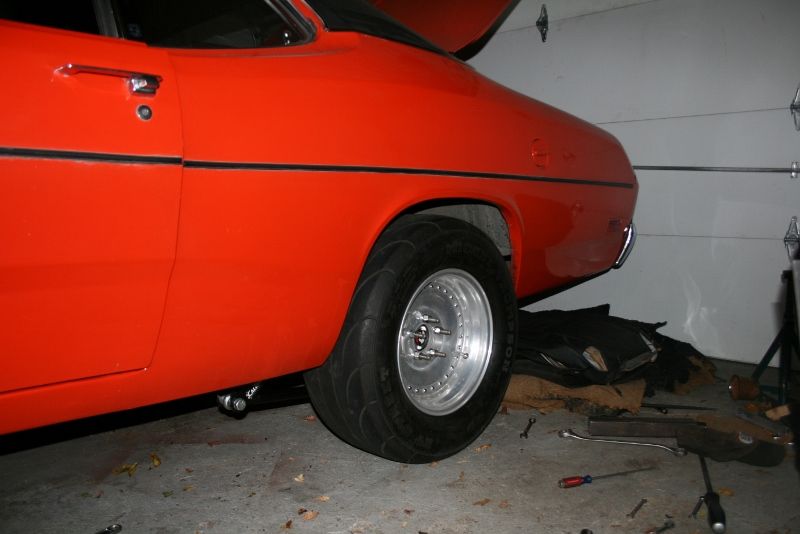
And here's the rear wheels back on the car.
More to come.
So feels like I've cleared a few hurdles and I'm knocking some stuff off the list.
Got the brake push rod thing figured out, turns out it was operator error. After chasing my tail the other day, I finally took the master cylinder off the firewall and had a look to see what was happening, I figured I had to be doing something wrong. Turns out it takes a good amount of effort to get the tip of the rod to seat in the back of the piston with the retainer, it's kinda tough to get it to pop in all the way when you're under the dash. I stuck the M.C. in the vise, put a little lube on the tip and worked it in. I've done a few of these now but I failed to remember this little tidbit for some reason. Oh well. It's in and stays in. Cost me a few bucks for an adjustable push rod but its a cool piece and I can adjust the pedal height now if needed.
Also got the column issues figured out. After taking the whole thing out again, I learned there was no hole for the retaining pin in the coupler body. I thought it may have been hiding under the ridge where the cover gets crimped to (which was bent over) but there was no hole. I pried it back to see but again, no hole. :dontknow:
The problem seems to be with the back of the key release collar - it was rubbing/binding on the bottom of the cluster. Because of this, the lower column cover could not be installed correctly. I pried the column bracket forward and back to see I could adjust it but there was no spot where everything would fit and not pull the shoes out of the coupler.
The decision was made to ditch the lower cover for now and not have it pull the shoes out of the coupler. The lower cover I have is broken anyway. Might have to modify one to get it to fit without interfering with the key release collar. Doesn't seem right to me but it's working OK and the shaft is not collapsed. Maybe there is a specific collar for a Tuff Wheel/floor shift/manual column? Dunno.
Finished up some more wiring in the engine bay, mostly in regards to the neutral safety switch and a ground strap from the driver's side head to the frame. I am 95% done with all the wiring at this point, just a few odds and ends to take care of. I will be stoked to stop measuring/crimping/soldering/heat shrinking/wire-tying.
Finished up the Line Lock too and the remainder of the brake lines. The L.L. pipe fittings were coated with Teflon paste and installed for good. The rear lines were cinched down, as well as the rear flex line and axle vent fitting. I'm happy with how it came out.
The rear end is finished and the rear wheels are back on the ground which means the Cal Tracs are installed. Since the car has offset springs, there are some clearance issues with the front spring hangers that needed to be dealt with. The inside Calvert triangulated pivot bracket needs to be trimmed under the spring eye hole to allow full forward swing motion without hitting and thus binding on the inside bottom of the offset hanger. So much for the nice powder coated finish! I am using Cass's offset hanger kit which is WAY nicer and lighter than the old Mopar Performance set but the pivot bracket still needs to be trimmed. See pics below.
I finally got to install my fancy Summit aluminum trans pan. This thing is beefy. Got a lovely, modern Mopar steel'n'silicone gasket from a later 42 to prevent leaks. The trans fluid was red and clear. There were traces of shiny stuff in the pan but I'm not concerned, the trans was working good.
While the old pan was off, I learned I have a Cheetah valve body, #17680. This is their 'race' FMVB which does not have the low band apply. The theory with this valve body is that it makes the 1-2 shift quicker. There are a few caveats with this part though. At the track, you must do your burnout in 2nd, shift into third and let off slowly when the tires bite. The other issue is driving on the street. Since there is no engine braking in first, it can be a little tricky. You have to be on your toes and need to be ready to upshift or coast if you let off. You can't get off and on the throttle in low quickly or you will kill the sprag. 2nd and third are 'OK' since those gears have engine braking but I try not to hammer it if I let off. I don't spend a whole lot of time in low so I'm used to it but you definitely need to be aware of it in traffic.
Unfortunately though, I've encountered another road block with the shifter cable. When it was first installed, there was a bench seat in the car and it was mounted almost a foot forward of where it is now. I moved it back to a more comfortable position with the buckets in it which effectively altered the length of the cable. Initially it was looped around the starter and secured to the trans-to-engine brace. But now since it's further back, there is not enough length to reach around the starter and it lays right on the header tube.
The original hole for the cable to go through the floor is now too far forward so I will have to drill another one closer to the shifter. I've been looking at it trying to figure out how to route it, I've seen where guys run it towards the passenger side first then loop around the bell and back to the selector lever. Might have to get a different length cable to make it work but we'll see how it goes. I think I can make it work somehow.
And to whoever has been reading through this - thanks for sticking with me! I know I can get a bit wordy with the descriptions, hope I'm not boring everyone to death with all the little details. I always think it might be helpful to someone who runs into the same situation. I also do it for myself to have a document of what I did.
OK, on to some pics. I didn't get images of all the issues I described this time, just the ground wire I made and the Cal Trac bracket trimming.
The ground strap is 00 wire. I use my Grainger hammer crimp tool for big cable ends.

Here's the crimp job. It's solid.

Final step is to heat shrink. I'm just realizing now that I forgot to solder it. It attaches from the left cylinder head to the bottom of the frame between the K member. I made sure to leave enough slack for movement.

OK, here are pics of how the Calvert bracket needs to be trimmed. The half-moon relief is where it hits the inside/bottom of the offset spring hanger. If you can picture where this part is installed, you can probably see how it could bind.

Here's another pic from a different angle.

Here's the triangle pivot bracket. You can see only the inside needs to be trimmed, there's plenty of room on the outside for full swing motion.

And here's the rear wheels back on the car.

More to come.