Going to resurrect a Daisy Dukes CJ Jeep!
So while the tail gate liner was drying to be ready for painting, I thought, what about the spare tire? The tires, on this remember are resin! The ones that the kit had with them were NOT the right for the kit! The rims you see here would simply fall through the openings in the tires!!!! SO I had to seek out other means for tires for on the Jeep PLUS fit the rims you see here! WELL then, originally the spare tire just glued to the back of the tail gate. Not exactly detailed at all, and sadly enough as you all know, you know that lacking bit with me well, I try to up the detail level to be more fitting to the build.
SO, I went on lookin' at "still" shots from the show showing the back of the Jeep to see the tire details....
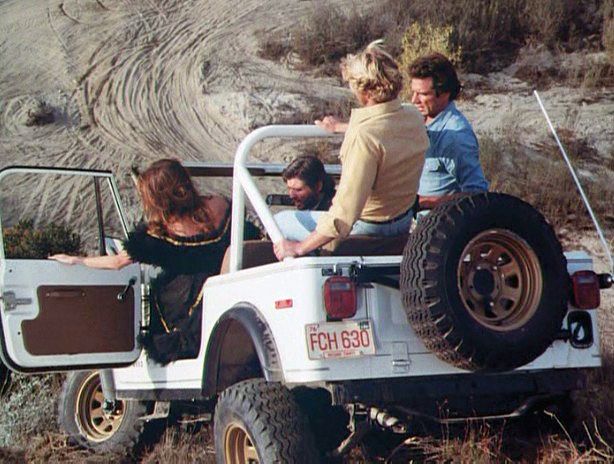
This ---^
Is what I plan to try and replicate!

SO, I start out by going to my metal stock bin, to see what I had for brass wire, to use. I choose brass so I could "solder" it together for strength.... This ALSO allows me to make all the fine adjustments to fit the tail gate, as well as the custom made hinges!
I then got to looking to see HOW I was going to "hang" the spare tire on it, as well as it "close" against the truck, AND clear the rear bumper at the same time! Remember the tires are a bit bigger in size, AND slightly wider.... SO, on making the place for the spare, I made it all go to the location it be on the tail gate (was a glue pin on the spare tire hanger, and a dimple in the tail gate for this so I just carried it over to the newly made parts for the same purpose.


Brass sheet is soldered to the frame, this adds strength, AND holds shape to the wire really well! -Hinges, are made to the right, adjusted to the receptacles on the Jeep (that I also made) and this is how this detail is coming together!

Brass plate drilled for the spare tire and its mount. As well as a vertical brass bar by the hinges to hold the shape and support the tire and its weight, as well as look good detail-wise....
So since this brass work had to cool, AND be cleaned by a bath in Acetone I then painted the tail gate liner and got in place..... That way I could get the tail gate on the Jeep body too! SO on the liner went, and then on the tail gate went..... and this is how that all looks now:

A LOT better lookin' then leaving it as the kit box-stock would have been! The tail gate had a BUNCH of imperfections in the plastic so I sanded and filed it off and then with the looks of it by that time something "more" needed done! So thats when I sat out to make the tail gate liner. NOW however its all in place!


I think that looks GREAT! A LOT BETTER then if I had left it box-stock! NOW, I can focus on the spare tire rack and all that detail on the other side of the Jeep! Stay tuned everyone, more to follow! -I got A LOT done on this build in the past couple days/nights!
Thanks for lookin'!!! Comments welcome! ~Enjoy!
So while the tail gate liner was drying to be ready for painting, I thought, what about the spare tire? The tires, on this remember are resin! The ones that the kit had with them were NOT the right for the kit! The rims you see here would simply fall through the openings in the tires!!!! SO I had to seek out other means for tires for on the Jeep PLUS fit the rims you see here! WELL then, originally the spare tire just glued to the back of the tail gate. Not exactly detailed at all, and sadly enough as you all know, you know that lacking bit with me well, I try to up the detail level to be more fitting to the build.
SO, I went on lookin' at "still" shots from the show showing the back of the Jeep to see the tire details....
This ---^
Is what I plan to try and replicate!
SO, I start out by going to my metal stock bin, to see what I had for brass wire, to use. I choose brass so I could "solder" it together for strength.... This ALSO allows me to make all the fine adjustments to fit the tail gate, as well as the custom made hinges!
I then got to looking to see HOW I was going to "hang" the spare tire on it, as well as it "close" against the truck, AND clear the rear bumper at the same time! Remember the tires are a bit bigger in size, AND slightly wider.... SO, on making the place for the spare, I made it all go to the location it be on the tail gate (was a glue pin on the spare tire hanger, and a dimple in the tail gate for this so I just carried it over to the newly made parts for the same purpose.
Brass sheet is soldered to the frame, this adds strength, AND holds shape to the wire really well! -Hinges, are made to the right, adjusted to the receptacles on the Jeep (that I also made) and this is how this detail is coming together!
Brass plate drilled for the spare tire and its mount. As well as a vertical brass bar by the hinges to hold the shape and support the tire and its weight, as well as look good detail-wise....
So since this brass work had to cool, AND be cleaned by a bath in Acetone I then painted the tail gate liner and got in place..... That way I could get the tail gate on the Jeep body too! SO on the liner went, and then on the tail gate went..... and this is how that all looks now:
A LOT better lookin' then leaving it as the kit box-stock would have been! The tail gate had a BUNCH of imperfections in the plastic so I sanded and filed it off and then with the looks of it by that time something "more" needed done! So thats when I sat out to make the tail gate liner. NOW however its all in place!
I think that looks GREAT! A LOT BETTER then if I had left it box-stock! NOW, I can focus on the spare tire rack and all that detail on the other side of the Jeep! Stay tuned everyone, more to follow! -I got A LOT done on this build in the past couple days/nights!
Thanks for lookin'!!! Comments welcome! ~Enjoy!