How to Megasquirt your 3G Hemi

-

Uhcoog1

Well-Known Member
Joined
Feb 7, 2011
Messages
888
Reaction score
79
Location
Houston
I'm going to outline my megasquirt install for everyone, make it easy for the DIY crowd.

I chose the Megasquirt 3x, as it provides sequential fuel and spark, the fact that I can tune it myself, and the fact that tunerstudio has a 'self-tune' setting that will adjust the fuel tables to match your specified air/fuel ratios. There are a ton of other features that make it comparable or better than the commercial grade offerings. This isn't quite a plug and play, though; you'll be wiring the thing yourself. Go here for a feature comparison between the megasquirt and the FAST - both offer things the other doesn't, but are very similar in most features.

Inputs needed for the megasquirt box:
Crank trigger input (5v power, common ground to box, and signal out)
Cam sensor input (5v power, common ground to box, and signal out)
Throttle position sensor (5v power, common ground to box, and signal out)
Coolant temp input (common ground to box and signal out)
Intake air temp input (common ground to box and signal out)
Wideband O2 sensor (O2 sensor to it's own box, then common ground to box and signal out)

Outputs for my install:
Logic level spark (12v fused feed and box controlled ground, through coil drivers, to fire coils) (more on this later)
Injectors (12v fused feed and box controlled ground to fire injectors)
Idle air control (not installed by me- there is no idle air control on a hilborn) (should be 12v fused feed and box controlled ground to operate)
Fuel pump relay control (via ground- turns pumps off if car not running after 3 seconds in key on position)
Tach signal (single signal wire to run to tach input)

Additional Hemi specific notes:
-For the box to be able to read the Hemi crank sensor, a special pull up needs to be installed in the box. DIY auto tune did that for me for $12 before sending me the box.
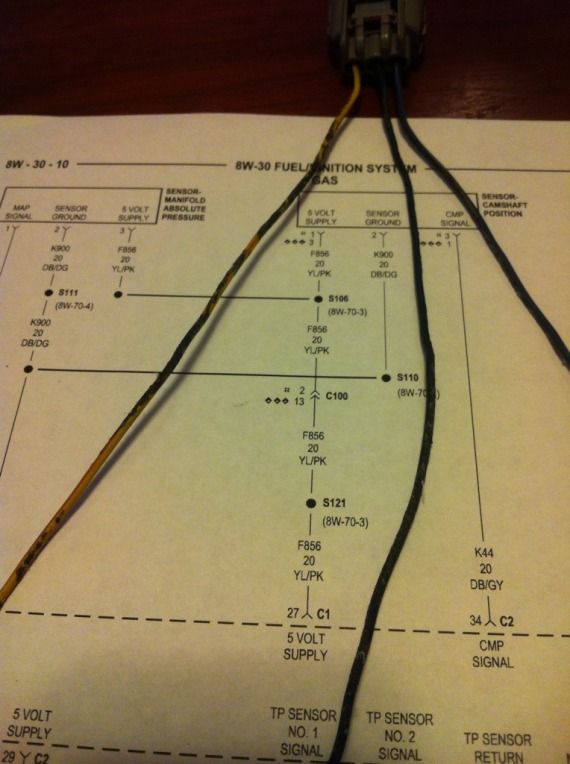
-The Cam and Crank sensors are 3 wire - ground, signal, and 5v power. There is only one 5v source on the megasquirt box, and that is the Throttle Position Sensor VREF wire (pin 26 on main MS3 connector). That feed is shared between the TPS, the crank sensor, and the cam sensor.
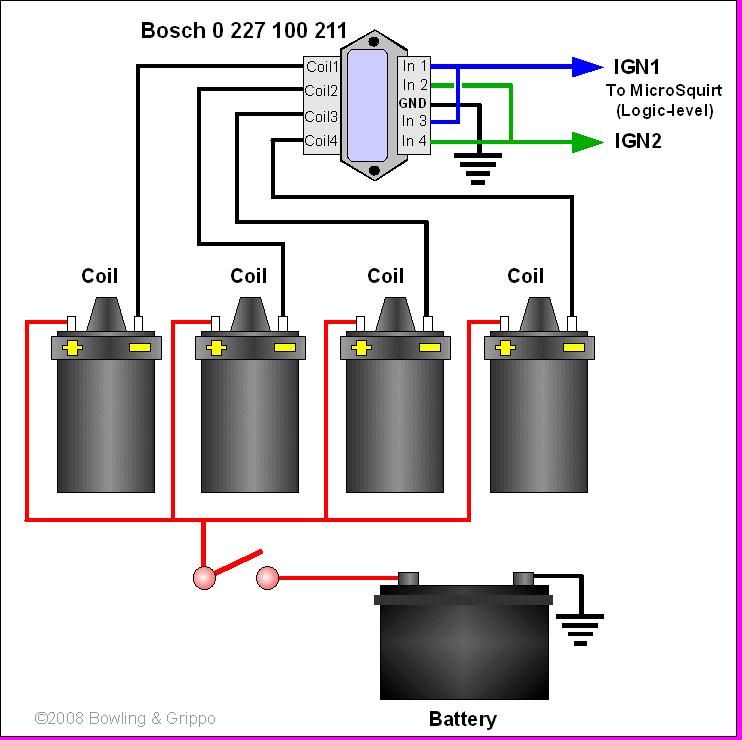
-The spark output for the megasquirt is logic level - that doesn't work with the hemi coils. So, you need to use coil drivers; you can use either the diyautotune BIP373 version, make your own Bosch BIP373 box, or get the bosch 211 factory part. I am using the bosch 211 version - the most difficult part of using these is finding the connectors, which I outline in the parts list below (and give a source - $27 shipped for everything). Here is a link to info on the Bosch 211 including all applications they were used on.
-buy the IAT and Coolant temp sensors from DIY Autotune; the megasquirt is already calibrated for (you can re-calibrate the settings for other sensors if you want).

Parts list:
Megasquirt 3x box assembled with $12 pull-up: $657
MS3 wiring harness (8 ft): $67
MS3x wiring harness (8 ft): $72
Innovate O2 sensor (MTX-L): $199
Bosch 211 (I bought Meyle): $140 ($70x2)
Bosch 211 connectors: $27 (outlined below)
Factory connectors for injectors, coil packs, cam sensor and crank sensor (and alternator):$100-$200 for factory harness from junkyard
TPS Sensor & plug: $40-$150 (specific to your throttle body)
Idle Air Control Valve & plug: ??
GM Intake Air Temp - open Sensor & Plug: $20
GM Coolant temp sensor and plug: $16.25
Cable driven throttle body: $100-$400
Throttle body adapter (if running GM cable driven throttle body): $60
3 relays: $24 ($8x3, including wiring)
A bunch of extra wire: $60
Buy Tunerstudio & MegaLogViewer software: $60
 
Main power for the engine management system:
Megasquirt relay (feeds MS3 and second relay):
12v feed #87: from battery
12V out #30– into two wires:
-to MS Box main pin 28 (through 3A fuse)
-to fuel pump relay
Switch feed #85 – from ignition (needs to be hot during crank AND when key in on position – more on this later)
Ground #86

Fuel Pump Relay (feeds fuel pump(s), injectors, coil packs, and O2 sensor):
12v feed #87: from #30 MS3 main relay
12V out #30– into fuse panel (feeds fuel pump(s), injectors, coil packs, and 02 Sensor)
Switch feed #85 – from #30 MS3 main relay
Ground #86 – Pin 37 on the main Megasquirt connector (will switch off fuel pumps if motor isn’t running or cranking)


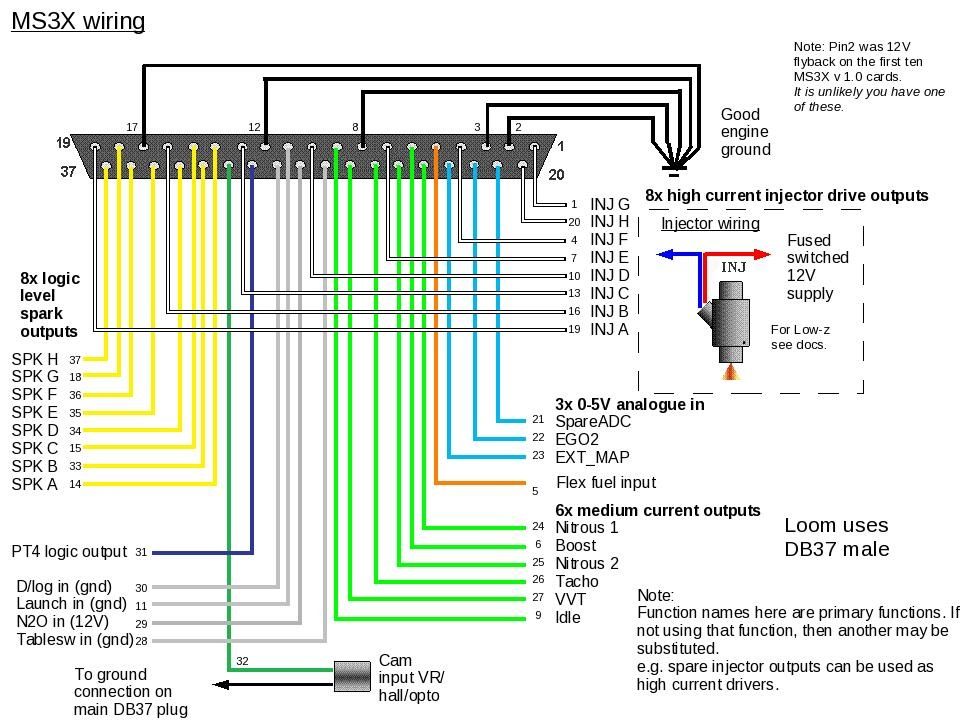
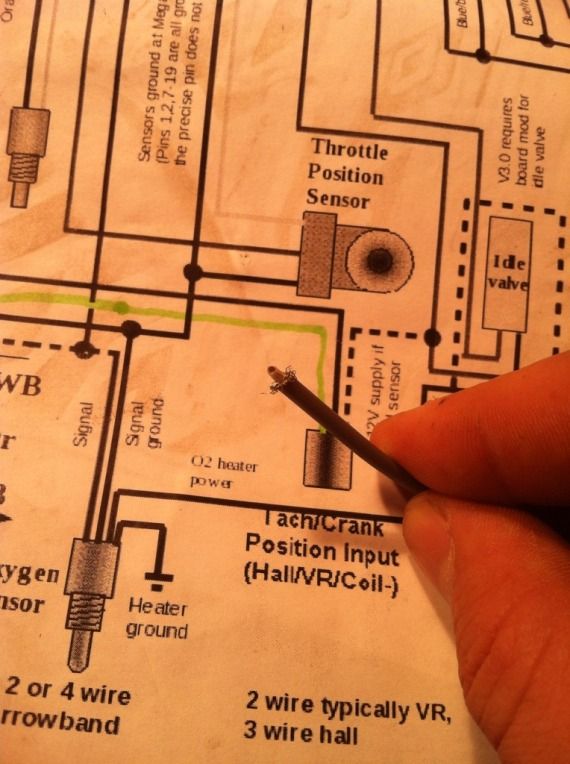
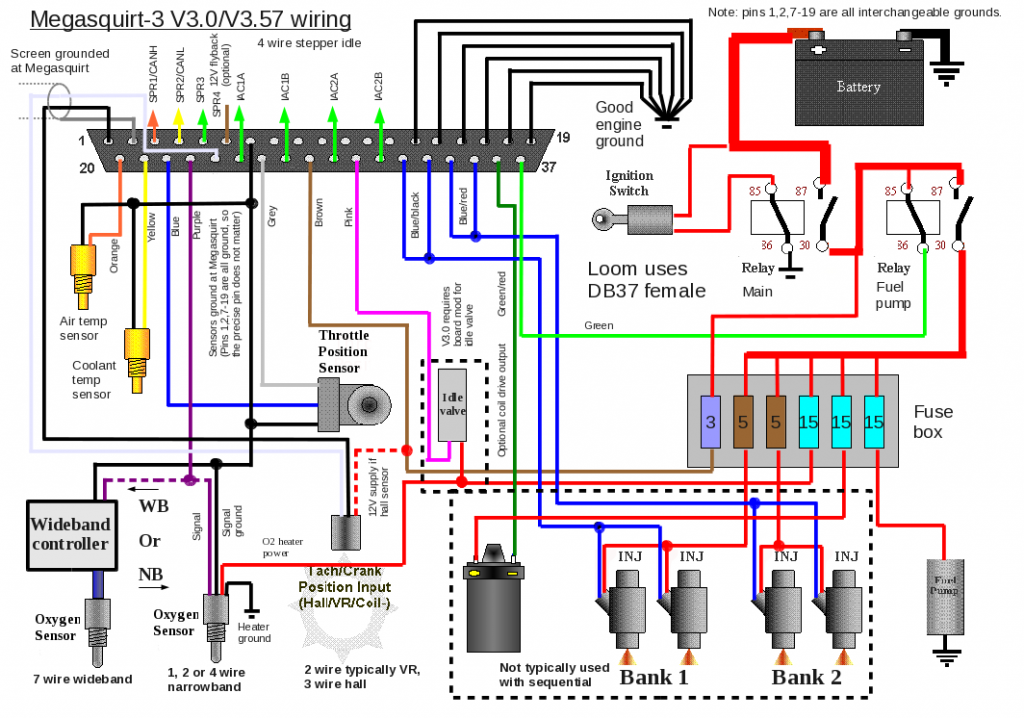
v3-wiring_zps1eff8d21.png

from msextra.com

ms3x-wiring_zps2499eb40.jpg

from msextra.com
 
Inputs First:

Crank trigger input (5v power, common ground to box, and signal out)
5v power: comes from Pin 26 of the main megasquirt plug – this 5V output is shared with crank, cam, & TPS)
Common ground to box – any of the black wires going back to the box (pins 7-19 of the main megasquirt plug)
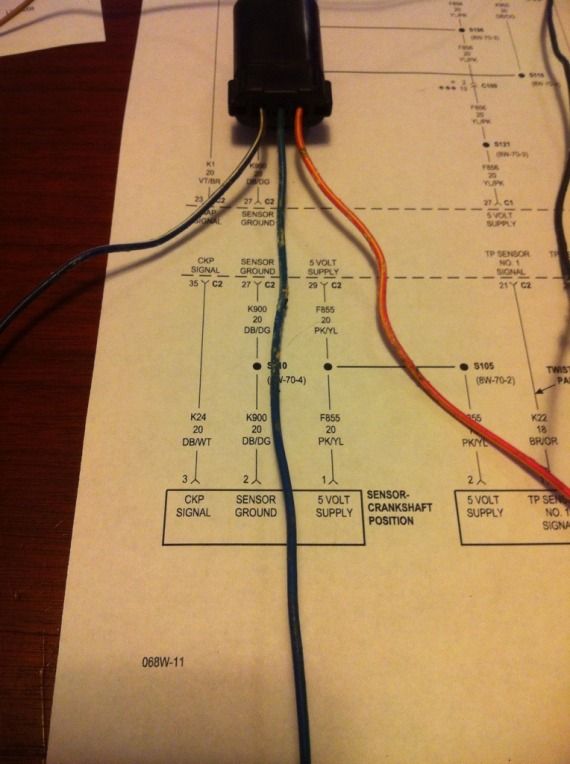
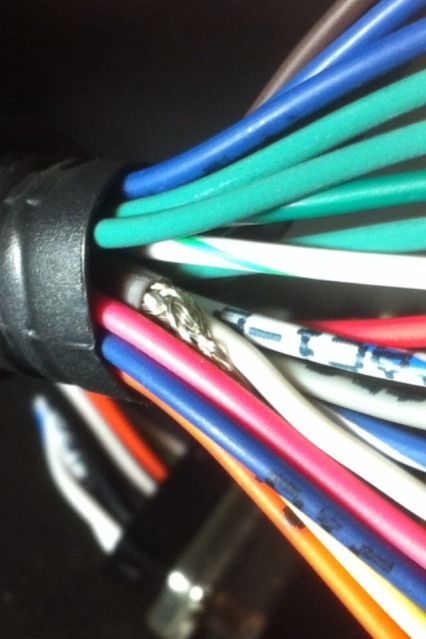
Signal out: Pin 24 on the main megasquirt plug. FYI – it is encased! See pic below. It is NOT clearly labeled.
8A038D8C-4E70-475E-8224-13C527872EB6-247-0000001D8B6270FA_zps994d0e79.jpg


Pic of encased crank sensor feed wire:
7A3DBE4E-080E-43C3-A3CA-C4AD35213BB0-247-0000001D7F4D871A_zps2510ce65.jpg

And another:
9CD1D149-9BEC-48BF-847F-A02CD81A9ADA-247-0000001D7D7C55A3_zps5089491f.jpg


Cam sensor input (5v power, common ground to box, and signal out)
5v power: comes from Pin 26 of the main megasquirt plug – this 5V output is shared with crank, cam, & TPS)
Common ground to box – any of the black wires going back to the box (pins 7-19 of the main megasquirt plug)
Signal out: Pin 32 on the MS3X plug. Wire is labeled.
43F136A3-B982-468B-B87F-74798852938C-247-0000001D8ECAD121_zps48e762c1.jpg


Throttle position sensor (5v power, common ground to box, and signal out)
5v power: comes from Pin 26 of the main megasquirt plug – this 5V output is shared with crank, cam, & TPS)
Common ground to box – any of the black wires going back to the box (pins 7-19 of the main megasquirt plug)
Signal out: Pin 22 on the main Megasquirt plug. Wire is labeled.


Coolant temp input (common ground to box and signal out)
Common ground to box – any of the black wires going back to the box (pins 7-19 of the main megasquirt plug)
Signal Out: Pin 21 on the main megasquirt plug. Wire is labeled.


Intake air temp input (common ground to box and signal out)
Common ground to box – any of the black wires going back to the box (pins 7-19 of the main megasquirt plug)
Signal Out: Pin 20 on the main megasquirt plug. Wire is labeled.


Wideband O2 sensor (O2 sensor to it's own box, then common ground to box and signal out)
Ground – I grounded to Chassis
Signal to box – Pin 23 on the main megasquirt plug. Wire is labeled.
 
Time for the Outputs:
Logic level spark (12v fused feed and box controlled ground, through coil drivers, to fire coils):
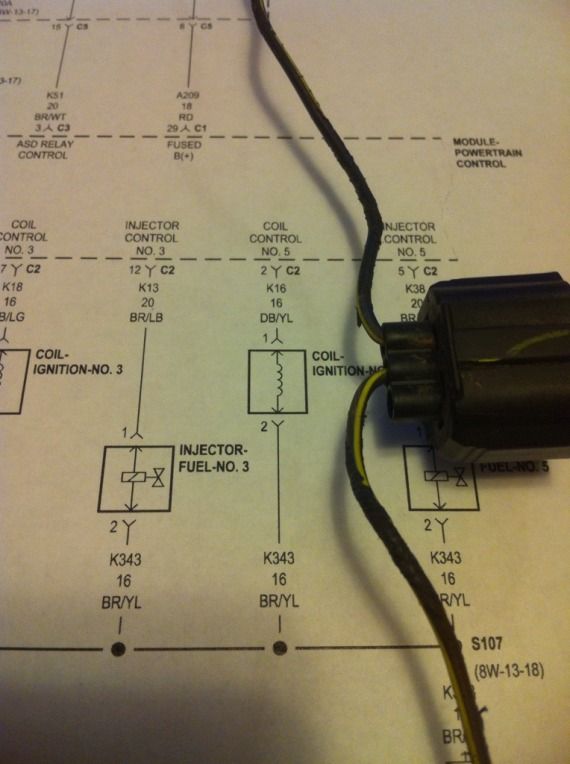
*the MS3x box ‘fires’ the coils by grounding the connection. So, all coils share a common fused 12V, but each has a different ground connected through the coil driver to the MS3x box.
12v fused feed- from fuse box powered by the fuel pump relay. Powers all the coils.
Ground – run the ground wire from the box to the coil driver, and from the coil driver to the coil. Coil wires are labeled, and are on the MS3x plug. The hemi firing order is:
• Spark A - cylinder 1
• Spark B - cylinder 8
• Spark C - cylinder 4
• Spark D - cylinder 3
• Spark E - cylinder 6
• Spark F - cylinder 5
• Spark G - cylinder 7
• Spark H - cylinder 2
*the order is of course the same when wiring the injectors
EAF2B61A-5618-412A-8C02-1B12023A1899-247-0000001D85850DB6_zps824be666.jpg


Injectors (12v fused feed and box controlled ground to fire injectors)
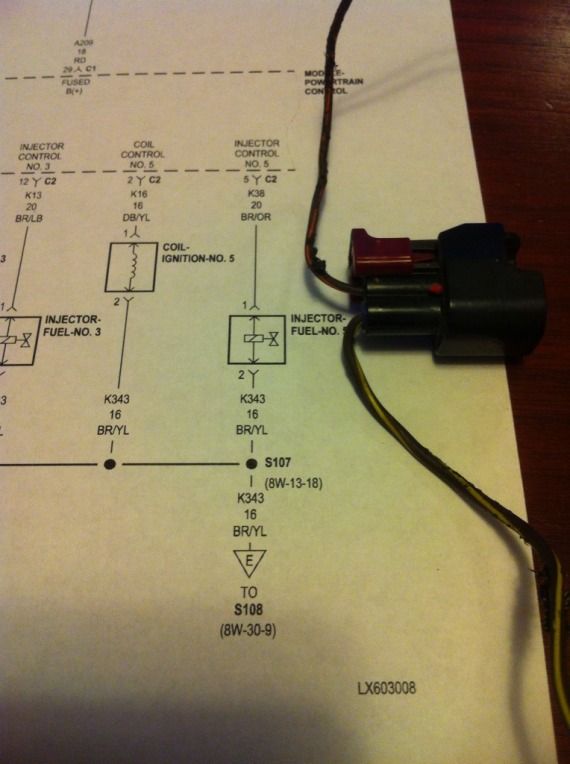
*the MS3x box ‘fires’ the injectors by grounding the connection. So, all coils share a common fused 12V, but each has a different ground connected to the MS3x box.
12v fused feed- from fuse box powered by the fuel pump relay. Powers all the injectors.
Ground – run the ground wire from the box to the corresponding injector. Injector wires are labeled, and are on the MS3x plug.
740193EE-17A2-4E63-8512-D6199ED18D2B-247-0000001D888A6FEB_zps3186f697.jpg


Idle air control (not installed by me- there is no idle air control on a hilborn) (should be 12v fused feed and box controlled ground to operate)

Tach signal (single signal wire to run to tach input)
Pin 26 on the MS3x plug.
 
More on wiring coil drivers. This diagram is NOT using sequential, so assume the IGN 1 & IGN 2 were replaced by the correct cylinder numbers and corresponding A-H MS labels.

Boschcoildriverwiring_zps04f0435a.jpg


More info added on edit:

The Bosch 211 needs to be mounted to a heat sink of some sort with dielectric grease between the two. I'll probably just use fairly thin aluminum stock.

The Bosch 211 uses junior power timer connections (one 4 pin and one five pin per 211). I had a seriously tough time finding the connectors. Here is the online components order I placed that got me all 4 plugs and pins. You end up with extra metal pins, but they have a $20 minimum order.


Manufacturer Part Number Quantity Availability Price Ext.Price
TE Connectivity / AMP Brand 828904-1 20 20 Ships ASAP
$0.022 $0.44
TE Connectivity / AMP Brand 929937-1 20 20 Ships ASAP
$0.320 $6.40
TE Connectivity / AMP Brand 929940-1 20 20 Ships ASAP
$0.320 $6.40
TE Connectivity / AMP Brand 282192-1 2 2 Ships ASAP
$1.640 $3.28
TE Connectivity / AMP Brand 282193-1 2 2 Ships ASAP
$2.040 $4.08
Subtotal: $20.60
Shipping: $6.95
Order Total: $27.55
 
Getting the settings correct in Megasquirt can be difficult. Some things will not match mine!!! Specifically:
Required fuel (use the formula)
Fuel VE Table (use the formula)

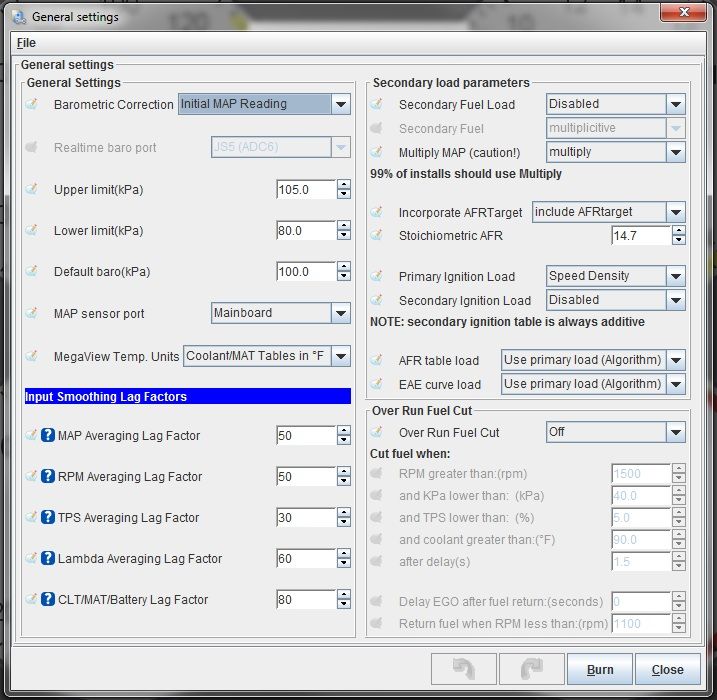
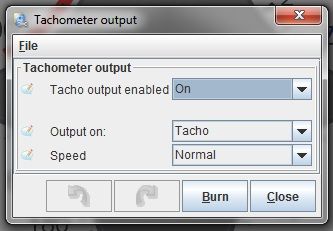
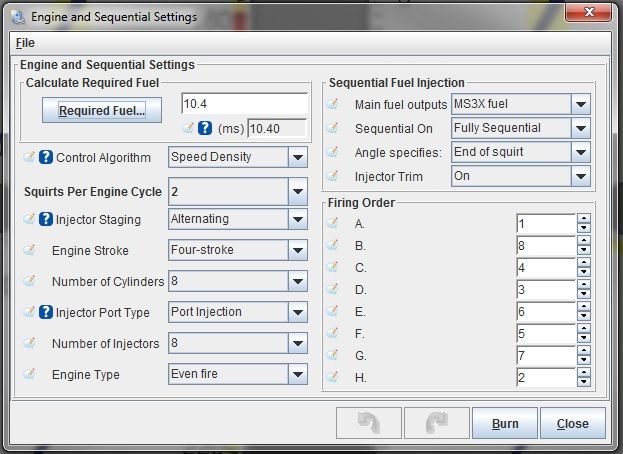
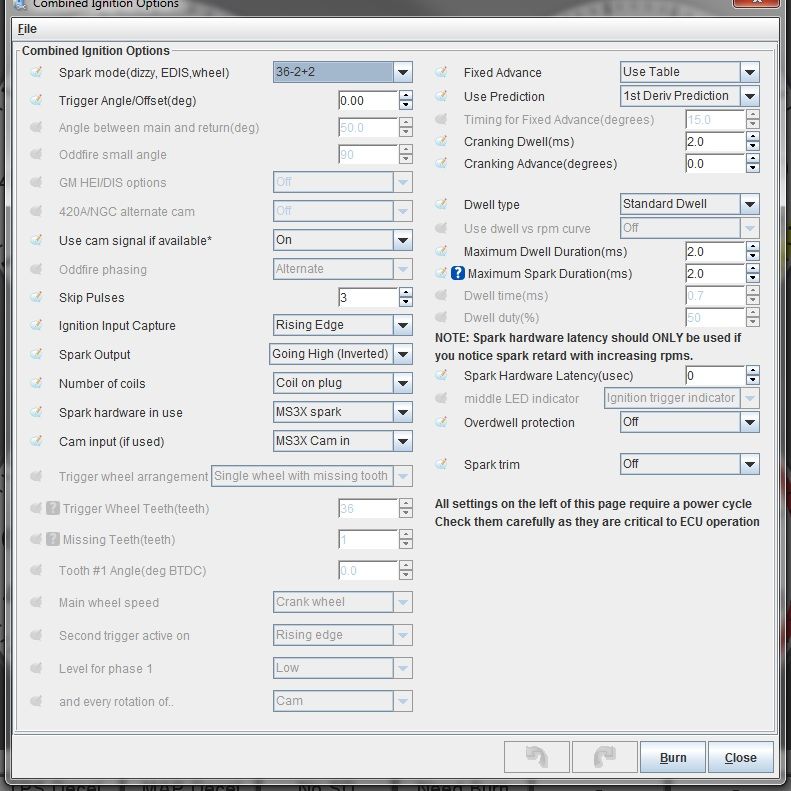
Here's what my settings are:

GeneralSettings_zps944653ad.jpg


TachometerOutput_zpsa7709322.jpg


EngineandSequentialSettings_zpsdf33b50b.jpg


CombinedIgnitionOptions_zps0a2f1d62.jpg


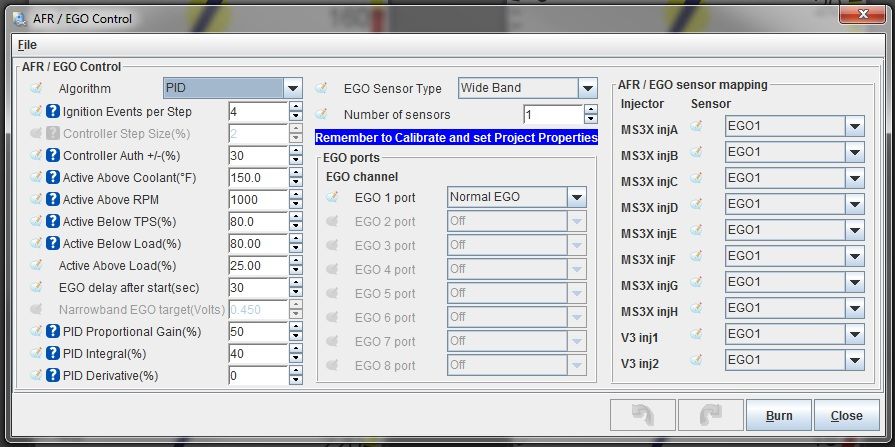
AFR-EGOControl_zps3378be16.jpg
 
Also, you need to calibrate your O2 sensor using:
Tools > Un / Lock > unlock calibration settings
Tools > Calibrate AFR > Pick EGO Sensor (Innovate LC-1 for me)

You can also calibrate your thermistor tables, but if you're running GM sensors, you don't have to.

Make sure you lock your calibration settings after you finish those above.


Then, calibrate your Throttle position sensor (tools > calibrate TPS), and your MAP sensor (tools > calibrate MAP). Fairly straightforward. You need to get a reading with your TPS fully closed, and fully open. Also, you need to know what MAP sensor you have!!!
 
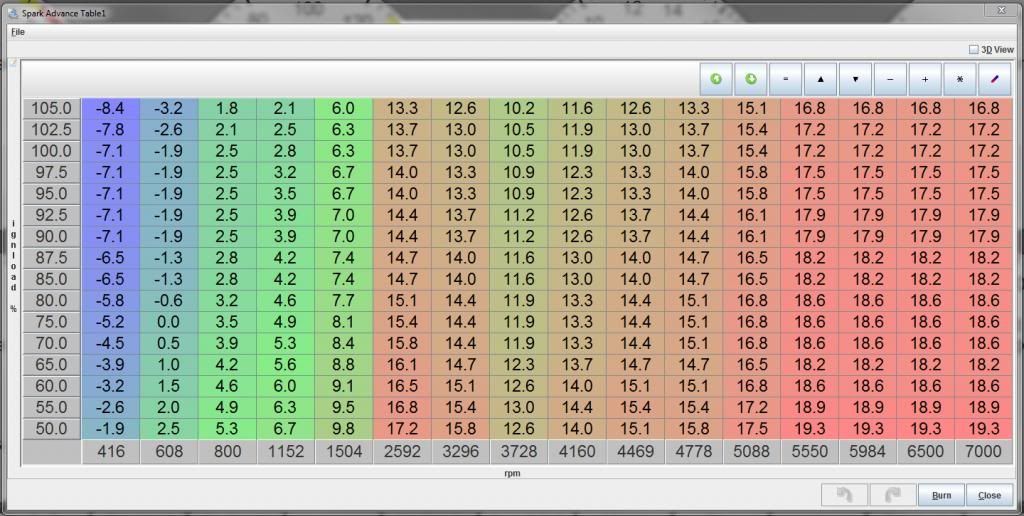
Here is my current ignition table. I used a 6.1 ignition table below 600 or 800, and a 5.7 ignition table above that, and then PULLED 30% timing out across the board.

Ignition-30percentpulled_zps21d37590.jpg


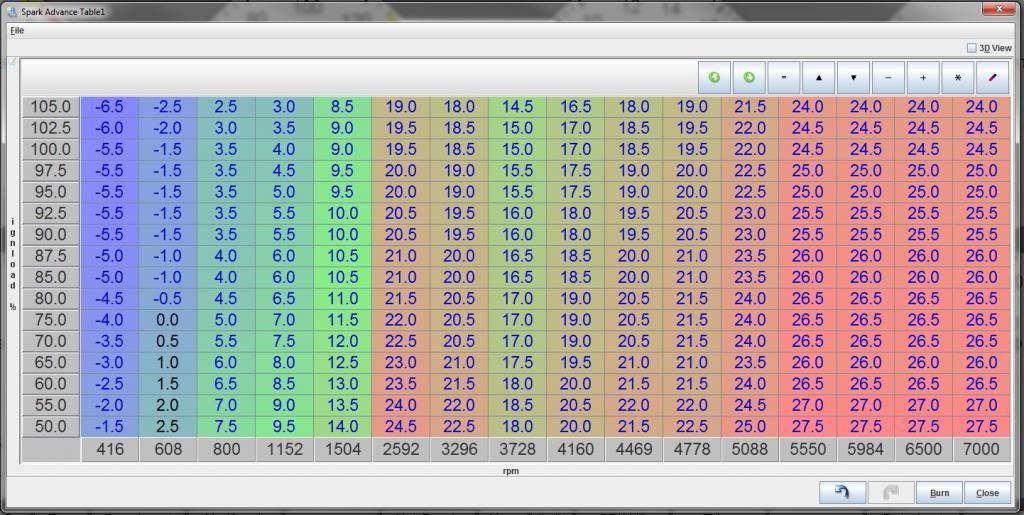
Here's what I came up with based on factory 5.7 above 800 and factory 6.1 below 800 (I would have done 5.7 the whole way, but the factory numbers went below -10 at low rpm, and tunerstudio wouldn't allow less than -10).

KEEP IN MIND - this is based on full throttle all-in hemi timing (factory computer pulls timing for coolant temp, high IAT temps, knock, etc). THE HEMI HAS KNOCK CONTROL AND CAN PULL TIMING FROM THIS. Megasquirt does NOT have knock retard integrated like the hemi does (at least mine doesn't yet), so use these numbers AT YOUR OWN RISK.

*if you figure out knock control with MS3x for the hemi, please let me know! I want in on that...

Ignition-0percentpulled_zpsb94b6ce2.jpg
 
Final thoughts:
I built a forged 5.7. Hence the 7000+ rpm on my tables. Set a rev limiter in tuner studio to a number that fits your motor build.

DO NOT JUST READ THIS AND TRY TO START YOUR CAR. You MUST also read all the documentation on msextra.com. I guarantee you I left some things out - so go figure out what I didn't put in this tutorial and come back and tell me.

ALL of the information I posted above can be found at one of these two links:
http://msextra.com/doc/index.html#ms3
http://www.diyautotune.com/tech_articles/how_to_megasquirt_your_new_hemi.htm
 
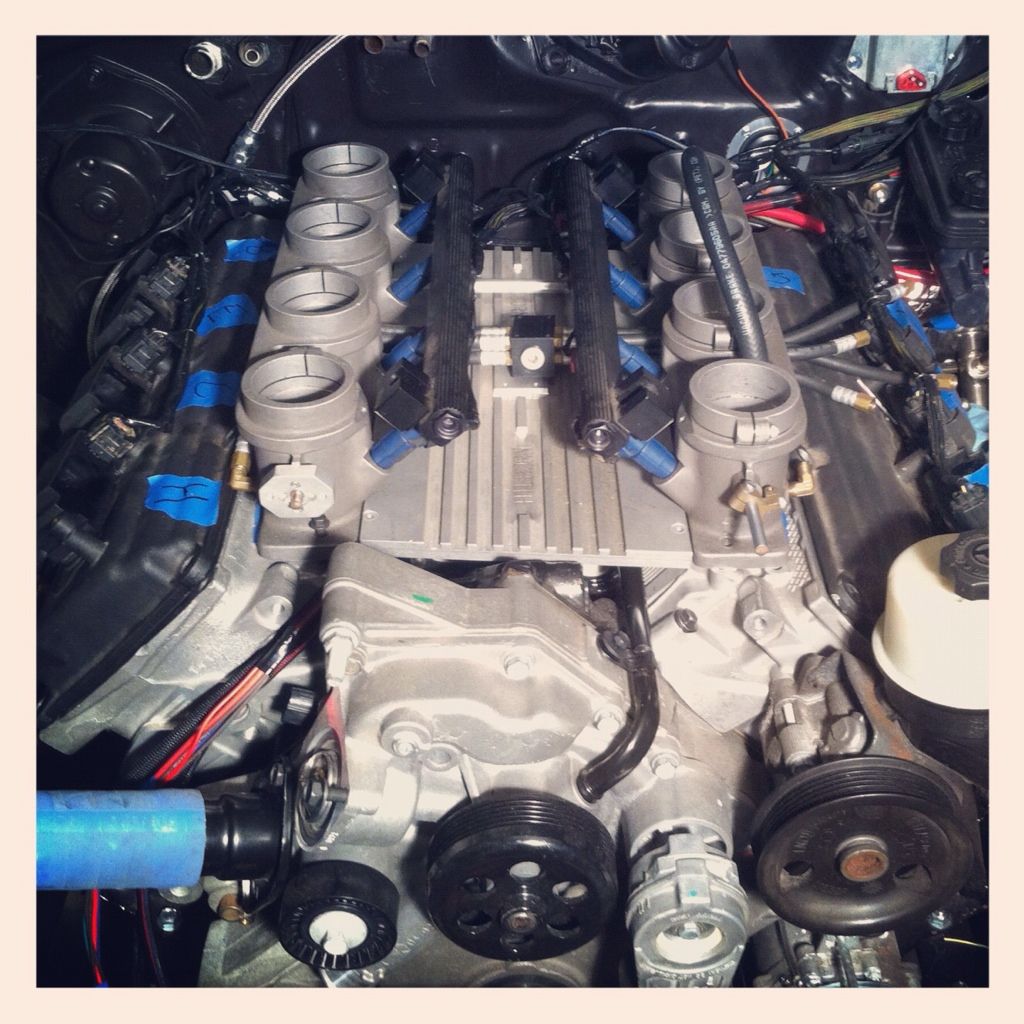
First start up last night:

[ame="http://www.youtube.com/watch?v=ZG9kk48WCT4&feature=share&list=UULmauI0f-d_etqBKwN98jrA"]First start hilborn hemi - YouTube[/ame]

2212B234-F736-4E89-AD21-B5FCF03E270A-265-0000001EA27CDFBF_zps913ac437.jpg
 
I think this is "more than" awesome!! Thanks for the write-up and PLEASE update this thread as you go!!

and..........thanks!!
 
This is really nice, This will help someone a LOT. I run ms3 on my toyota. I am pretty sure ms3 can do knock control but IDK if its enabled in your ms3 computer. might need a jumper or something. I built a diypnp unit so its a bit different.
 
SirDan, does the less expensive MS have "Self tune" IE MS2?
 
The paid version of tuner studio is what has the auto tune. Yes, it works with ms2. It will help with your fuel tables, does nothing for ignition tables.
 
John-

Here are my numbers. Probably different than what yours will be:

Megasquirt 3x box assembled with $12 pull-up: $657
MS3 wiring harness (8 ft): $67
MS3x wiring harness (8 ft): $72
Innovate O2 sensor (MTX-L): $199
Bosch 211 (I bought Meyle): $140 ($70x2)
Bosch 211 connectors: $27 (outlined below)
Factory connectors for injectors, coil packs, cam sensor and crank sensor (and alternator):$150 for factory harness from junkyard
TPS Sensor & plug: $140 (specific to your throttle body)
Idle Air Control Valve & plug: don't have one
GM Intake Air Temp - open Sensor & Plug: $20
GM Coolant temp sensor and plug: $16.25
Cable driven throttle body: don't have one
Throttle body adapter (if running GM cable driven throttle body): n/a
3 relays: $24 ($8x3, including wiring)
A bunch of extra wire: $40
Buy Tunerstudio & MegaLogViewer software: $60
Hilborn intake: a lot

Total without intake, injectors, coil packs, and cam/crank sensors is: $1512
You would save money with a different TPS (gm is like $46 new, $10 used, vs my $140)
To compare to FAST or factory option, add the price of a TB, adapter, and idle valve. I'm guessing both of those options include an o2 sensor, TB, all wiring, relays, connections, sensors, but realistically you'll probably still need a couple things.

The complete list of items you might or might not need with prices is above in post #1.
 
johnparts, Google up Megasquirt, or DIYautotune

The MS2 stuff which you can assemble yourself is considerably cheaper than the MS3 stuff

Also, I recently bought an innovate WB O2 and dash gauge for considerably less than than, I think it was just under 140
 
Thanks a lot. Very nice write up.

Also, I am very jealous of your Hilborn setup. ITB's look truly awesome.

Regards,

Joe Dokes
 
The ms3x also has a prototype section built on the board which may allow the use of a drive by wiressystem. I'm going to look into it.
 
I added info to the Bosch 211 post above. Heatsink info and connector order. It took a while to source those connectors!!!

Thanks a lot. Very nice write up.

Also, I am very jealous of your Hilborn setup. ITB's look truly awesome.

Thanks Joe!

The ms3x also has a prototype section built on the board which may allow the use of a drive by wiressystem. I'm going to look into it.

Google search: drive by wire site:msextra.con

Msextra has a fairly active forum. I'm sure someone has done it, but probably not with a Hemi. You'd probably have some coding to do, but I could be wrong. That'd be pretty sweet if you could figure it out!
 
Absolutely,a killer thread! Haven't dealt with feedback, in a while. Nice to see tunable block learning.
 
-
Back
Top