First, some history... on why I started doing this myself and why I am turning it into a tutorial. It is a story that will probably sound familiar to many of you, at least at the beginning...
I bought my first car at 15 - a rusty-as-hell (and conveniently rust-colored, Burnt Orange, I think) 1972 Duster Slant 6 automatic for $225 in roughly 1983. I was immediately in love, and a Mopar Head forever with a "slant" toward A bodies (heh, you see what I did there right? lol). I drove the car like the green idiot I was at the time (I'm still an idiot, but less green and more jaded, lol) and the damn thing threw a rod after a couple of months (I know right?!! - just how the hell does one kill an indestructible Tower-of-Power?). I was now a heartbroken green idiot with no car. My girlfriend-at-the-time's dad ("Big AL" the aerospace engineer - a text book nerd with goofy glasses and a pocket protector) graciously offered to help me swap in an engine if I could find one (those were the days, and they were a dime-a-dozen), so I did, and we did. We did it all on a Sunday afternoon after AL and family dragged me along to church. We pulled the sixer out of the pea green '73 with a snapped torsion bar that I managed to buy for almost nothing (which is good because minimum wage back then was like $3.35/hr) and we (well I sort of helped anyway) dropped it into my beloved Ruster. Holy crap. I had no idea at the time that dudes (and ladies of course) could do stuff like that in their own garage (or back alley or on the street in front of the house with an engine swinging from a tree). I was hooked...
Needless to say, I have been wrenching on just about anything I could get my hands on ever since. But my return to the world of classic Mopars had to wait about 40 years until I was able to grow up and get a real job (EMC engineer), buy the house, and get all of our daughters through college debt-free. So, fast-forward from 15 year old dumbass to 55 year old dumbass with finally some money in his pocket...After I bought my first* amazing classic A body in 2020 right at the start of the pandemic - a beautiful (not Mopar) blue, but easily a 10-20 footer with an OMG what a crappy DIY paint job with a white center stripes 1967 Barracuda Fastback original Formula S 383 4-speed with a white interior - the first thing I wanted to do to it was rehabilitate the amazing rallye dash. *My second A body a couple of years later (sidebar, long story, there was a '72 Duster 360 automatic in between) ultimately turned out being a stunning '71 Duster 340 4-speed in Sassy Grass with a V24 hood and pins. She had her own (you guessed it) dash-related challenges, including not one working dash light or indicator and the dash had been mutilated to install a horribly awful looking and sounding Kenwood DIN-mount CD player. Ugh. But I digress...
Ok, this is getting longer than most people will care to read, so I will wrap it up. So I wanted to replace the primitive "points-style" IVR that, for some reason, the Chrysler engineers built inside of the rallye fuel gauge, and that sends a reduced voltage (pulsed, 5-6 volts) for the gauge power feed to the fuel, temp, and oil gauges. I needed a solid-state alternative that would not burn up all my gauges when the original IVR ultimately failed. So I did the same thing probably a lot of you have done and researched the problem and the solutions. There was no reinventing of the wheel involved. But I also did not want to pay the premium to get an overpriced, off-the-shelf unit and then pay a stupid amount to get it shipped to me when they weigh like an ounce and a half. So I designed and built my own. With some forethought, I put the first one together in a way that would be easy to repeat should the need ever arise. But I had to buy all of the components in multiples. Multiples that I would have absolutely no use for unless I built more of them. So, yada-yada-yada, here we are.
I have been building these and sending them - AT COST - all over the dang place (primarily to FABO members, but I do have a couple of friends anyway that I didn't meet through this Mopar geek board, lol). I've sent upward of a hundred of them all over the world. BUT, sending them to fricken Canada is ridiculously expensive for the buyer relative to the cost of the part. So I was PM-ing with a Canadian FABO member the other day who wanted one, but did not want to pay the ransom, so I offered to give him info on how to build his own. And then I thought - you know what - why should I have all the fun? I'm sure there are others out there not afraid to buy a few components and maybe pay it forward a bit. And rather than type all of the info out in a one-off, help-a-guy-out email, why not just do it on here and give everyone a chance at being a soldering iron warrior? So here we are (again). The rest of this will be in the normal how-to, step-by-step format, but with a "slant" (ha! callback) toward building them in bulk (or a few at a time) and sharing with your buds.
Last thing before I get down to business... If you have ever used one of mine and/or find this tutorial useful, please share some feedback/comments in the DISCUSSION tab. Let's keep this thing going and in people's feeds, K?
Also, if you decide you just don't wanna mess with building one, I am still happy to do it, but probably won't actively advertise it going forward. PM me. Thanks for reading.
PARTS LIST AND LINKS
*Again, I've geared this toward the idea of "mass production". You can find these components all over the place and in lesser quantities, but you may not save much, if anything, by buying fewer. As much as I hate Bezos and Amazon, it is the one of the more convenient sources.


BUILD STEPS:
I bought my first car at 15 - a rusty-as-hell (and conveniently rust-colored, Burnt Orange, I think) 1972 Duster Slant 6 automatic for $225 in roughly 1983. I was immediately in love, and a Mopar Head forever with a "slant" toward A bodies (heh, you see what I did there right? lol). I drove the car like the green idiot I was at the time (I'm still an idiot, but less green and more jaded, lol) and the damn thing threw a rod after a couple of months (I know right?!! - just how the hell does one kill an indestructible Tower-of-Power?). I was now a heartbroken green idiot with no car. My girlfriend-at-the-time's dad ("Big AL" the aerospace engineer - a text book nerd with goofy glasses and a pocket protector) graciously offered to help me swap in an engine if I could find one (those were the days, and they were a dime-a-dozen), so I did, and we did. We did it all on a Sunday afternoon after AL and family dragged me along to church. We pulled the sixer out of the pea green '73 with a snapped torsion bar that I managed to buy for almost nothing (which is good because minimum wage back then was like $3.35/hr) and we (well I sort of helped anyway) dropped it into my beloved Ruster. Holy crap. I had no idea at the time that dudes (and ladies of course) could do stuff like that in their own garage (or back alley or on the street in front of the house with an engine swinging from a tree). I was hooked...
Needless to say, I have been wrenching on just about anything I could get my hands on ever since. But my return to the world of classic Mopars had to wait about 40 years until I was able to grow up and get a real job (EMC engineer), buy the house, and get all of our daughters through college debt-free. So, fast-forward from 15 year old dumbass to 55 year old dumbass with finally some money in his pocket...After I bought my first* amazing classic A body in 2020 right at the start of the pandemic - a beautiful (not Mopar) blue, but easily a 10-20 footer with an OMG what a crappy DIY paint job with a white center stripes 1967 Barracuda Fastback original Formula S 383 4-speed with a white interior - the first thing I wanted to do to it was rehabilitate the amazing rallye dash. *My second A body a couple of years later (sidebar, long story, there was a '72 Duster 360 automatic in between) ultimately turned out being a stunning '71 Duster 340 4-speed in Sassy Grass with a V24 hood and pins. She had her own (you guessed it) dash-related challenges, including not one working dash light or indicator and the dash had been mutilated to install a horribly awful looking and sounding Kenwood DIN-mount CD player. Ugh. But I digress...
Ok, this is getting longer than most people will care to read, so I will wrap it up. So I wanted to replace the primitive "points-style" IVR that, for some reason, the Chrysler engineers built inside of the rallye fuel gauge, and that sends a reduced voltage (pulsed, 5-6 volts) for the gauge power feed to the fuel, temp, and oil gauges. I needed a solid-state alternative that would not burn up all my gauges when the original IVR ultimately failed. So I did the same thing probably a lot of you have done and researched the problem and the solutions. There was no reinventing of the wheel involved. But I also did not want to pay the premium to get an overpriced, off-the-shelf unit and then pay a stupid amount to get it shipped to me when they weigh like an ounce and a half. So I designed and built my own. With some forethought, I put the first one together in a way that would be easy to repeat should the need ever arise. But I had to buy all of the components in multiples. Multiples that I would have absolutely no use for unless I built more of them. So, yada-yada-yada, here we are.
I have been building these and sending them - AT COST - all over the dang place (primarily to FABO members, but I do have a couple of friends anyway that I didn't meet through this Mopar geek board, lol). I've sent upward of a hundred of them all over the world. BUT, sending them to fricken Canada is ridiculously expensive for the buyer relative to the cost of the part. So I was PM-ing with a Canadian FABO member the other day who wanted one, but did not want to pay the ransom, so I offered to give him info on how to build his own. And then I thought - you know what - why should I have all the fun? I'm sure there are others out there not afraid to buy a few components and maybe pay it forward a bit. And rather than type all of the info out in a one-off, help-a-guy-out email, why not just do it on here and give everyone a chance at being a soldering iron warrior? So here we are (again). The rest of this will be in the normal how-to, step-by-step format, but with a "slant" (ha! callback) toward building them in bulk (or a few at a time) and sharing with your buds.
Last thing before I get down to business... If you have ever used one of mine and/or find this tutorial useful, please share some feedback/comments in the DISCUSSION tab. Let's keep this thing going and in people's feeds, K?
Also, if you decide you just don't wanna mess with building one, I am still happy to do it, but probably won't actively advertise it going forward. PM me. Thanks for reading.
PARTS LIST AND LINKS
*Again, I've geared this toward the idea of "mass production". You can find these components all over the place and in lesser quantities, but you may not save much, if anything, by buying fewer. As much as I hate Bezos and Amazon, it is the one of the more convenient sources.
L7805CV Voltage Regulators
Heat Sinks
- 10 uF Capacitors
Shrink Tube Kit
#10-32 Nuts
Ring Terminals
Approximately 12" lengths of small gauge hook up wire (stranded), in three colors
I use Red for the 12V input, Black for GND, and White/Red Stripe for the 5V output, but obviously color them how you want to.
SOME TOOLS YOU MAY WANT TO CONSIDER (especially if you are going to do these regularly)
Pictures of most of the above:BUILD STEPS:
- Cut the wire to length (about 12" works). I use a scrap piece of wood in a vice as a measuring stick to try to maintain some uniformity.
- Strip the ends of the wire and twist
- Orient the stripped ends of the power and ground wires to the capacitor leads as shown. Pay attention to polarity. You don't want the cap to be connected backward. The shorter lead is almost always ground, but electrolytic caps are plainly marked with a stripe. And the orientation shown is important to make the assembly cleaner and more streamlined. Yes, it is easier to just have the wires and leads going in the same direction and twist them, but you will understand why that doesn't work well if you try it, trust me.
- Join (neatly twist) the wires and capacitor leads.
- Tin the joints with a tiny bit of solder (you don't need much and don't want gobs) and tin the end of the 5V output wire.
- Trim any extra cap leads that are not part of the solder joint.
- Spread the legs on the transistor apart and lightly tin the legs.
- Carefully solder the cap and wires to the appropriate legs, paying careful attention to NOT create any solder bridges or otherwise unwanted current paths between the legs. Use some small needle nose pliers to carefully align the cap leads with the legs. Ensure you don't have any unwanted cross-connections. (Notice that I keep saying stuff like "spread the legs" and "between the legs"? I told you earlier that I am still just a 15 year old idiot...)
- Slide the tiny shrink tubes (I use 3/32 x 1-9/16) into position on the transistor and close the legs (HA!). This is the point where the effort you invested in properly joining the wires to the cap leads the hard way pays off. Be sure to get the best insulation and isolation you can.
- Shrink the tiny tubes and get them as closely bunched together as you can.
- Position a larger shrink tube (I use 13/64 x 1-9/16) over all three wires and legs and shrink.
- This is a completed component ready to be attached to the heat sink.
- Gather the tiny parts for heat sink assembly. Do not forget the silicone heat transfer pad.
- Attach the transistor to the heat sink with a ridiculously tiny screwdriver.
- This is your completed assembly that just needs the finishing touches and a bench test. Notice that I have now bent the cap neatly into place, again while ensuring that the leads do not touch each other or anything else. The bench test will reveal whether or not you have been successful, sometimes explosively, lol.
- Strip, twist, and tin the other ends of the three leads.
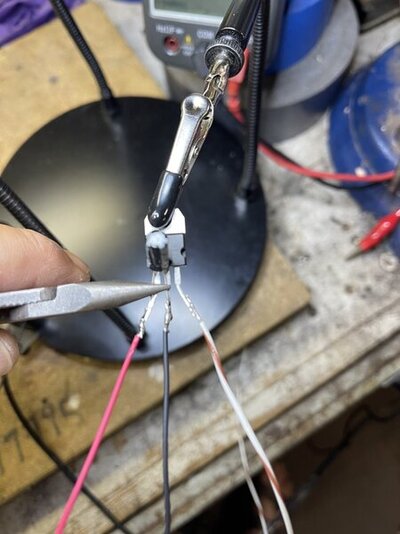
- Bench test the completed assembly with a 12V power supply and a digital multi-meter (DMM). Don't be concerned if it takes a second for the voltage to settle. That is normal. But after is is powered for a second or two, it should not fluctuate. Let it "burn-in" for a minute or two, just to be sure the cap isn't going to explode because you connected it backwards, or something is shorted, or that you got a bad chip. It happens, trust me.
- Gather and and pack everything for shipment. They don't need a stupid amount of padding, but don't skimp either.
- Don't forget to include the instructions. I don't intend to share those publicly, but PM me with your email address if you'd like a copy.