Power Disc conversion/ proportioning valve question

-
Calipers are fine, use the bleed screw furthest way from the brake line/inlet (the one closest to the hood of the car. They look like the ones doctor diff sells with the two bleed screws.

I respectfully disagree with jcb426. No need for Teflon tape on the bleed screw. If they don’t leak fluid when the brakes are applied and held they certainly won’t suck air when the peddle is left off.
I fully agree with your bleeder positioning analysis, but I respectfully disagree with your second statement. I think there is a misunderstanding of what I was trying to illustrate here. You are right, the Teflon tape is not needed to seal a closed bleeder screw, as they seal with an angled seat and tapered bleeder screw end.

However, the Teflon is often needed when the bleeder is cracked open, with a preferably clear plastic tube fitted over the tip to direct the fluid into a clear jar, so you can see any bubbles. The Teflon around the threads comes into play at this time.

I say this because, most of the bleeder screws I have dealt with will seep fluid around the threads when they are unscrewed even slightly. This "leak" can potentially allow air back into the system during the bleeding process. It's happened to me numerous times.
 
I ran across this video from McCalla's Modified Rides showing install of a '73+ proportioning valve on an early A-Body. Seems reasonable. On my car ('68 Formula S FB), I ran '78 11.81" rotors and a Mancini adjustable proportioning valve in place of the factory value (original KH Disk Brake car) and got it adjusted so the fronts lock just before the rears. Beast brakes I have ever had on a car.
 
Here is where I am at this morning. Having someone hold the brake pedal until the brake light comes on, open any of the front brake bleeders the light goes off and pedal goes to the floor. close bleeder and press brake pedal, light comes on again. For the rear brakes with the pedal pressed until the light comes on if either bleeder is opened I get fluid out (not as strong as the front), brake light stays on and pedal does not drop to floor. Not seeing bubbles come out of any of the bleeders. I think the next thing is to replace the proportioning valve?

rlf-cuda, I don't see an attachment for the video
 
Here is where I am at this morning. Having someone hold the brake pedal until the brake light comes on, open any of the front brake bleeders the light goes off and pedal goes to the floor. close bleeder and press brake pedal, light comes on again.

When the lite came on, pressure had been lost on one side/system.
Opening fr bleeder and lite going out equalized pressure to zero, lite off, - secondary system (rear) failed as pedal went to floor, - if properly bled !

For the rear brakes with the pedal pressed until the light comes on if either bleeder is opened I get fluid out (not as strong as the front), brake light stays on and pedal does not drop to floor. Not seeing bubbles come out of any of the bleeders.

Lite staying on indicates shuttle is already triggered to failed side (rear), - pedal not going to floor indicates front system holding pressure as it should, and applying front brakes.

If there has been no fluid loss outta rear brake reservoir, other than accounted for by bleeding.
I would suspect master cylinder, except pedal should be "disappearing" - creeping to floor till lite comes on.

Is pedal close to top and firm/hard when first applied, or does pedal go down a bunch till you feel "pedal"/resistance. ?
If it goes down a bunch first, you need to adjust the rear brakes, and/or properly bleed.

Good luck .
 
Last edited:
Correction on my part, I had not put the drums on the rear for the test (idiot). Now with the drums on light goes out when bleeder is released just like the front.
 
I fully agree with your bleeder positioning analysis, but I respectfully disagree with your second statement. I think there is a misunderstanding of what I was trying to illustrate here. You are right, the Teflon tape is not needed to seal a closed bleeder screw, as they seal with an angled seat and tapered bleeder screw end.

However, the Teflon is often needed when the bleeder is cracked open, with a preferably clear plastic tube fitted over the tip to direct the fluid into a clear jar, so you can see any bubbles. The Teflon around the threads comes into play at this time.

I say this because, most of the bleeder screws I have dealt with will seep fluid around the threads when they are unscrewed even slightly. This "leak" can potentially allow air back into the system during the bleeding process. It's happened to me numerous times.
If I read you right, you're not to take the foot off the brake until you tighten the bleader, so not to allow air back into the system. I also always use a clear jar with a little fluid in it and watch for any air being removed. Remember, always blead from the further location and work your way to the closest point to the master cylinder. Usually, RR, LR. RF and LF, in that order. Keep your eye on the fluid level or you have to start over again, if you draw air from the master cylinder.
 
I did go back twice on Saturday and re-bleed the brakes in that order making sure the reservoir stayed full, still having the same issue. Ordered a new prop. valve from Inline Tube and will swap it out once it arrives. In the meantime on to changing the transmission tail shaft seal (glad I remembered to drain the trans fluid first).
 
I did go back twice on Saturday and re-bleed the brakes in that order making sure the reservoir stayed full, still having the same issue. Ordered a new prop. valve from Inline Tube and will swap it out once it arrives. In the meantime on to changing the transmission tail shaft seal (glad I remembered to drain the trans fluid first).
No shortage of excitement at your place. I've had to replace the tail-shaft bushing while chasing down driveshaft chatter at highway speeds under coast conditions. That was interesting, because I bought a tool to do it with the seal removed but trans intact. It worked.
 
So just noticed this so I’m sorry if it seems a bit rude to push in.
1.) proportioning is accomplished by the master cylinder. The block on the frame in front and the axle in back is distribution only.
2.) every “disc upgrade” that uses the 10x2 1/2 rears adds more rear brake. So for a car that had to much rear with the 10 x 1 3/4, you just made more problems.
3.) switch in the block indicates an imbalance in the system.
Brake warning light on dash
As others pointed out the balance valve can cause the light as well as air and improperly adjusted rear brakes.
First be sure your bleed is good. Stab the brakes hard three to five times and hold down the peddle on the last stab. Open the brake bleeder. Rinse and repeat on all four wheels. This bleed method shocks the system to release bubbles as well as dislodge any jammed balance valve. After that bleed, and properly adjusting the rears, if you still have a light, the block is faulty.

Now after you have fixed the light, you can address the rear bias. You can go back to the 10x1 3/4 rear to get less brake or put an inline valve to back off the rear.
I don’t like the valve solution as it gives you a much harder peddle feel. It is the one most guys use.
To get big bolt pattern on the rear with smaller drums, use the A body backing plate with a B body six drum. I’ve bought AMC drums to see if that works as well but haven’t been able to get one put together
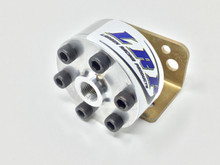
Yes, the Master Cylinders control the ratio of volume of fluid moved upon application, However I was told by Cass (a.k.a. Dr Diff), that the optimum way to "balance" or "proportion" a given brake system is to determine the the size or braking power of the front and rear calipers/wheel cylinders.

Adjustable proportioning valves can work, but are a band-aid approach. As compared to using the proper size/output of braking components at each sets of wheels. That always made sense to me.

Also, there is an effective anti-lockup component that spices in-line between rear car mounted hard line and the rear flex-line to the rear end. I usually don't hear many folks being aware of it.

My E-Body had too much rear brake bias from the factory, as it was relatively easy to lock the rear brakes when suddenly hitting the brakes. It also would suddenly spin the tires with too much gas pedal too though... ;-).

They use this device on dirt track cars a lot, but it really helped my E-Body even though I used a "weaker" rear disc set-up matched to Police/Taxi brakes up front. It's main function is to dampen the sudden pulse of the pressure wave upon a quick application of the brakes, however it does NOT reduce the pressure sent from master cylinder to the rear brakes. It just limits the initial pressure spike which can often lead to rear brake lock-up, especially with drum brakes.

Brake anti-lock 2.jpg


Brake anti-lock 1.jpg
 
Last edited:
Thanks for the additional info., I've definitely gained some knowledge on the brakes system from this. After bleeding the brakes a few more times and still had the brake light problem I changed the proportioning valve with a rebuilt one from Inline tube, bled the brakes and no more issue with the light coming on and brakes are operating correctly although the front passenger disc is a bit tight to spine when I check it with the wheels off the ground.

What is the manufacturer, name of the part you show a picture of?
 
-
Back
Top