Sweet car! Enjoy.
You are using an out of date browser. It may not display this or other websites correctly.
You should upgrade or use an alternative browser.
You should upgrade or use an alternative browser.
1966 Barracuda "car ****"
- Thread starter robodhran
- Start date
-
Hi again... It's been pretty much one year since my last post: I lost much time, hair and nerves with some engine trouble, so I decided to come back, as soon as this obstacle is solved.
Had a water leak between block and head. Finding the cause for this, was not easy and time consuming. I suppose, it was a combination of not having machined the required rough average on the surfaces in combination with the Cometic MLS gaskets. These are custom made (part #H2594SP9051S - the 51 stands for .051 thickness) with the correct bore of 3.700" and fit a 273 small block HiPo engine. If we compare this gasket with Cometics standard product (part #C5622-051 4.080 MLS HEAD GASKET - that has not the correct bore size) we notice, that the standards have much more embossed areas around water- and oil-holes, but none around the bolt-holes. In the custom-made Gasket it is the other way round. So the standard gasket allows much more pressure to the water holes to keep the sealed. The outer bridle on the custom gasket doesn’t help, if there is water protruding from the inside. This is my personal opinion. I had contact with cometic, but they do not seem to be really interested.

Cometic custom gasket (see embossements around plug holes)

Well, at least I decided to put on Fel-Pro 521SD Heavy Duty gaskets (the one with the blue stripes). They provide enough thickness and seal that engine properly. At this point I don't care about compression loss anymore...
But before I got to this point, I noticed that there was a crack in one of the new valves. Since I didn't know how deep and serious it was I decided to bring it back to the shop. They ordered new parts but wrong valves arrived from U.S. --> waiting again.
Me and my brother Ben fired that engine few days ago outside the car. I built a small test stand and could check a few data. We were able to adjust the carter carb.
2500 r.p.m. 47° advance (idle hot - with vacuum ported)
750 r.p.m. 10° advance (without vacuum)
750 r.p.m. 20° advance (with vacuum ported)
vacuum idle hot at 750 r.p.m. 500 Millibar (14.7 inhg)
oil pressure 5.3 bar (approx. 76 psi) snapshot...don't know what r.p.m.
But check out the video-clip:
Had a water leak between block and head. Finding the cause for this, was not easy and time consuming. I suppose, it was a combination of not having machined the required rough average on the surfaces in combination with the Cometic MLS gaskets. These are custom made (part #H2594SP9051S - the 51 stands for .051 thickness) with the correct bore of 3.700" and fit a 273 small block HiPo engine. If we compare this gasket with Cometics standard product (part #C5622-051 4.080 MLS HEAD GASKET - that has not the correct bore size) we notice, that the standards have much more embossed areas around water- and oil-holes, but none around the bolt-holes. In the custom-made Gasket it is the other way round. So the standard gasket allows much more pressure to the water holes to keep the sealed. The outer bridle on the custom gasket doesn’t help, if there is water protruding from the inside. This is my personal opinion. I had contact with cometic, but they do not seem to be really interested.
Cometic custom gasket (see embossements around plug holes)
Well, at least I decided to put on Fel-Pro 521SD Heavy Duty gaskets (the one with the blue stripes). They provide enough thickness and seal that engine properly. At this point I don't care about compression loss anymore...
But before I got to this point, I noticed that there was a crack in one of the new valves. Since I didn't know how deep and serious it was I decided to bring it back to the shop. They ordered new parts but wrong valves arrived from U.S. --> waiting again.
Me and my brother Ben fired that engine few days ago outside the car. I built a small test stand and could check a few data. We were able to adjust the carter carb.
2500 r.p.m. 47° advance (idle hot - with vacuum ported)
750 r.p.m. 10° advance (without vacuum)
750 r.p.m. 20° advance (with vacuum ported)
vacuum idle hot at 750 r.p.m. 500 Millibar (14.7 inhg)
oil pressure 5.3 bar (approx. 76 psi) snapshot...don't know what r.p.m.
But check out the video-clip:
Next step I wanted to have that engine repainted again. Three times tearing it apart left its traces. Don't know yet, if I should put it into the engine bay with the 4-speed transmission or step by step. I got an engine leveler, that should make it possible to put it in in one piece... And I read, that the left collector should be removed anyway because of lack of space.
Engine stand with radiator mounted:

after repainting:


This shows the distributor with the pertronix ignition:


to be continued...
Engine stand with radiator mounted:
after repainting:
This shows the distributor with the pertronix ignition:
to be continued...
Robert - that engine looks Great with the new paint on it! Now that you have solved the issue with the water leak, sounds like time to get motor and transmission installed and enjoy the Barracuda this summer!
Today was wedding day! Me and my brother Benny (well - I rather was the assistant) managed to put engine and transmission back into the car in 3.5 hours. Without engine leveler we would not have had any chance at all. Had just a little gear-oil running out the transmission because of the steep angle. It definitely needs two people because of the process of lowering and leveling....But there's no need for more words....enjoy the pic and movie-clips...I am pretty happy now! View attachment 1714938494


Outstanding! Get a few things installed and hooked up and you'll be on the road shortly!
Commando66
She's a beaut Clark!
An exciting marriage! That car is going to be so much fun.
Robert - will you be swapping that single master cylinder for a dual?
I think you might be able to upgrade to a dual master cylinder and keep the same booster and vacuum tank. A friend of mine was in AZ the last couple of weeks and found the tank but not the booster. He wants to add the correct PB set-up to his 65 Valiant. I recommended using a 67-72 booster and eliminate the tank but he wants it to look correct. Should you want to ever sell the booster (or both), let me know and I'll put you in touch with him - he's another member as well.
That console looks great! That top plate is hard to find!
I repainted the black parts and it turned out great.That console looks great! That top plate is hard to find!
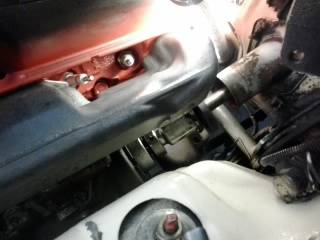
While putting the engine back into the bay, we forgot about the drivers side exhaust manifold.
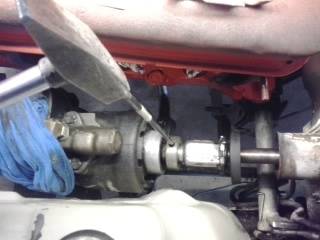
There is just no space between the wall an block to put that thing through. Instead of manipulating the engine again, I wanted to move the steering shaft backwards, to get enough space for the manifold to slip through.
Thanks to FABO-Member recommendations it was simple to get that exhaust manifold in place at least.
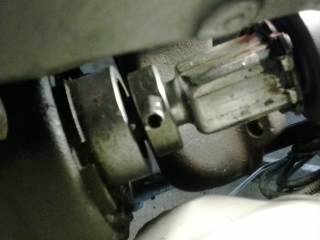
The roll pin was easy to remove. Just wacked it out with a iron rod and hammer. It doesn't matter what side you start. The pin is straight. Did mark the spline position with a white marker, before removing the bracket of the steering column. It slid out like butter. Thanks a lot.
Turning the shaft in position
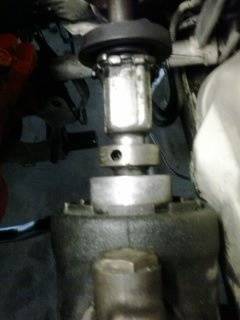
Hammering the roller pin out
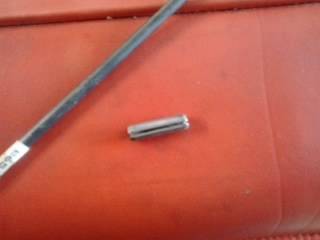
The pin removed with the iron rod
Installing manifold
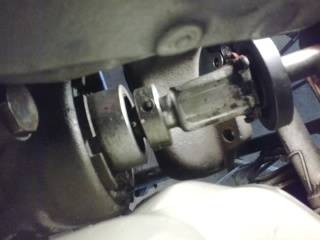
Getting ready to put it in again (see white marks)
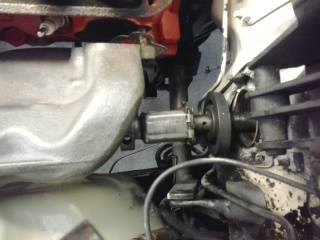
Pin installed (white marks in correct position again)
not much space on driver's side.
t.b.c.
There is just no space between the wall an block to put that thing through. Instead of manipulating the engine again, I wanted to move the steering shaft backwards, to get enough space for the manifold to slip through.
Thanks to FABO-Member recommendations it was simple to get that exhaust manifold in place at least.
The roll pin was easy to remove. Just wacked it out with a iron rod and hammer. It doesn't matter what side you start. The pin is straight. Did mark the spline position with a white marker, before removing the bracket of the steering column. It slid out like butter. Thanks a lot.
Turning the shaft in position
Hammering the roller pin out
The pin removed with the iron rod
Installing manifold
Getting ready to put it in again (see white marks)
Pin installed (white marks in correct position again)
not much space on driver's side.
t.b.c.
what brake booster is that from? mine doesn't have one and I have thought of installing but not sure if it want to mess with the looks.
That is a 65/66 (and maybe a 64) booster which requires a separate vacuum tank mounted to the driver's side inner fender.
Thats right. Here you have a nice look on that vacuum tank. I unfortunately broke the small pipe an will have to glue or solder it back on.

This car has been assembled in Switzerland back in 1966. So they might have had parts in the shelf from other years they used whenever they were needed. We had two licenced companies back then. One for Chrysler Coorporation and one for GM-Models. 1948 - 1973, Chrysler, Dodge and Plymouth
These cars are wanted in Europe, because they have a good reputation. Those companies invested more time in assembling...
-


