1970 Dart Swinger (340 clone)

-

HevD

Well-Known Member
Joined
Oct 12, 2007
Messages
46
Reaction score
0
Location
Cloquet, MN
Well guys and gals, I have been around this page for a little while and have mostly sat back and watched. I really enjoy reading and watching your projects progress, so I figured I could start a thread showing my progress (or lack thereof) for anyone interested.

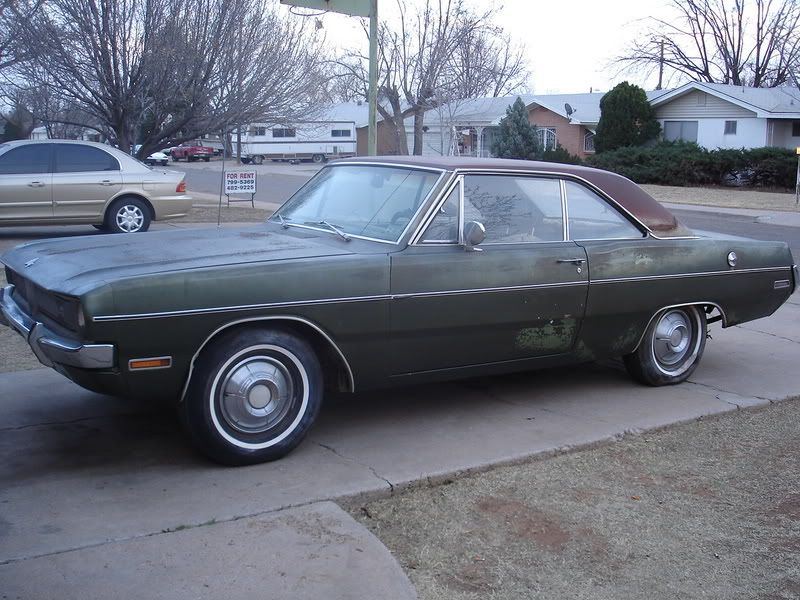
I will introduce my A-Body first. I purchased this car after looking for a Dart for some time. My first car when I was 16 was a 1975 Dodge Dart SE, and ever since I have been in love with the A- Body and Dart specifically. The car was purchased last fall, after getting the "go ahead" from my wife. As we all know, when those words come out of our wifes or husbands mouths, we need to act quick. Anyhow, the car is a 1970 318 Dart Swinger. When I purchased the car, it had the 340 scoops already on it. I have grown to like the look of the scoops, so during my build I think I will keep them. This build is not going to be a stock or a drag racing build, but geared towards having a car that I can take around town and use as my daily driver.

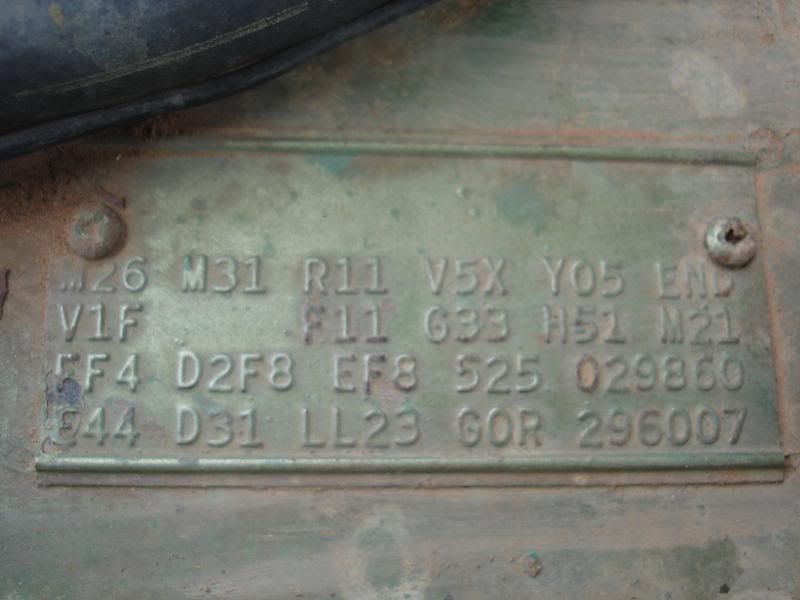
This car last resided in Oregon, as far as I can tell from some of the papers left behind. After reading the fender tag, the car is supposed to be a 2 bbl 318 with black vinyl top and some color green body. It does appear to be a factory A/C car along with power steering. It no longer has a heater core or A/C but I would like to have the cooling option back someday. The body seems to be in great shape, that is the main reason I overlooked the rest of her issues. Enough of my chatter, here is what has been done so far.

- Replaced the rusted out frost plugs
- Upgraded the starter
- Upgraded the alternator
- cleaned up the carb
- Basics like new plugs, belts, change fluids all around, etc....
- Hooker Comp headers (I wish I would have found this website before I purchased those... TTI's or Dougs sound better than what I have now.)
- New battery tray

That is it so far. I am currently working on cutting the old exhaust out so I can drive to the exhaust shop and have it redone. I think I will reuse my Flowmaster mufflers, they look pretty good under the car now.

I think now that I have posted, I will be more apt to keep on working on things so I have something to update. I plan on doing most everything myself, so this is a learning process for me. Along with my parts budget, I am scraping $$ together for the necessary tools that I need also. Anyhow, thanks for looking and I hope to keep a steady stream of posts coming!

mopar 001.jpg


mopar 002.jpg


mopar 003.jpg


mopar 004.jpg


mopar 005.jpg


mopar 006.jpg
 
Great start HevD -
Keep those posts and pics coming. Not my 1st car, but my 1st performance car was a '69 340 Swinger that was less than 6 months old when I bought it used in very early '70 so I know what you mean. Kept the car and played with it for quite awhile and eventually got stupid and decided to turn it into a racecar (NHRA Super Street on a 10.90 index). Got even stupider later and sold the car instead of turning it back to the street.
Finally regained some smarts a little over a year ago and found a '69 Dart build that had been started in Oregon but the guy lost inspiration and sold the project to me. Came with a 380hp 360 crate motor, solid body, rebuilt 727, b-body 8-3/4, decent interior, NIB B&M shifter, NIB Autometer guages, new 3" exhaust (in the back seat), and a trunk full of misc. parts. Project is finally gaining some steam and I hope to have it on the street later this year.
Great luck with yours, enjoy, and have fun!!!
 
Sweet Project!..........oh wait, I am partial to 1970 F4 Dart Swinger's:
DSC06547.jpg

DSC06435.jpg


Our cars are like Bro's!
 
Spooky how close our fender tags are eh? I believe mine has a birthday of 12-10-1969.

mopar1.jpg
 
Does yours have the 8.75?

Mine Does :cheers:
 
Yes sir, she does w 3.23 gears. I just need a bigger displacement motor and I am ready to go... Well, body and paint, interior, wiring, rework the tranny and then that motor and I am ready...
 
Hey, does anyone have a good trick for getting rid of the undercoating on these mopars? My car is LOADED with it and it feels like old rubber or something. I am WIDE open for suggestions!
 
And here is my second question for everyone... What are my wheels worth? I am thinking about e-baying them and picking up a set of steel wheels and dog dishes. I really like that look better than the Rally wheels, so I am curious if I can make the sale and buy the wheels I want. (Or maybe someone wants to trade w/ me?)
 
I would say about $400 for the set with the caps and trim rings would be fair.
 
Good deal, thanks for the response AdamR! I am impressed with your resto, I spent about the last 1/2 hour reading it.
 
Thanks, If you read the Scamp thread that car is gone. Theres a 71 Dart in its place now.
 
Best way to remove undercoating is with a heat gun and a putty knife. And a cement block to clean the putty knife on. Chemicals will remove the final bits.
The value of small bolt pattern rallyes is a matter of opinion or perspective.
Even large bolt pattern 14s are being replaced with 15 inch wheels since 14 inch tire size options are fading fast.
 
Thank you Redfish! I am looking at exhaust in the near future and some minor bodypart replacement, so I hope to get an update going soon. I will have to pickup a heatgun and putz away with that removal project... Thanks again for the info.
 
I used a propane torch from the hardware store to heat up my undercoating and it scraped off easy. Then I'd go over it with a wire wheel in an angle grinder and it was stripped to shiny metal in no time. Make sure you have a fire extinguisher close by. A wet rag also works well if you develop some flames. Make sure there is nothing on the other side of the floor like carpet or trunk floor mat and remove the gas tank if you are working in that area.

Look like a very nice solid car.
 
I agree with Redfish regarding the wheel size. I am really glad I went to 15's I have more options available to me now. My Dart sits well on them too.
 
Thanks for the responses regarding the wheels... I think I will take your advice and make the switch to 15's when that time comes. Things jump around on my priority list, and the wheels are up and down depending on my pocket book. The responsible part of me tells me to get the running gear and suspension up to snuff before I go for the wheels and paint.

Well today I did a little work on the Dart, trying to get it ready for exhaust. I crawled under her and cut out the old rusted stuff, in hopes of salvaging the Flowmasters that were obviously recently put into place before I bought the car. I should be able to save a few bucks by "bringing the bacon to the restaurant" (brining my used mufflers to the exhaust shop) as one exhaust guy said. A few weeks back, I drove out of my garage heading to my previous exhaust appointment, and while on the way the Dart decided to die in the middle of the road. Come to find that my alternator wiring burnt up, and I was running off of my battery for a few miles. Sooo, one 140 amp Powermaster swap and some bracket fabrication, I have a new 1 wire internally regulated alternator ready to charge that new Interstate battery of mine. Needless to say that is where my exhaust budget went for a few weeks.

On a different note, I seem to have developed a leak somewhere!? This appeared after I put the Dart on jackstands, so I am guessing it was a pool of antifreeze that gravity took off the K-member and put on my shop floor. I will investigate further tomorrow.

Finally, anyone in Minnesota looking for a decent 1974 318? I am going to try to drive this for the summer, then pull the 318 and get ready for paint and a new motor. So, anyone up north, let me know if you or someone wants a running 318. Here are some photos of my progress (or lack thereof)

Mopar2 001.jpg


Mopar2 002.jpg


Mopar2 004.jpg


Mopar2 005.jpg
 
I took my car to a local sandblasting shop.I stripped the interior and all exterior parts and had them blast the underside of the car as well as the inside floors ,engine bay,and trunk.The cost was only $125 including epoxy primer.This was a very good deal and they had it completed in three days.If you consider this just ask them to use a low enough pressure as to not blow right through the metal and be sure you have a solid foundation(metal)in all these areas before you consider this.I had it all painted in a week.Great time saver.:clock:
 
I think that is a dirt cheap price for sure! I would have at least twice that price into a pressure pot, media conversion kit, materials... Where in Canada was that? I am only about a 2 -3 hour rip from the boarder, and I don't think I can find someone around here to do that for that price...
 
(07-07-2008)

Well, today I ordered a replacement A/T A904 dipstick. Not sure that it is really worthy of a post, but I need to clean up my thermostat housing and get a new gasket, air cleaner system and check my fluids and I am off for the exhaust man. $$ has been the holdup for me lately, so now that I have some cash ratted for the exhaust, I am more apt to take care of the little issues I had before she is road worthy. So, actually, the dipstick is what has sparked me to get a few things taken care of and get this ride back on the road.

On a different note, I ordered my dipstick from Yearone, and I wanted to pass on a promo code that worked for me! extra10 got me an extra 10% off. It wasn't much, but it was worth the 5 second Google search I guess.

Finally, I may have said it in earlier posts, but I want to drive this car for the summer and then start breaking it down this fall and really doing some work on it. Sooo, updates will be small and far between.
 
OK, it has been a while, but I wanted to put an update on this project. As of now, I have added a few minor parts here and there, but have mostly focused on purchasing tools, etc. All my extra $ has gone towards my new toolbox, engine hoist, engine stand, jack stands, tools, and last but not least... My 360!

I am almost ready to purchase an air compressor at this time, and when that is in the garage, I plan to do some serious damage to the car. I hope to do all my own body work and paint, so this will be a learning project for me.

Thats all today, but I will keep updating when things change!

DSC00154.jpg


DSC00155.jpg
 
Finally!

I took about 6 hours combining the last few nights to actually get something done on this car, and I made some serious progress. All of the free work is done, now I am going to have to start spending money on my interior.

I had gone back and forth as to where to start on this car. Right now, the 318 runs, and I am happy with it until I can finish my 360 the right way. I do not want to cut corners on this, but to do it the way I want from bumper to bumper.

That being said, I decided to focus on the interior and keep the car running.

I started by taking out the front seat, which went pretty quick. The seat is in terrible shape, and I like the idea of buckets, so the seat had to go. I may just purchase a few generic bucket seats from Summit or Jegs to put in, instead of combing the junk yard for these items and having them redone.

Next, I took out the belts and the back seat. I am not sure if I can dye the belts, but I want to convert the interior color from the green it currently is, to black and grey. Those are the colors I plan on going with during the resto, so I am going to make that switch. After taking out the back seat, I removed the worn carpet and padding, under which I found my 4th build sheet. This sheet was on the floor in the back of the car, behind the drivers seat. Of the 4 I found, it was in the best shape. I did find additional sheets under both front and back seats, and under the carpet in the front, on the passenger side. All in all, I walked away with 1 clean sheet which I will laminate and keep with the rest of the documentation.

The headliner was already out, so I moved to the door panels and back panels and a few other odds and ends. At this time it was about midnight, and a friend that I managed to convince to come over to check out progress helped me with removal of the dash pad. That was a pain in my A$$!!! It did come out, but that was after removing the gauge cluster and dropping the steering column. But anyhow, things are out and I am on my way.

I plan on taking a few hours and cleaning up the inside to prep items for paint.

I was happy to find that the car is basically rust free. There is a small 5 x 5 spot of surface rust on the passenger front side of the floor, but a little sanding and prep/paint and it is as good as new. I really lucked out with this car and the lack of rust.

I now plan on cleaning up some parts I removed, getting new door pannels and painting them the color I want. Painting the floor and dash and a few other parts. Headliner, new seats, recover the back seat, carpet, sterio and last but not least, rewire the car. Sooooo, ill try to keep moving and keep the updates coming.

Now to the car ****...

picresized_th_1226764088_DSC00238.jpg


picresized_th_1226764243_DSC00239.jpg


picresized_th_1226764410_DSC00242.jpg
 
Man it has been a while since I updated this thread... Lots of changes, but no pics as of now. I hope to get something on the thread sooner than later.
 
-
Back
Top