BBP rear axle conversion on the 73 Dart sport

-

racerbob

Well-Known Member
Joined
Nov 17, 2008
Messages
409
Reaction score
12
Location
La Plata, MD
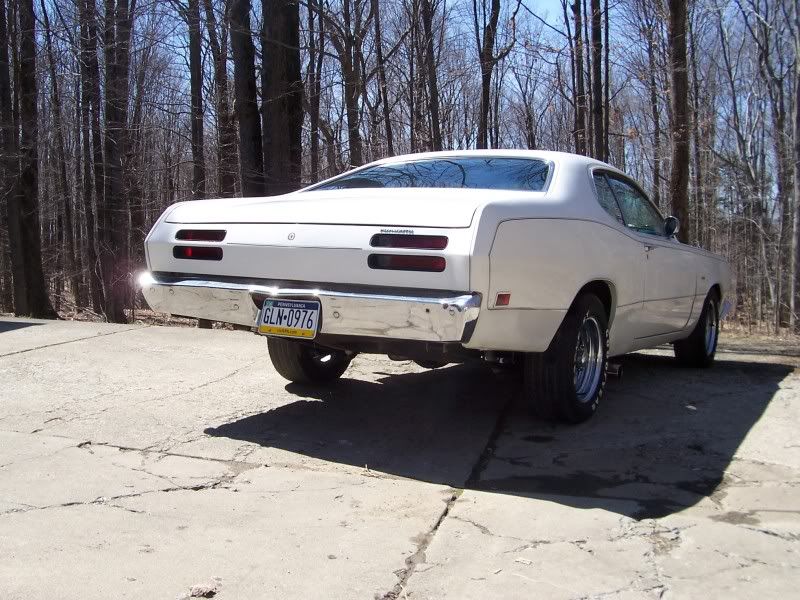
Finally cleared out enough space in the garage to get the Dart sport off of the trailer and inside.

I have been racing the Dart sport with an earlier SBP 8.75" rear in it since it was in the car when I got it! Since the car came with BBP front disc brakes (the front track was a bit wider than the rear track), I decided I would replace the A-body rear with an early B-body unit. I found a nice one from a 1965 satellite in great shape for a decent price $200 for drum to drum rear from a restored car with a set of brand new green bearings included (just not installed yet). The rear came with good condition usable brakes which the PO had removed and boxed up to keep all of the parts in order. Rear even had replacement brake lines and hose on it!!

My car has MP SS springs with Competion Engineering shocks and a MP pinion snubber on it presently. I plan on retaining all of that stuff as well as relocate the springs with the offset hangers and shackles. I decided to go that route since I was already going to weld on new spring mounts on the rear housing and the rest of the set up was bolt-on. My car is a real '73 340 ("H" code) car and do not want to cut it up to do a mini-tub or any other permanent modifications. From the preliminary measurements I have made these mods will allow me to use 10" slicks with no fender surgery.

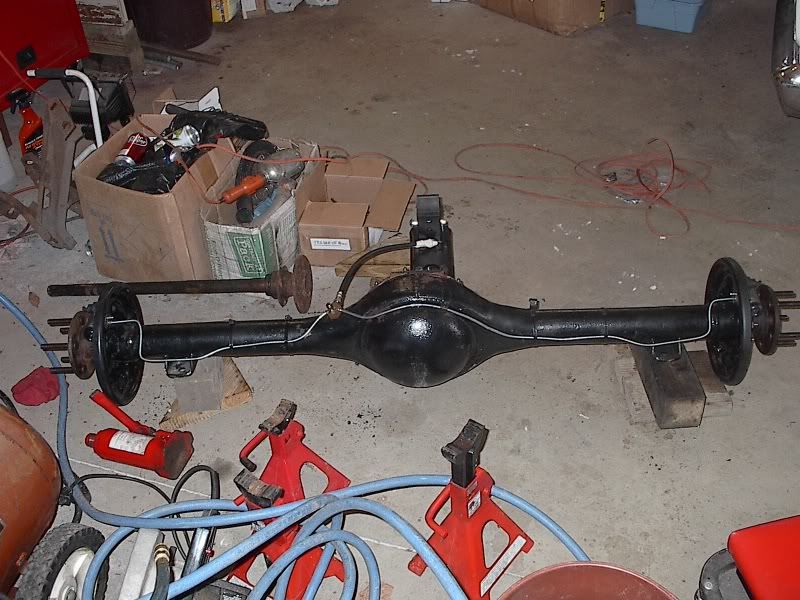
So far I have torn down the rear axle assembly:

Removed the brake backing plates
Removed the Axles
Removed the 741 light duty third member

I have also removed the stock bearings and lug studs from the axles and installed the green bearings and the 3" long High Strength Steel lug studs.

I will post some pictures of my progress soon.

Bob
 
Here are a few pictures:

The first is of the B-body rear end after it was disassembled into its basic components (axles, center section and the housing shown in image the backing plates and brakes are not shown).

the next shows my '73 dart sport backed into the garage (and you get the idea how UN-organized my garage is!!)

the last shows one of the axles after the Green bearings and lug studs have been installed.

More pictures to come after car is up on jackstands and ready for disaasembly.

Bob

DSC_0020.jpg


DSC_0021.jpg


DSC_0022.jpg
 
Managed to get the car up on jacksgtands yesterday when I got home from work. Picture shows how the 8.5/26 - 15 MT ET drag slicks fit on thw 15 X 7 steelies.

DSC_0023.jpg


DSC_0024.jpg
 
today (new years eve) I had the day off from work (the last UNION floating Holiday of 2009). I managed to remove the rear axle assembly. the rear spirngs as shown in this image.

DSC_0027.jpg


DSC_0028.jpg
 
the disassembly went so smoothly I had enough time to remove the stock hangers and shackles from the springs and install the offset hangers and shackles. Also was able to install the springs on the car. The one issue I encountered was the offset spring mounts (hangers) require a hole in the car's frame to clear the nut welded on the inner side of the offset mount.

Have few pictures that show the stock versus offset spring mounts and spring shackles. Another picture shows one of the holes in the frame.

Of course I need to show the A-body axle assembly compared to the B-body housing which will replace it. I hope to get on final axle housing preps and install it in place to locate the axle mounts for welding tomorrow.

DSC_0030.jpg


DSC_0031.jpg


DSC_0034.jpg


DSC_0035.jpg


DSC_0037.jpg


DSC_0038.jpg


DSC_0039.jpg
 
You'll like it when you get done. I did the same thing to my 70 Duster...axle housing ended up looking like this:
IM003702.jpg

4-11-2009011.jpg
 
racerbob, what's the measurement on that '65 8 3/4 bare rear flange to flange?


I already have it in the car (mocked up to set the pinion angle , tack weld in place and remove for final welding, painting, assembly, etc) tonite. But should have it out for welding tomorrow or the next day . Man I am making good time on this project!!

Anyway it will be easier and a more accurate measurement to measure it from flange to flange across the front with the third member removed. I will get you that dimension soon.

Bob
 
I put a B body 8 3/4 under my Dart Sport also, I really like the way it brings the wheels out.
Thanks guys I hope I like it, we will find out soon.

I think I go the idea to do this from a post by goldduster318 about his b-body rear installation (or it was a post about a car very similar to his?).

Thanks,

Bob
 
More progress made on 1-1-2010:

Today it was sunny and a balmy 45 degrees here in La Plata, MD so it was perfect to prep the B-body housing for installation by :

Grinding the rust and paint off of the portion of the axle tube inboard of the existing spring mount (the area where the new spring mount will eventually be welded to).

Then I marked the approximate location with a sharpie, about 1.3" inboard from the current B-body spring mount location (.5" inboard for a the A-body spring width and then an additional .8" inboard for the spring relocation using the MP spring relocation kit from Mancini racing).

Now the fun starts with using the cutting torch to cut off the old spring mounts.

Then I ground the remaining weld and slag off using my trusty makita 4" grinder (the best tool I ever got from Harbor Freight, I bought it from them like 25 years ago!! nowadays they do not even carry makita power tools!!)

then I installed a third member in the housing and them the housing one the springs. It is basically sitting on the spring mounts with the u-bolts clamping it in place. After I rotated the rear to an initial pinnion angle setting the u-bolts are tightened so the axle housing is secured.

The next activity will be to install the driveshaft to the pinion yoke. Then I will lift car up with a floor jack and set it on adjustable screw jacks that support the rear of the car (one under each shock plate). Once these are adjusted so the axle center is 14" above the floor (the proper height for using 28" tires) and the rear springs are supporting the weight of the car, I can measure the pinion angle. More on this later.

Bob

DSC_0040.jpg


DSC_0042.jpg


DSC_0045.jpg


DSC_0044.jpg


DSC_0046.jpg


DSC_0047.jpg
 
I made a big post about it earlier in 2009...with lots of pictures.


What pinion angle did you set yours too?

I think I remember mine being set to somewhere between 5-7 degrees down angle using the angle shims below the spring perches? I have misplaced my MP chassis manual so I am not sure what I should set it at. I have read a few places a race car with SS springs can be as much as 7-8 degrees down where as a street car with stock springs might be set at 2-4 degrees. When a went to GM school (to become Mr. Goodwrench!) I remember them telling us it should 0-2 degrees on a chevy.

Any one else has any ideas on this topic??

Bob
 
Mine is set to stock. Had a welding shop do it for me. I gave them the axle, told them to set it up on their welding bench (clamped down so it would not rotate) and they rotated the axle to get zero degrees, chopped the old ones off, and welded the new ones on at zero degrees. They charged me $65. After 1000 miles everything is still good and their welds were better than the OEM ones by far. You won't be able to set true pinion angle without being at ride height anyway...which is why i went that route.
 
Mine is set to stock. Had a welding shop do it for me. I gave them the axle, told them to set it up on their welding bench (clamped down so it would not rotate) and they rotated the axle to get zero degrees, chopped the old ones off, and welded the new ones on at zero degrees. They charged me $65. After 1000 miles everything is still good and their welds were better than the OEM ones by far. You won't be able to set true pinion angle without being at ride height anyway...which is why i went that route.


I will be gving my a try. The adjustable jacks aloow me to support the car by the springs and set it to static ride height while I measure the pinion angle.

Thanks,

Bob
 
even though it was really cold today (high around 30 degrees and winds of 35 - 45 mph!!), I did get out in the garage and work more on this project.

Today I attached the driveshaft to the rear axle, lowered the rear of the car down to the shorter jack stands (with them supporting the car at the shock plates), measured the pinion angle difference bewteen the u-joint caps of the driveshaft and pinion yoke, loosened the u-bolts and adjusting the angle to 6 degrees down, tightened the u-bolts, tack weld the spring mounts to the rear axle housing tubes, installed one axle, brake drum and rear wheel & tire assembly to see how it fits.

then I jacked the car up and set it on the taller jackstands, removed the axle, wheel, brake drum, rear axle housing. Then I removed the third member and welded the spring mounts to the axle housing tubes.

DSC_0049.jpg


DSC_0048.jpg


DSC_0050.jpg


DSC_0051.jpg


DSC_0053.jpg


DSC_0055.jpg
 
Looking good.

I have a couple of questions about the offset spring hangers. Is the only benefit getting the .5" more tire clearance or does it do something for launching and what not. Also, do you have to modify the front hangers in the frame any or does it just make the springs move inward towards the back.

The kit I used uses Mopar Performance Offset spring hangers, offset rear shackles and new spring mount to be welded on the rear housing tube. The pictures show images of the front hangers and the rear shackles, and you have to cut a 1" X 2" hole in the frame (also shown in the pictures.

I do not think (or expect) the relocation of the springs to change how the car launchs.

The kit results in about .75 - .8 " more clearance per side. If you had a standard width A-body housing you can use a wheel with up to 5" backspacing with the springs moved in with it installed. With the stock location springs my tires where rubbing on the springs with 4.5" backspacing.

Thanks,

Bob
 
Update on my progress:

I welded a brace on the front and back of each of the spring mounts. These were made from 1/4" X 2" hot rolled mild steel bar stock about 3" long, and welded in place using my Lincoln WeldPAk 155 MIG welder set at Voltage E and wire speed 10 (basically WOT!) using .030" wire.

After I cleaned off the housing with a wire brush and then wiped it off with thinner. Then painted them with Eastwood's Rust encapsulator. It was pretty cold around here today (high of 33 degrees), so I made due with the facilities I had. I stored all of the items to be painted in the storage room in my house overnight, along with the can of paint. Then I heated the garage with my propane torpedo heater for over an hour while I performed other preparations (cover the car, 318 spare engine, etc) . Then I spread out a few left over furniture boxes on the floor space available (as you can see, some of this is actually under the car!). Anyway with the paint thinned by 20% with MEK and using an HVLP gravity feed spray gun I managed to get the rear housing , backing plates, rear drums, and a bunch of old steel barbell weights (for my son the wrestler) painted without generating much overspray. Since I was down low most all of the overspray just fell on the cardboard on the floor.

The Eastwood Rust Encapsulator worked well. It sprayed well and dried to a matte finish that looks good. Time will show how well it lasts with the little prep work I used on this job.

Next installment should show the final assembly.

Bob

DSC_0039.jpg


DSC_0040.jpg


DSC_0041.jpg


DSC_0044.jpg


DSC_0048.jpg
 
finally got it back together, here are few picts showing it with the 15 X 9 centerlines on the back with 275/D60-15 Hoosier tires (these have a 12 inch section width and 10" tread, which is identical to the 28/10X15 goodyear slicks I am going replace them with).

Put 4.5 X 15 crager wheels that look exactly like Weld Draglites on the front with skinny (VW beetle size) radials up front.

Wanted to drive it around on these old tires before buying the new ones to make sure everything is going fit as planned.

Hope to get it outside and do at least a least a few nasty burnout videos with the old tires and maybe some pictures outside of the garage sometime soon.

DSC_0122.jpg


DSC_0125.jpg
 
I posted pictures of final product (car with new tires) just before I loaded it up on trailer to go the track. They Are under another listing on the suspension,etc forum.

Here is one of it anyhow:

DSC_0170.jpg
 
-
Back
Top