disc brake setups...front/rear

-

carcrazyguy

Well-Known Member
Joined
Feb 5, 2005
Messages
1,358
Reaction score
16
Location
Amarillo, TX
I am needing to get the parts ordered for my 70 Duster project. I bought an 8 3/4 that I need to convert to LBP and I would like to update to disc brakes. I am wanting to find a kit that has cross drilled and/or slotted rotors that will clear a 15" wheel (Weld Pro Star or Billet Specialties Street Lites). Also I would like to find the matching front setup. I have seen kits that use the Viper caliper but will those clear a 15" wheel or do you have to run 17" wheels??
 
I went with Aerospace Components. Expensive yeah ... but you have to whoa before you can go. There's no way you should scrimp on brakes when your life is on the line.

View attachment 126637

Nice fit with 15" Torque Thrust IIs. A little grinding on the shock mount but otherwise a pretty painless installation.
 
Just curious how expensive was the Aerospace kit?? How much are the replacement pads? I am trying to find a set-up that I will have a front and rear matched sets. I see cars with cross drilled rotors and nice calipers on the front then have drums or mis-matched rotors/calipers on the back. I thought someone on the forum sold the Viper caliper/11.75 rotor front kits?


edit...looks like the Aerospace kits are $950 for the front and $950 for the rear (shows Dana only?).
 
It was about a grand for the front setup 5 years ago. I haven't been able to afford the rears yet LOL, but the fact they have matching fronts and rears available was one of my main reasons for going with Aerospace.

Plus they asked me what size free t-shirt I wanted and they sent one that actually FITS. :-D Everybody else always socks me with the XLs that drape to my knees.

If you do a search for Viper you might be able to find what you're looking for. Since my brakes are done for now, I don't read much of the brake threads.

Good luck with the decision!
 
ARE engineering has the viper stuff yor looking for.
 
I bought a slotted and crossed drilled set up from Master Power. I am in the process of installing it now.

Dartbrakes021Medium.jpg
 
Psssssssst Brian, don't let that AC Delco jack stand know it's holding up a Mopar ... it might revolt on ya!!! :-D
 
Psssssssst Brian, don't let that AC Delco jack stand know it's holding up a Mopar ... it might revolt on ya!!! :-D

:toothy10::toothy10::toothy10::toothy10::toothy10::toothy10::toothy10::toothy10::toothy10::toothy10::toothy10::toothy10::toothy10::toothy10::toothy10::toothy10::toothy10::toothy10:

True True!
 
i'm using the ARe viper kit with 11.75 rotors but i cant say whether they'll fit inside a 15" wheel since i'm running cobra rims. i really think it depends on the wheel you're running as some have different inside profiles. for certain though it would be a very close fit.

0606091808a.jpg
 
Here in Oz Toyota 4 spots are a popular conversion

There are two types of caliper that will just about bolt straight onto the mopar mounts. Not sure about the ‘B’ body here but definitely ‘A’ bodies and OZ Valiant stuff.

A) To start with the calipers found on the FJ/HJ or 60 series Landcruiser’s are suitable. Also used on some model Hilux’s. This is a 4 spot caliper that has two different sized pistons and some cooling fins. The leading piston is smaller than the trailing one i.e. two small opposing and two big opposing pistons.
B) The second suitable style are the ones used on the Toyota HZJ75 series prior to about 95’ I think. This is about 20% bigger than the ones above. The difference is that it has 4 pistons of the same size, which makes it longer and hence a bigger pad.

Note: Both of these are available new from Veale’s for a reasonable price. Second hand they can be bought very cheap. Overhaul kits are also available for both also very cheap. The smaller caliper is the better for straight replacement. The larger one really needs some brake proportioning work depending on what sort of booster your Chrysler is running standard. Don’t get me wrong it will work brilliantly but rear drum brakes may lock in emergency stops (pretty par for course actually). My booster is quite weak due to M1 single plan manifold, so the old right boot does the work and the bigger brakes work well. There is a large range of pads so experiment here too. The big plus is that you have a platform to improve the whole braking system from here on. The most noticeable change is the brakes won’t pull on either side first, it is very even and you are not fighting to keep the car in a straight line. You have a lot more feel and can therefore go harder on the pedal.

Here is what you need to do. It may sound fiddly but it is all a piece of cake.

1) Find a pair of Toyota 4 spot calipers. Remove your old Chrysler calipers and do a quick mount up to see what your up against. They bloody well almost bolt straight on but you will need to do a couple little things so they look and work like factory ones.
2) Send your disks (the vented style) off to the brake shop and have them skimmed around 3 mm off the outer radius. NOT thickness, the outer diameter of the disk needs to be reduced so it doesn’t touch the caliper. Some vals are different which is where the quick fit check prior to skimming pays off. Do some quick eye-balling of your own. Mine was a small bolt pattern vented disk set-up ala Dart/VG.
3) Whilst that’s being done. New or old you will need to split the calipers apart. Simply four bolts. Whilst they are separated you need to open up the central rotor slot by about 2-3 mm on each side. Probably don’t need too if using a solid rotor, but go the vented ones whilst your upgrading. I used a smaller angle grinder with a thicker cutting disk rather than a grinder disk. Cutter disks don’t like sideways force so don’t rush it, take your time and use safety goggles. The Chrysler vented (or brand new DBA slotted disk if you choose) disk will now happily fit in them.
4) Okay. The Toyota stuff is metric so a couple little mods must be done here. The caliper bolt holes are a little bigger than the Chrysler caliper bolt holes. The simplest thing to do here is fit a sleeve between the standard imperial bolts from you old brakes and the new caliper. Thus retaining mounts and retaining bolts. I used some copper pipe pressed with my vice into the caliper holes and then filed out for a neat fit. Then I notice that Suzuki Sierra locating dowels, between the engine and gearbox, are a perfect fit. This is what I used on my second conversion. Clean up either side with the grinder so it’s flush.
5) Thoroughly clean the calipers and join back together. No sealant is required. Just REMEMBER the ‘O’ ring seals. Paint them what ever colour you want. I recommend VHT caliper paint here.
6) Homeward bound now. One more critical thing to do, but also very easy. Take your flexible brake line, the one that goes from the chassis to the caliper, to a hose specialist (Perth Brake Supplies, Welshpool) and get two new braided steel lines made. The chassis end needs to retain the 3/8? NPT thread BUT the other end needs to be a 10 mm i.e. the same as the Toyota metric thread. It will be a banjo style with bolt through centre so you can tighten without twisting the hose. Just tell ‘em to copy your old one bar the metric end. Ensure they give you the right bolt for the right Banjo. Some are grooved bolt and some are grooved Banjo for hydraulic fluid flow. You MUST put in the two new copper washers to seal the bolt.
7) Putting everything back together! IMPORTANT. Depending on the pads you use, you will need to take a bit off the internal radius on the central hub side of the pad. A bench grinder will do this nicely. You need only do the outer pad, but make sure you put it on the outside of the caliper! As they wear in they may begin to touch on the hub of the disk causing a squeak or uneven pad wear.
The most critical stage. Once you have re-assembled everything and bled the brakes, turn the wheel by hand check your work. Then TEST, TEST, TEST, before you even go onto the road. Then when you’re on the road, TEST again in a safe spot. Not whilst you coming down a steep hill or driveway. Then check your handy work again back home.

Cheers
 
Heres what Dr Diff offers.Several people here have been very happy with his parts and support/service.

Aluminum master cylinder package. Kit includes 1 1/32″ bore master cylinder with level reservoir, billet aluminum adapter and push rod retainer. Correct bore for most Mopar musclecars $85

DoctorDiff Hemi brake booster assemblies:
Complete assemblies with brackets, linkage, rebuilt booster and master cylinder:
1. With Hemi bolt pattern Bendix booster $1000
2. With Wedge bolt pattern Bendix booster $850

DoctorDiff Hemi brake booster brackets:
Kits include brackets, linkage, retaining plates, push rod boot and hardware (no booster):
1. Hemi bolt pattern Bendix booster $250
2. Wedge bolt pattern Bendix booster $250

Hemi Booster kits available for:
1. ‘66-’70 B-bodies
2. ‘71-’74 B-bodies/’70-’74 E-bodies (add $35 for firewall stiffening plate)

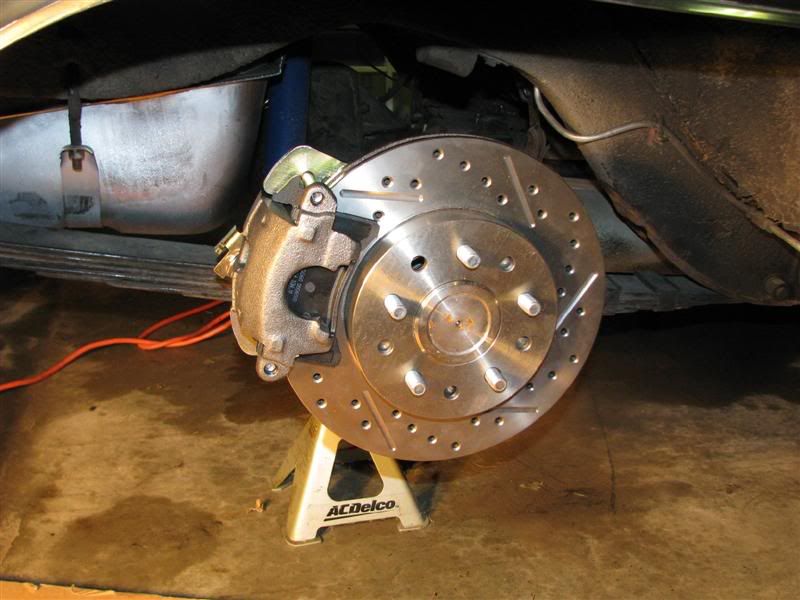
DoctorDiff 14″ front disc brake kit includes loaded second generation Viper calipers, billet steel caliper brackets, billet aluminum hubs, slotted, plated rotors, bearings, seals, dust caps, stainless flex lines and hardware. All new parts $2000

DoctorDiff 13″ front disc brake kit includes loaded Cobra calipers, billet aluminum caliper brackets, rotors, hubs, bearings, seals, dust caps, stainless flex lines and hardware. All new parts $800

DoctorDiff 10.7″ econo rear disc brake kit includes loaded Cobra calipers with internal parking brake, 2 piece steel caliper brackets, rotors, stainless flex lines and hardware. All new parts $500

DoctorDiff 10.7″ rear disc brake kit includes loaded Cobra calipers with internal parking brake, billet aluminum caliper brackets, rotors, stainless flex lines and hardware. All new parts $625

DoctorDiff 11.7″ rear disc brake kit includes loaded Cobra calipers with internal parking brake, billet aluminum caliper brackets, rotors, stainless flex lines and hardware. All new parts $600

DoctorDiff 13″ rear disc brake kit includes loaded Cobra calipers with internal parking brake, billet aluminum caliper brackets, rotors, stainless flex lines and hardware. All new parts $700

I take Visa, MC, Discover and money orders.

[email protected]

(406) 883-4772


Websight.

http://www.doctordiff.com/?page_id=41


Im in no way associated so dont worry,not trying to sell anything.
 
DoctorDiff 13″ front disc brake kit includes loaded Cobra calipers, billet aluminum caliper brackets, rotors, hubs, bearings, seals, dust caps, stainless flex lines and hardware. All new parts $800


DoctorDiff 10.7″ rear disc brake kit includes loaded Cobra calipers with internal parking brake, billet aluminum caliper brackets, rotors, stainless flex lines and hardware. All new parts $625

Anyone here using this exact setup??
 
I thought you wanted to use 15 inch rims? Do you want 13 inch rotors or 15 inch rims?
 
Just noticed that that Dr Diff kit was 13" front rotors not 11.75. I would like the option of running a 15" wheel from time to time. I do plan to make a pass or two with the car so I would like to run the 15" Billet Specialties Street Lites.
 
oem 11.75 brakes are pretty good for a street car.

unless your making a track car, you may be over braking the car with huge front and rear disc brake set ups. depending on the friction material and caliper used the brakes may need to be warmed up to work properly.
 
How much larger are the mount holes? Three MM's?


Here in Oz Toyota 4 spots are a popular conversion

There are two types of caliper that will just about bolt straight onto the mopar mounts. Not sure about the ‘B’ body here but definitely ‘A’ bodies and OZ Valiant stuff.

A) To start with the calipers found on the FJ/HJ or 60 series Landcruiser’s are suitable. Also used on some model Hilux’s. This is a 4 spot caliper that has two different sized pistons and some cooling fins. The leading piston is smaller than the trailing one i.e. two small opposing and two big opposing pistons.
B) The second suitable style are the ones used on the Toyota HZJ75 series prior to about 95’ I think. This is about 20% bigger than the ones above. The difference is that it has 4 pistons of the same size, which makes it longer and hence a bigger pad.

Note: Both of these are available new from Veale’s for a reasonable price. Second hand they can be bought very cheap. Overhaul kits are also available for both also very cheap. The smaller caliper is the better for straight replacement. The larger one really needs some brake proportioning work depending on what sort of booster your Chrysler is running standard. Don’t get me wrong it will work brilliantly but rear drum brakes may lock in emergency stops (pretty par for course actually). My booster is quite weak due to M1 single plan manifold, so the old right boot does the work and the bigger brakes work well. There is a large range of pads so experiment here too. The big plus is that you have a platform to improve the whole braking system from here on. The most noticeable change is the brakes won’t pull on either side first, it is very even and you are not fighting to keep the car in a straight line. You have a lot more feel and can therefore go harder on the pedal.

Here is what you need to do. It may sound fiddly but it is all a piece of cake.

1) Find a pair of Toyota 4 spot calipers. Remove your old Chrysler calipers and do a quick mount up to see what your up against. They bloody well almost bolt straight on but you will need to do a couple little things so they look and work like factory ones.
2) Send your disks (the vented style) off to the brake shop and have them skimmed around 3 mm off the outer radius. NOT thickness, the outer diameter of the disk needs to be reduced so it doesn’t touch the caliper. Some vals are different which is where the quick fit check prior to skimming pays off. Do some quick eye-balling of your own. Mine was a small bolt pattern vented disk set-up ala Dart/VG.
3) Whilst that’s being done. New or old you will need to split the calipers apart. Simply four bolts. Whilst they are separated you need to open up the central rotor slot by about 2-3 mm on each side. Probably don’t need too if using a solid rotor, but go the vented ones whilst your upgrading. I used a smaller angle grinder with a thicker cutting disk rather than a grinder disk. Cutter disks don’t like sideways force so don’t rush it, take your time and use safety goggles. The Chrysler vented (or brand new DBA slotted disk if you choose) disk will now happily fit in them.
4) Okay. The Toyota stuff is metric so a couple little mods must be done here. The caliper bolt holes are a little bigger than the Chrysler caliper bolt holes. The simplest thing to do here is fit a sleeve between the standard imperial bolts from you old brakes and the new caliper. Thus retaining mounts and retaining bolts. I used some copper pipe pressed with my vice into the caliper holes and then filed out for a neat fit. Then I notice that Suzuki Sierra locating dowels, between the engine and gearbox, are a perfect fit. This is what I used on my second conversion. Clean up either side with the grinder so it’s flush.
5) Thoroughly clean the calipers and join back together. No sealant is required. Just REMEMBER the ‘O’ ring seals. Paint them what ever colour you want. I recommend VHT caliper paint here.
6) Homeward bound now. One more critical thing to do, but also very easy. Take your flexible brake line, the one that goes from the chassis to the caliper, to a hose specialist (Perth Brake Supplies, Welshpool) and get two new braided steel lines made. The chassis end needs to retain the 3/8? NPT thread BUT the other end needs to be a 10 mm i.e. the same as the Toyota metric thread. It will be a banjo style with bolt through centre so you can tighten without twisting the hose. Just tell ‘em to copy your old one bar the metric end. Ensure they give you the right bolt for the right Banjo. Some are grooved bolt and some are grooved Banjo for hydraulic fluid flow. You MUST put in the two new copper washers to seal the bolt.
7) Putting everything back together! IMPORTANT. Depending on the pads you use, you will need to take a bit off the internal radius on the central hub side of the pad. A bench grinder will do this nicely. You need only do the outer pad, but make sure you put it on the outside of the caliper! As they wear in they may begin to touch on the hub of the disk causing a squeak or uneven pad wear.
The most critical stage. Once you have re-assembled everything and bled the brakes, turn the wheel by hand check your work. Then TEST, TEST, TEST, before you even go onto the road. Then when you’re on the road, TEST again in a safe spot. Not whilst you coming down a steep hill or driveway. Then check your handy work again back home.

Cheers
 
-
Back
Top