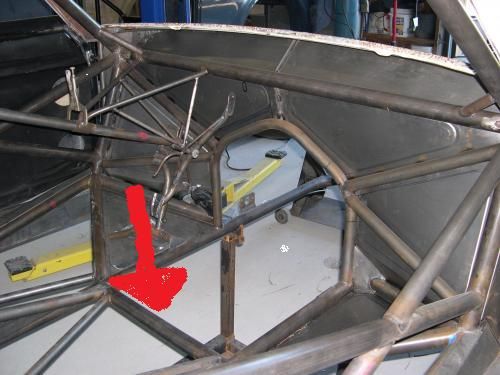
new car on the jig

-
I think I just drooled on my lap,I don't know how u guys do this but it never stops amazing me the work some of you guy's do and how fast you do it,It can't be your first rodeo-simply unreal,Thanks for letting us watch--Steve
 
Ahhh I remember when my car looked like that .

You can make this bar removable now in SFI rules 25.1E and 25.2 and pull your transmission from the bottom .

trans_zps7beca8f8.jpg
 
Very Impressive! Did you by any chance do Will's Barracuda a few years ago?
 

Attachments

  • Me_N_Will.jpg
    60.2 KB · Views: 614
Mean Green you are right you can make it removeable to take it out the bottom. For me it is more trouble to jack the car up high enough to get it out the bottom than it is to hand it out the door.
Hyper Pak yes I did rework Wills car quite a few years ago.

On my car finishing a few details over the holiday and its off to the powdercoater this week!
 

Attachments

  • DSCN3773.jpg
    54.9 KB · Views: 598
  • DSCN3781.jpg
    37.3 KB · Views: 589
  • DSCN3784.jpg
    51.4 KB · Views: 585
  • DSCN3788.jpg
    36.5 KB · Views: 595
  • DSCN3793.jpg
    52.8 KB · Views: 592
Got the chassis back from the powder coater. Having the body blasted and primed before re-installing. Starting final assembly.
 

Attachments

  • DSCN3820.jpg
    47.2 KB · Views: 497
  • DSCN3814.jpg
    53.2 KB · Views: 483
  • DSCN3808.jpg
    43.4 KB · Views: 510
  • DSCN3804.jpg
    54 KB · Views: 503
I do believe the 9" is up to the task.
Very nice work. If your attention to detail follows through the whole job , this one is gonna be purdy !:D:D

Allow me to reiterate. :D
The brake line routing gave me chills. :prayer:
Absolutely top notch work.
This is gonna be automotive jewelry.
 
Thought I would add a few pics of the work in progress. Got the body back from media blasting/epoxy primer. Plumbing and wiring going on along with headers. A few more weeks and we will see what it weighs and how it runs!!!
 

Attachments

  • DSCN3847.jpg
    46.4 KB · Views: 330
  • DSCN3844.jpg
    47.4 KB · Views: 330
  • DSCN3839.jpg
    48.8 KB · Views: 330
  • DSCN3838.jpg
    37.4 KB · Views: 326
  • DSCN3829.jpg
    80 KB · Views: 345
wow.. amazing. i dont understand how you guys do it...just mind blowing..i dunno

what it weighs, and what it goes ! engine size? maybe start a thread on guessing the e.t., anyone care to start ??:coffee2:
 
what it weighs, and what it goes ! engine size? maybe start a thread on guessing the e.t., anyone care to start ??:coffee2:

just went back and read the first of this thread. I`ll lead off, 7.90 e.t. first full shot .:coffee2:
 
Thanks for the compliments! I do chassis work on the side to support my racing. I'm using the 1.76 low in the trans. Haven't decided on rear gear yet. If under 2400# I'll go with 4.11, over 2400 4.30. Hoping for 8.0's , depends on the weight.
 
When I started this project my goal was to renew my license, get a grade point at a division race and get back on the national event circuit as early in the season as possible. For me it meant I had to make the division 1 race at VMSP this past weekend. well we made it. There are still some details to take care of. I will run it primed for the remainder of this season and worry about paint over next winter. We only got to make a couple runs before the rain set in but it gave me important info, mainly the converter is too loose. Here are a few pics. If I can figure out how to upload some video I will do that. Second pass was a 8.66 @ 154 mph. Will go 8.40's with right converter and a little tuning who knows!
 

Attachments

  • 4.26.15 034.jpg
    41.3 KB · Views: 235
  • 4.26.15 048.jpg
    24.3 KB · Views: 214
  • Phone 4-27-15 118.jpg
    46.9 KB · Views: 224
-
Back
Top