Biohazard

-
This will be a great reference for us at the " putting stuff back in" point too. I see that Grandpa wasn't above doing Day 2 modifications....
I did see a power top switch in the usual position under the dash at the left knee; what's that one labelled and do, if you can tell yet?
 
How dare you, my good sir! Grandpa rocked an AM radio into the 21st century!

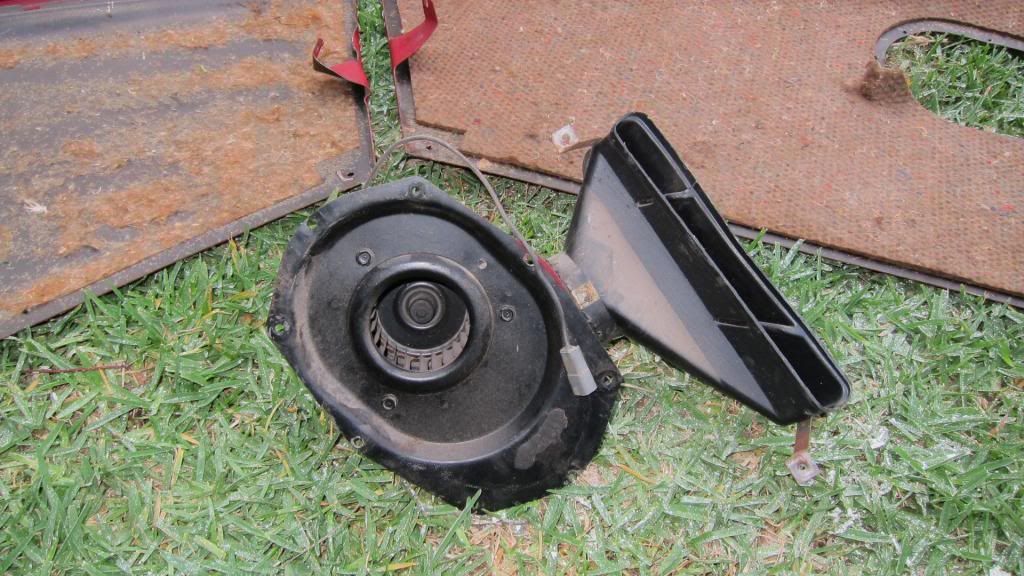
I believe you're referring to the toggle labelled "REAR AIR" which activates the factory rear window defogger. Interesting setup this as the blower fan draws air from the cargo hold through a 6 x 9 speaker grille.
 
How dare you, my good sir! Grandpa rocked an AM radio into the 21st century!

I believe you're referring to the toggle labelled "REAR AIR" which activates the factory rear window defogger. Interesting setup this as the blower fan draws air from the cargo hold through a 6 x 9 speaker grille.


Pistols at dawn then, Sir. Our seconds can hold our coats.

THAT is the Second Mod this '69 has that I wish I had on board mine. I have been thinking about fabricating an air funnel and blower motor to do exactly that. Love to see how yours is laid out physically and electrically. Flying one of these things in the spring, fall, winter, and in the rain- the rear glass becomes useless- that, along with the giant blind spots and the single mirror on the driver's side. . .well, let's say that a bunch of people over the years have had me try to occupy their lane and recreate that physics experiment. . . .

The oval holes with the 6x9 speaker grills I saw in one pic suggested that stereo might have been added on "Day 2". . .along with the sidewall coverings.

Great car Sir. I might suggest you consider EZ Cool insulation from lowbucrod.com. Check out the Aussie testimonial! I have that down double from the plenum all the way to the trunk area, single on sides and top- and have put in place a bit of a water vapor barrier between the rear roll down window area and the trunk area to control some of that excess water vapor that steamed over my rear glass all these years. . .along with a flapper valve of rubber over the defroster slot for now.

Mine showed up in my life new (demo car) from Solok and Turner in Pasadena TX in Spring 1967; I was 9. Learned to drive in it, HS, college, first honeymoon; never let it get away from me. She is getting the rebuild and improvements she has always deserved. . . .it will be my time machine.

Enjoy!

Mike
 
Disassembled the doors for proper washing, a lot like how I did the floors, i.e. soapy water, scrubbing, and ample rinsing because I specifically went for the space between the inner and outer door skins.

Driver's door, shown with vapor shield removed and most of the tape peeled off (near the bottom), before washing.

IMG_0915_zps6d09179f.jpg


Inside the door. Looking pretty good here, just dirty. Its going to take a skinny brush to get down in that crease at the bottom.

IMG_0916_zpsb3f15d63.jpg


Going all-out to get it done. Sprayed the entire inside with a cleaning solution and hosed it out with a vengeance. Good thing there's drain holes at the bottom.

IMG_0921_zps2456fcf4.jpg


Door washed. I sprayed some Krud Kutter along the adhesive tape and let it soak, hoping it will peel off a little easier.

IMG_0922_zpsc377cc52.jpg


Otherwise, the door handles are in a very good state, needing just a light polishing to bring the bling back and the armrests are likely cleanable but, if not, repros are available in white so...whatever.

 
There's some sort of treatment for flood damaged cars.

It consists of some sort of biological organisms that eat the mold/bad smelling stuff.
 
The "rear air" defroster was a factory option. Parts are out there, not easy to find since it was not a common option.
 
Yes. Found several items on EBay from time to time- mostly from the full size cars before '66 if I remember correctly. Never a complete setup....but it sure got me to thinking what a pop riveted aluminum oval "funnel" and a DC powered Shark Vac unit might be made to do...;-).
 
I shot some photos of the REAR AIR assembly which I'll post when I get to that phase of the cleanup. I think you'll find it pretty straightforward and probably easy to re-create but a vacuum cleaner motor? Let's just say that would be overkill. I did test my unit for operation and it works! With 12 volts applied directly thru a 10" lead wire (no rheostat, just straight off the battery) it is a low-rpm device.
 
Thanks, would love to see them. The vac motor would be noisy, but I've noticed how warm the air gets when it passes around the motor on the exhaust side...no heater elements needed if I could tap that side for defrost air....and tap cabin air for the intake air side would eliminate excess humidity....just thinkin' is all;-D
 
In the same vein, how about routing some cold A/C air from the under dash vent thru a defrost tube UNDER the console to an A/C vent mounted at the back of the console? The rear seat passengers were always short changed by the original set up.
More idle thinkin' that improves the machine's utility....
 
All of the seats are out. I have never done upholstery work before so I am experiencing fear and anxiety. I will take pictures to help with getting it all back together correctly and I will either buy pre-made repro covers and buns or solicit a local upholstery shop (more fear and anxiety) but the bottom line is this: All that foam rubber, jute, and burlap creates a wonderful harbor for mold so it has to go.

I suppose I'll start with the rear seat.

IMG_0925_zpsa060855c.jpg


IMG_0924_zps44e7105f.jpg


IMG_0923_zps2bc648de.jpg


In that last pic you can see sheets of plastic in the background. That is all of the other seat sections sitting on the lower back porch slab and wrapped up so nobody has to smell them. (our house has a walk-out basement)

I pulled about 80 hog rings removing the jute and the vinyl cover. I wanted to immediately toss the jute strip that goes around the upper part of the frame but Mopar Muscle's DIY suggested keeping it to use as a template for the replacement padding so I bagged it. (Need to find some 'biohazard' stickers for these bags, lol.)

With the frame stripped of all the soft stuff, I sprayed it with a cleanser, let it soak, and rinsed it with a pressure washer. After letting it dry thoroughly in the sun, I completely coated it with the plant-based oil, blotted up the excess and added it to the parts stockpile.

IMG_0947_zps97b398c0.jpg


I'll need to get some minor weld-work done with the seat bottom frame. It secures to the floor by two drilled stips of metal affixed at the back of the frame. One of those tabs had broken away from the frame and was still screwed into the floor. That tab will need to be tacked back on.

IMG_0950_zps1dd58480.jpg


There is also a weld that has failed at the back left corner of the frame that will need a quick tack but, an easy fix.

IMG_0948_zps822373d5.jpg


IMG_0949_zpsa383f6c4.jpg


So far, pulling the carpet and seating and the subsequent floor scrubbing has had the single biggest impact on the mold smell (duh). My estimate is that the odor dropped from a 10 to an 8. It is still pretty rotten in there and after working on anything to do with the interior, I have to strip in the garage and head straight for the shower. Clothes then get laundered in an anti-mold solution. Yeah, its that bad.
 
I have the same weld job to do on my Barracuda's rear seat as well!

I also had the same fear when it came to the upholstery job on my Duster. I bit the bullet and ordered the correct Legendary seat covers for the car. Bought some high density foam, hog rings and pliers from a local upholstery shop and did the job myself. Probably saved $500-1000 in the end. If you have any questions, feel free to PM me. It's almost as simple as putting a sheet over a bed. Watch the Legendary videos and then just take extra time to make sure the covers are straight before you start hog ringing. If they aren't as straight as you'd like, cut the hog rings out and start over again. There really isn't much to it and taking plenty of pictures will remind you of how the factory did it.
 
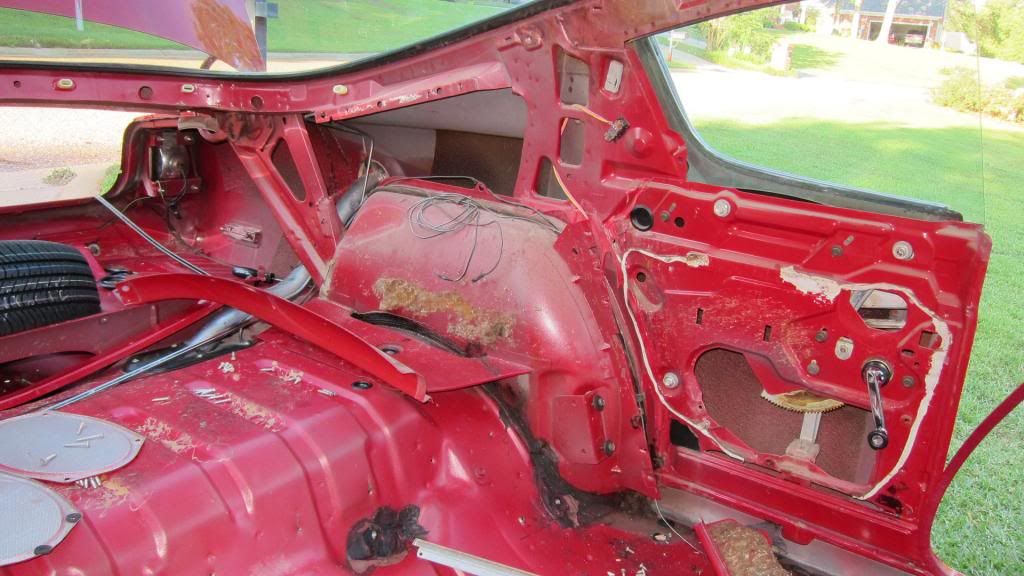
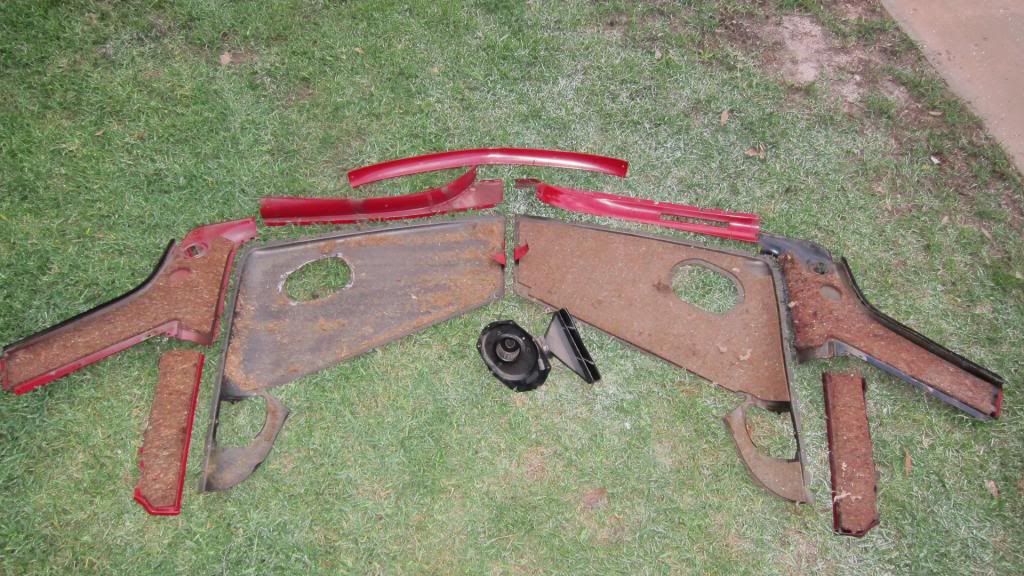
Pulled the rest of the stuff out of the back of the car. Then gave it another good washing from the inside out. Pulling all of the interior panels around the cargo area allows me better access to the space around the rear wheel humps which had insulation fuzz stuck to them.


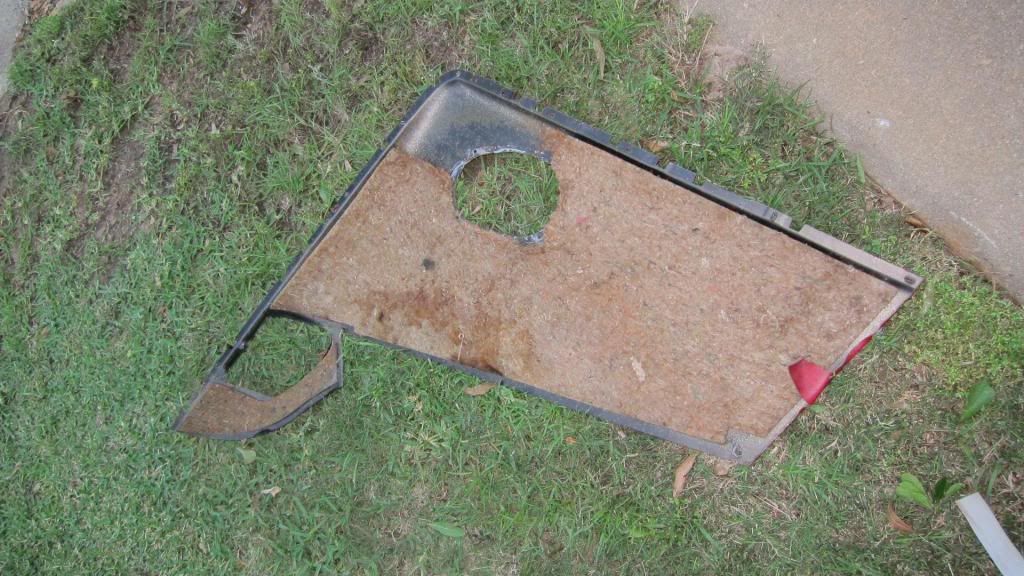
Of course, the backside of the cargo wall panels had insulation fuzz stuck to them as well. With all of the fibrous insulation removed, I can give them a thorough cleaning. There is a lot of fibrous jute matting back there.


Inside - out:

 
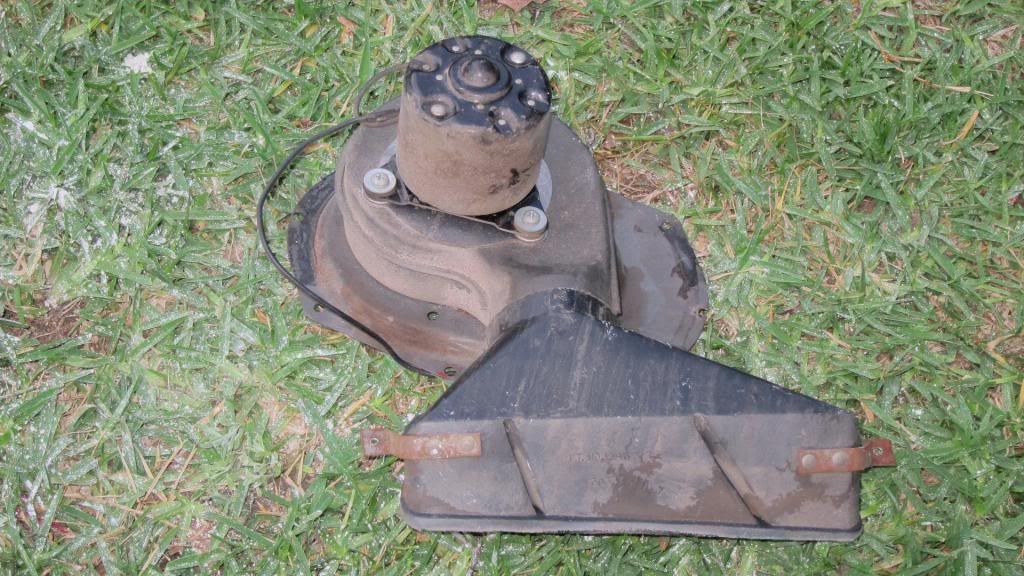
Some of the things that came out with the cargo walls removed, most notably, the rear window defog blower assembly. As mentioned earlier, I tested this off of a 12V battery and it works perfectly with no odd noises, whatsoever.


Blower operation is pretty simple: One wire (hot) runs to the unit from the control switch under the dash. The blower motor, being mounted to a metal 6 x 9 inch plate, is grounded directly to the metal cargo panel which, in turn, grounds to the chassis.

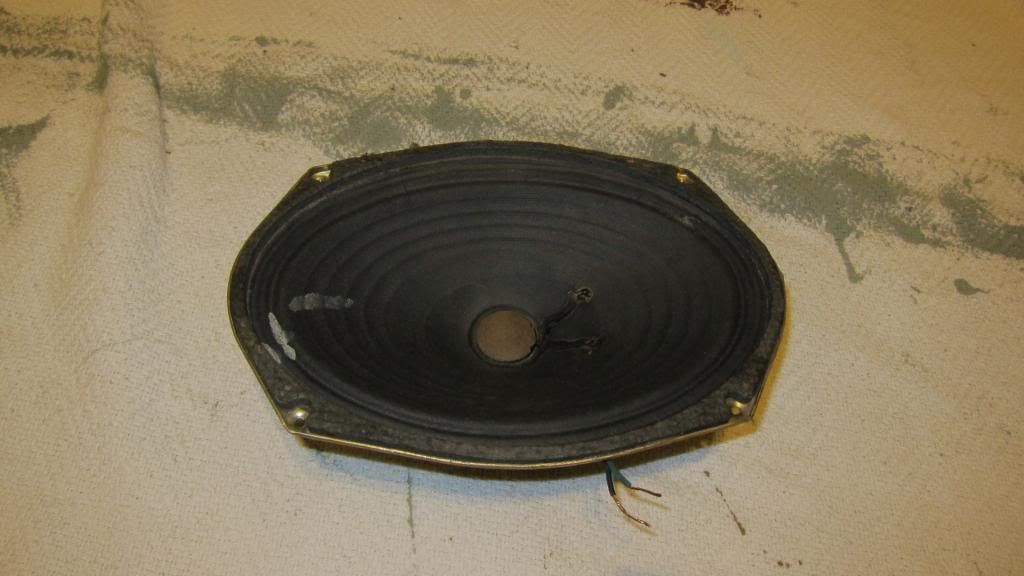
Here is an original Chrysler 6 x 9 full-range speaker. I assume this was an option to compliment the 4 x 10 located under the dash. This, too, is fully operational. I tested it by connecting leads from a bookshelf stereo system I keep in my basement. Had to be careful with things like volume and bass, lol.


What's disappointing is the manner in which this was installed. Seems to have been one of those 'dealer-installed' options and the gent who did the work was an utter hack as the cut-out appears to have been made with a spoon. I would like to get another left-rear panel with no cutout and simply run without the speaker. Anyone? Anyone?

 
....and...the cargo area platform, stripped of its backboard and carpet, disinfected with my trusty anti-mold solution, and rubbed down with the plant-oil.

IMG_0952_zpsd9f24199.jpg


Having cleared the entire rear of the car out, I washed, sprayed, and rinsed everywhere I could reach, even the ceiling. The weather has been cooperative and getting her all dried-out quickly has been a non-issue.

The next phase of the cleanup will be getting to the forward part of the cabin. This means pulling the instrument cluster, the A/C and vent assemblies, and as much of the dash as I can possibly remove in order to clean those components and get unrestricted assess to the firewall. There is certainly more jute insulation there and it, like all the rest, will have to come out.
 
looks familiar!


My rear bottom seat frame had the same issues.

The Uplostery is not to bad to replace. You will need some extras hands for the rear seat back when re-installling the cover if it is the folding seat.

The fun part is re-lacing all those support wires back into the new burlap. I marked mine out in a grid pattern so I could lace them back in nice and straight like the original. Takes some patience and time.

Good luck with the cleaning as I hope it smells like new when you are complete.
 
wow that is a really nice car hope you can get rid of the smell
 
The plant-derived oil is Ultra Lube. It is essentially an alternative to more familiar petroleum oils like WD-40 but lacks the heavy smell associated with those oils. I had lubricated all of the hinges on the inside of the garage door and fell in love with the stuff.

128911.jpg


Found it at Lowe's, read the label, works very well.
 
Saturday, I got under the dash and started pulling that apart. First thing I realized: I gotta get some more SAE tools :banghead: I hadn't had a need for them since selling my first Barracuda 20 years ago...a time when I didn't have a very robust assortment of tools to begin with.

Key elements were:
- Removed the rest of the cruise control system (but put the turn signal arm back in because I don't have a stocker).
- Set removed parts and pieces on the car's floor as a holding point until they can be cleaned and put away.
- Got the mangled dash pad off.

Can't believe the size of the AM radio.

It is every bit as nasty back there as anywhere else in the cabin. No wonder the car still smells. The bottom part of the dash frame creates a channel that catches....everything. More bits of broken glass, more dust, dirt, and some interesting antique salt and pepper packets.
 
There was just a few small spots of rust on the steel backplate of the rear seat upper. I sprayed those with "Right Stuff" chemical rust converter. Let it spend a few days in the sun so the spray could thoroughly dry and release the heavy acid smell. Then I simply wiped it down with a clean cloth and brought it inside.

I cleaned and sanitized all of the individual parts that were removed from the rear seat and stored them as well. The accumulation of parts in my store room is a solid sign of progress!

Thinking about ordering my new seat vinyl. I'm far from ready for it but I understand that it will take about a month to produce and leaving it in the attic for a while will allow it to dissipate the new vinyl odor.
 
If you have the dash pulled apart, now is the time to replace the under dash insulation and the firewall insulation. They usually are completely rotten and stink bad. They are available from places like legendary auto, and are fairly easy to replace.
 
-
Back
Top