Faulty battery, bad alternator, or both (photos)

-

Saverio

Well-Known Member
Joined
Apr 7, 2014
Messages
252
Reaction score
9
Location
nj
Car is a 1974 Plymouth Scamp w/ stock 318.

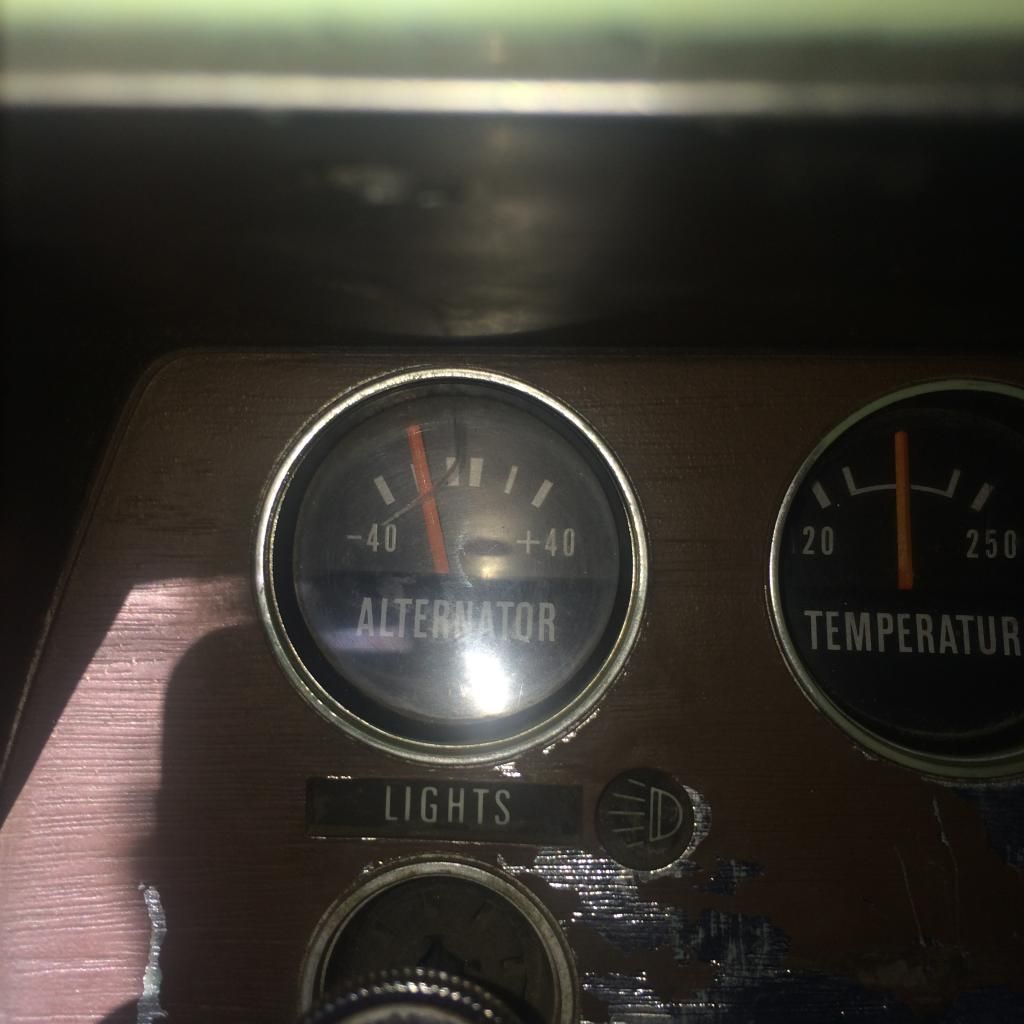
So after installing my new battery (due to timing, I went to Walmart :banghead: ), I decided to check the battery.... (right after I noticed while driving that my amp gauge was solid towards the middle, then pegged all the way to the right (+40), and slowly went back down).

When it settled, it landed in the negative.

I decided to do some testing.

With the car off, I'm getting a reading of exactly 12 volts at the battery. Shouldn't this be higher?

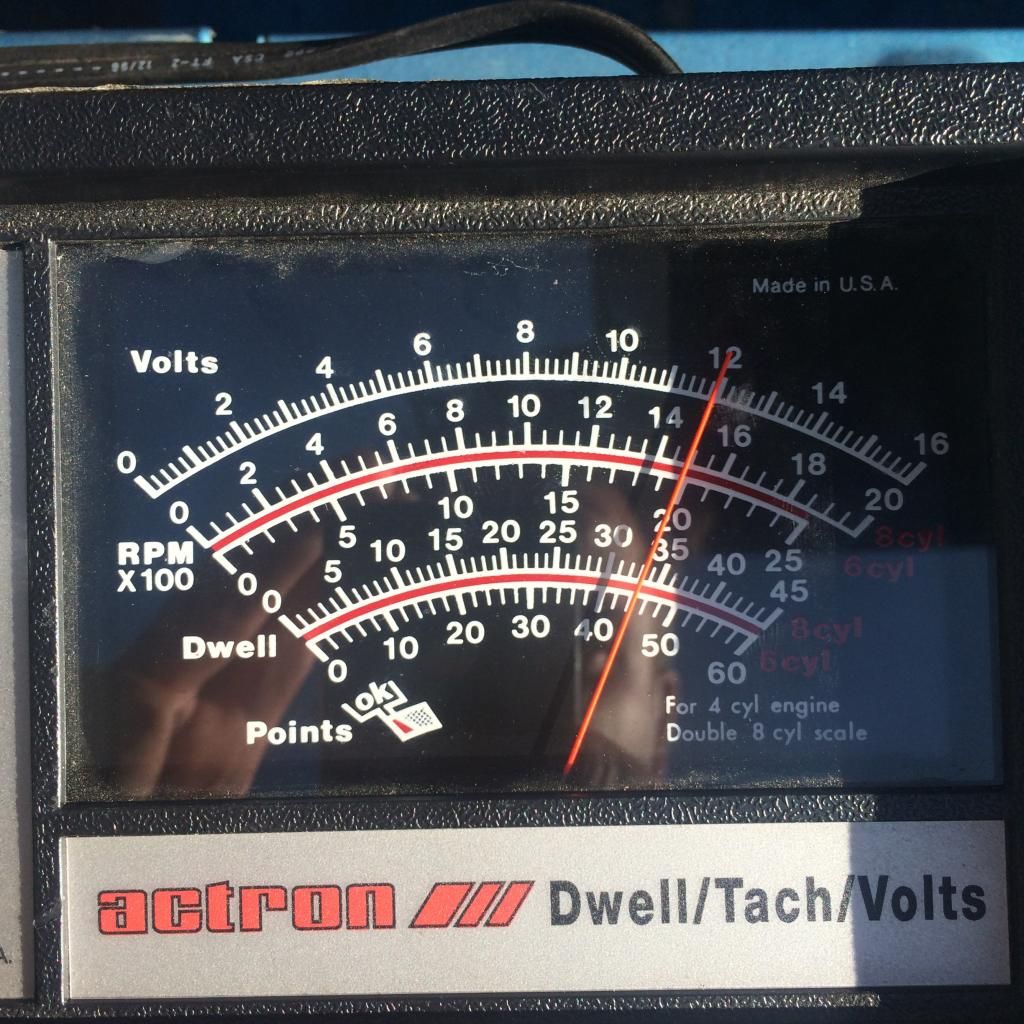
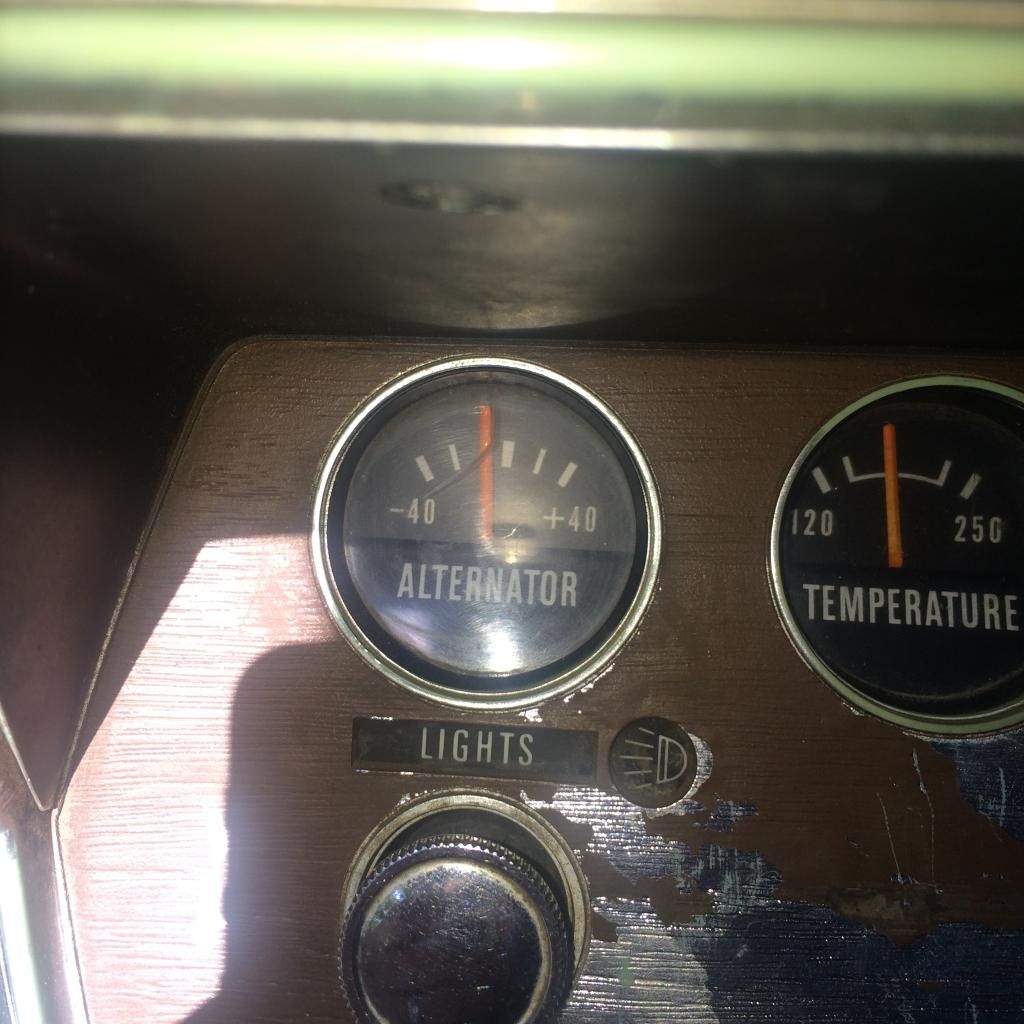
I started the car, no accessories turned on, and here is my battery and amp gauge reading:

battery:


Gauge:


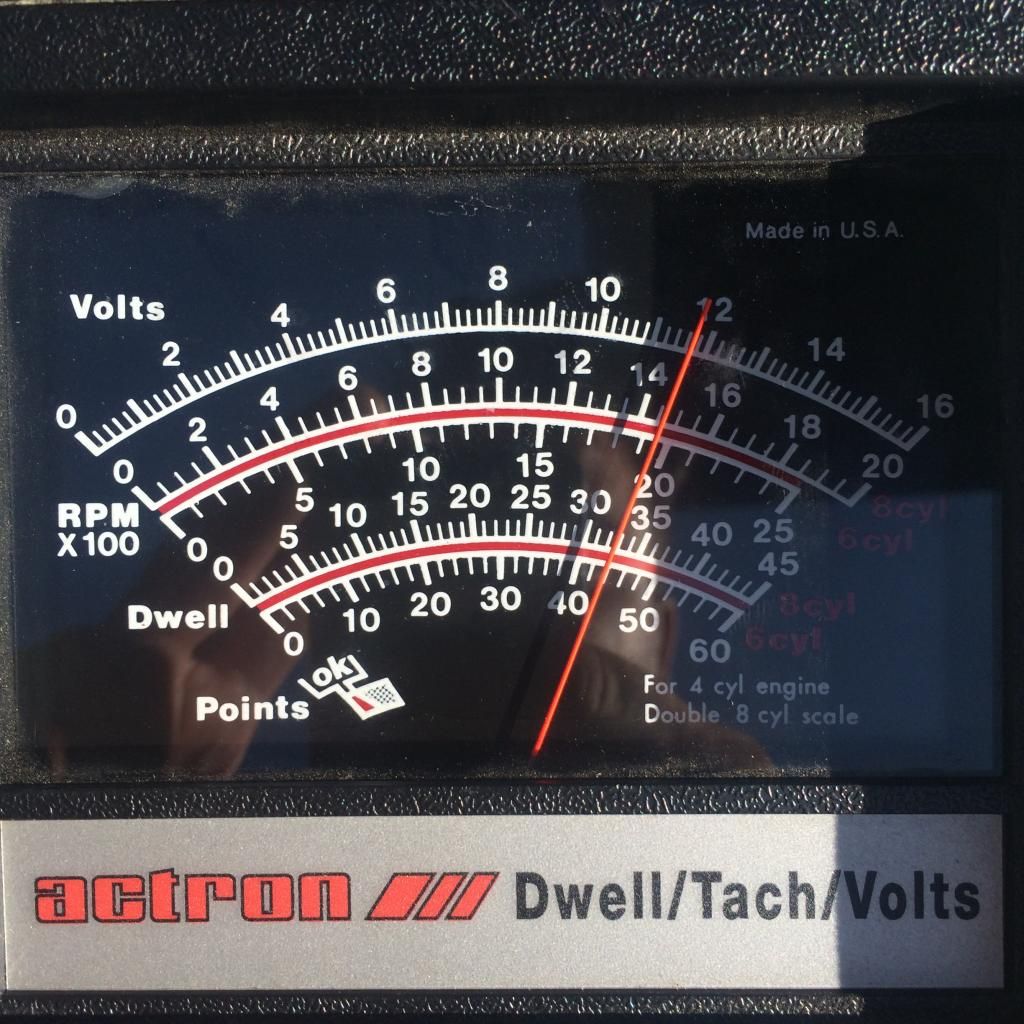
NOW....I then decided to rev the engine a couple of times, and turn on the lights. Here is the result of that, with ONLY the lights on:

Battery:


Gauge:


So my question is, do I have a bad alternator? A bad battery? Both?
 
How tight is your alternator belt? I would think your alternator should put out 13.5 at least, can you isolate it, have engine running and check what it's putting out? You could pull the battery and have it load tested, maybe it has a bad cell. Depending on outside temperature, I would think a battery at rest should read 12.6 or so.
 
The alternator belt is tight.
I was thinking the same thing, the reading at the battery with the car on should read higher, not lower.

Unfortunately, at the moment I don't have anything other than a way to test volts.

It may be worth a trip up to the store to have them test it.

Edit: I should also mention that I'm getting increasingly slow starts. Not sure if that helps with diagnosis...

Is there any way to tell if this the original 40yr old alternator?

 
Don't get too "fussy" with your meter. Analog meters may be off a bit. A "fully charged" "lead acid" battery is nominally 12.6V. Your meter might read anywhere from 12.2--12.8, let's say, and be "OK" for "that meter.

BUT it is NOT charging.

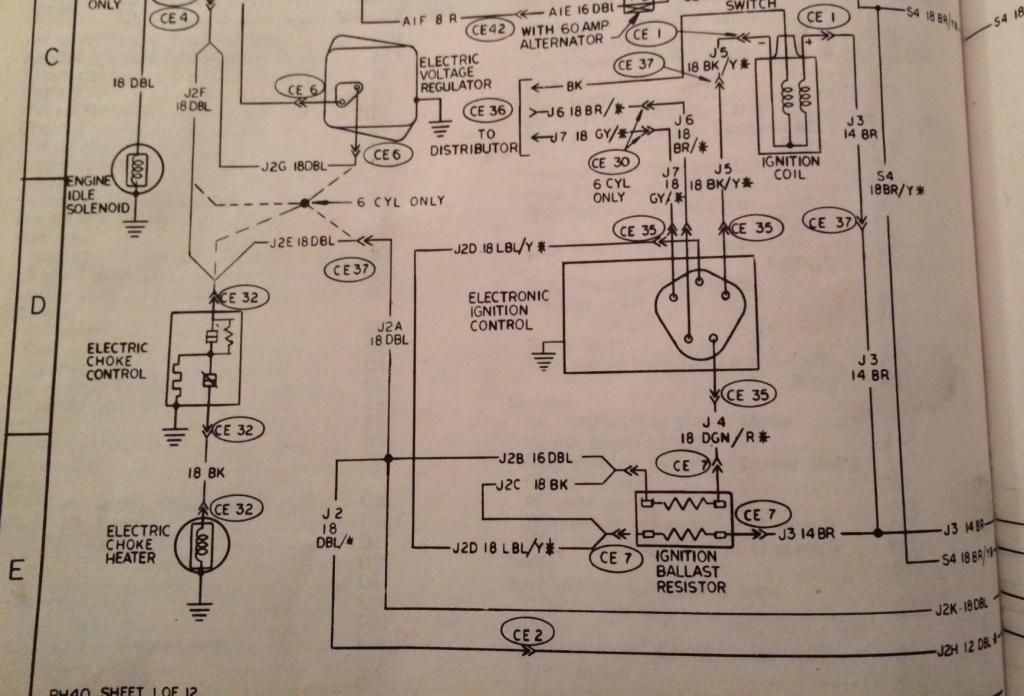
Here's a simplified diagram of your VR / alternator:


NOTICE that power comes from the "key", goes down and feeds the ballast resistor for the ignition

..........branches off from there and feeds the "I" terminal on the regulator..........

as well as one of the two field connectors on the alternator. This is normally blue or light blue at the alternator

THIS BLUE FIELD wire should be "same as battery" with the key "in run" and engine stopped.

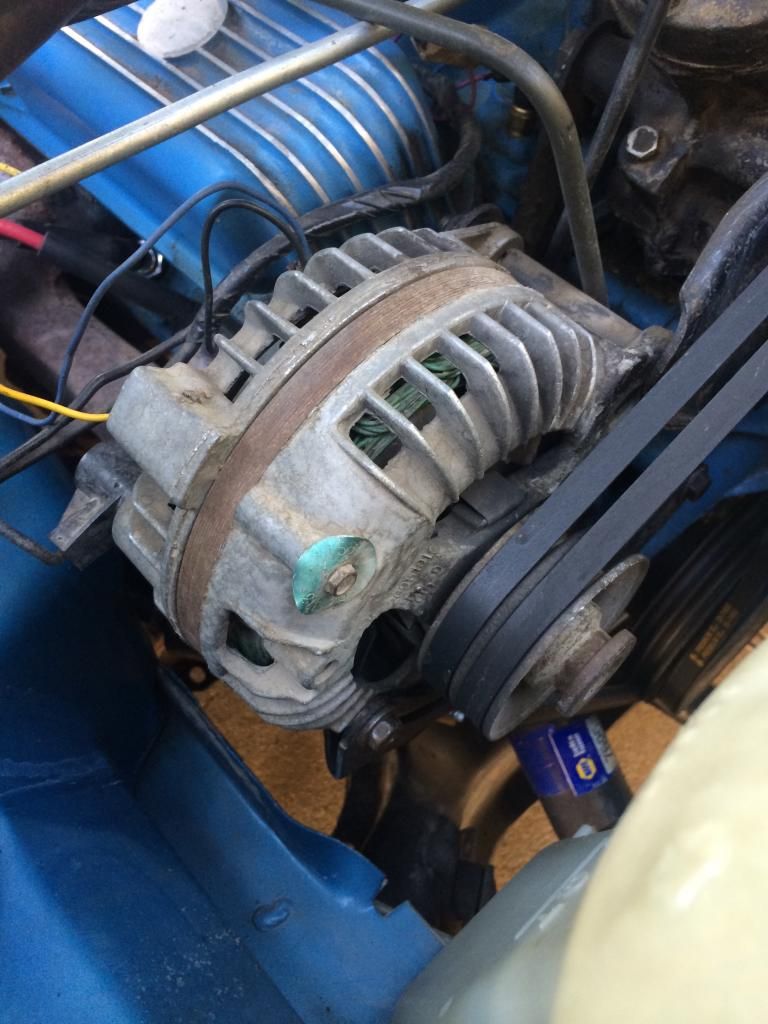
Remove the green field wire. Take a clip lead and hook to the alternator field terminal which you just unhooked. With the key in "run" ground the wire. In subdued light, you should see a small spark

Start the engine and slowly bring up RPM. It should charge. If not..........

go out and hook your meter to the alternator output stud. Check voltage while varying engine RPM

Very high......above 14V and way higher than battery.........means you have a break in the output line between alternator and battery

Very low, below 12.6 means it is NOT charging.

========================

If the above test DOES result in the ammeter showing a charge, now you either have a problem in the field wiring, bad regulator plug, UNgrounded regulator, or bad regulator

THE REGULATOR MUST BE grounded. Remove it, scrape it clean, and remount using star lock washers. The bolts MUST be tight.

WIGGLE the VR connector.

CHECK the wiring. One way to do this is to............

Remove the blue alternator field wire and ground that alternator terminal. Remove the VR connector. jumper between the two terminals. Run the engine and see if it charges. If so, the wiring is good. Again, suspect poor connections at the VR connector.

If you check all the above, and everything seems OK, replace the VR
 
A simplified test I would do first is to ground the field terminal while the car is running and see if your voltage spikes (might have to slightly rev it) but it should charge at full output when doing this test.
If the voltage climbs immediatly it's not the alternator.

This bypasses the regulator and everything while telling the alternator that full output is needed.
 
Thanks 67Dart273.

You once recommended I seek out a 74 Service Manual and I took your advice (having one of these is a huge help).

I'm guessing this may be the original alternator, the service states "Identification: with blue tag....60amp".
It clearly has a blue tag on it.
 
A simplified test I would do first is to ground the field terminal while the car is running and see if your voltage spikes (might have to slightly rev it) but it should charge at full output when doing this test.
If the voltage climbs immediatly it's not the alternator.

This bypasses the regulator and everything while telling the alternator that full output is needed.

Thanks! I'll go try that now...
 
A simplified test I would do first is to ground the field terminal while the car is running and see if your voltage spikes (might have to slightly rev it) but it should charge at full output when doing this test.
If the voltage climbs immediatly it's not the alternator.

This bypasses the regulator and everything while telling the alternator that full output is needed.

Make sure you get the right terminal. You must unhook the green and ground that alternator field. The blue should have 12V
 
I usually see 12.5-13.5 at idle...Alternators are easy to look at. Crack it open and look at the brush(s) they are spring loaded and touch the end of the rotor. They come out easily and are a few bucks at the parts store (check before you tear it open) most of the bad alternators just have brushes that are done, ground down to nothing. Get new ones, sand the contact path slightly to clean up the brush material and install. May need to solder the brush tail onto the alternator contact. Use a paperclip in the holes to hold retracted brush and put back together. Pull pins and rock on. Bad regulator can be tested by grounding the field term, alt should go full boogie ++++ Also check ground connection. Walmart doesnt sell bad batteries, they just sell same batteries that have the average 5% return rate, compounded over millions of users. Their house brand oil isnt bad either.
 
Make sure you get the right terminal. You must unhook the green and ground that alternator field. The blue should have 12V

Thanks Del
I didn't actually think to tell him not to ground the positive.
I better start thinking the obvious isn't so obvious.
 
ok, here we go....

Del,
I tried your recommendations. Got my lead on the alternator while not running, turned key to RUN, placed wire to ground and......NO Spark.

I got my keys out of the ignition, hooked everything back up, double checked my connections at the alternator, triple checked my battery connections, and made sure everything was back right.

I started the car to see if anything was maybe just loose and while i'm standing there, I keep hearing a popping sound.

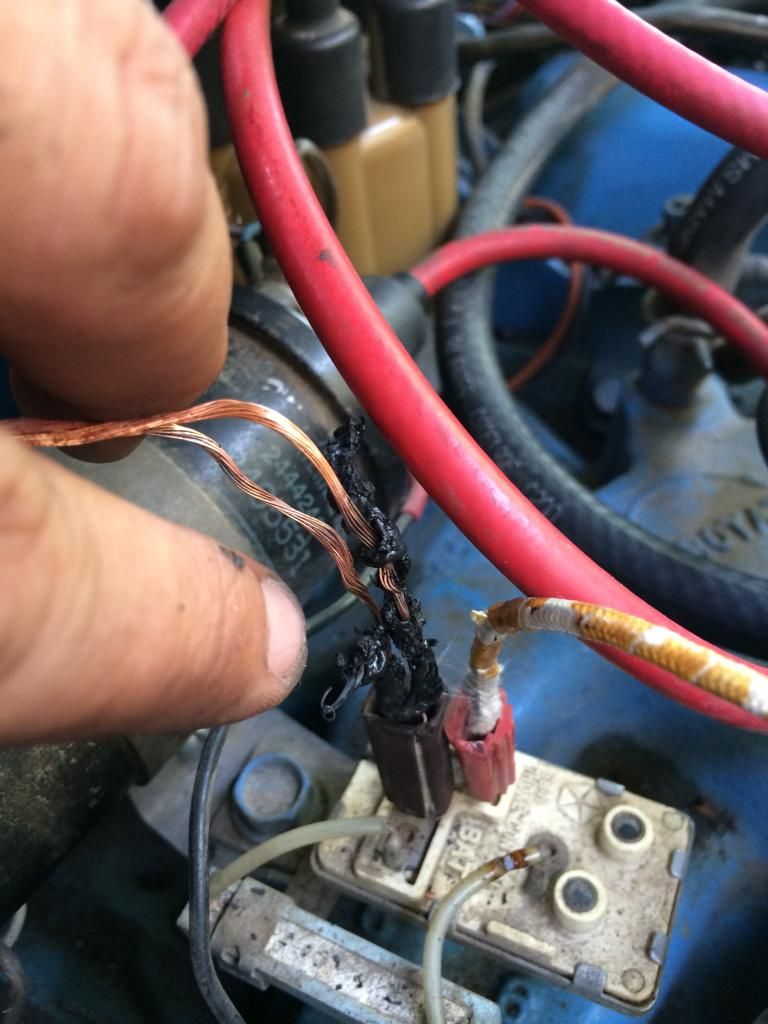
Soon after, I see a small amount of smoke and the engine cuts out. Then a larger, very larger cloud of smoke. I made sure everything was shut off and un-hooked the battery completely but, I think it was too late.

This is what is left of the wires coming off the balast at the electric choke control:


It burned clear through the insulation, all the way to the alternator.

Here's the connector, you can see where the burned wires were located at the bottom left.


I'm guessing I had a short.............
 
Marvelous. You are going to have to check the entire under hood harness at the least. In the old days, a dealer mechanic would have simply replaced the harness

"Red" (Redfish) has mentioned that "white" connector previously. It is not the cause of this problem, but it IS a problem causer. I would get rid of the connector while you are at it.

Easiest thing is probably to just strip the ignition harness out of the bay, lay it on a bench or scrap plywood, and nail it down so you know where all the branches go, untape / cut it open and replace wires.

or.....you are going to have to find a replacement.

Have you any idea what actually caused this?

The thing is, the ignition circuit is NOT fused except for the fuse link, which is nearly no protection at all

The ignition circuit (coming from the ignition switch) supplies and branches off to several things

The choke heater as you see

the ballast for the ignition

the blue alternator field wire

the VR "I" terminal

On some cars smog equipment such as distributor retard solenoids or the NOX "box" or idle solenoid on the carb. This varies from year to year and model.
 
Why do I get the impression that the box grounding from an internal problem could be the problem there?
That would melt those wires wouldn't it?
 
At least those melted connectors are easy to find and replace. They are termed "56 terminal" or "Packard 56" and can be bought on ebay or on-line auto electric sites. Re-wire w/ same color & gage wire. No sense fooling with an old harness since most 40-yr old underhood wires are degraded. I totally re-wired my 64 & 65 engine bays. Find the short to gnd before powering. You need a multimeter w/ ohmeter (free at Harbor Freight).

Re alternator. Easiest way to prove it works is to disconnect the factory field wires, jumper 12 V direct from BATT+ to one terminal (doesn't matter which, blue wire is factory) and jumper other terminal to ground. That applies full field current. The alternator should now give max output, which you will see on the dash ammeter. All that current goes thru the bulkhead connector (thick red & blk wires). Those often melt due to corrosion. Before that, verify that both field terminals are isolated from ground (ohmmeter), since a field short in the alternator could be why your IGN1 wires fried.
 
Sounds like the Alternator has a Dead Short in it.

Damn, you guys almost burned his car to the ground! ..... Lol, just messing!

I had a battery in one of my old little pick ups that popped out of the battery hold down and the + side hit the hood and grounded.... Burnt my whole harness all the way to the firewall. Nothing like a broke kid re wiring the complete under hood on the side of the freeway! haaaaaa

Sort of "messing" since anything can happen when messing with wiring.

I had a battery do that exact same thing except it did it while I was under the hood and the battery literally exploded.
There was battery acid everywhere, and I was so bent on getting it rinsed off that I just splashed my face with the water and started rinsing off the car.

That is why I am so ugly to this day. :D

JK

Haaa, Damn. Acid on the face is not good. And I thought I was Ugly! Lol
 
Well I wish I would have come in and checked before proceeding with what I did...

I got my burnt to **** alternator/electric choke / harness wire all redone and put on some new female connectors.

Thinking everything was ok, I decided to put everything back together and try to start it up. It kept cranking and cranking and then I saw it.....more smoke.

This time, it started coming from the area of the steering column (or so it seemed). I hurried up and got out to find that although my new wire job was ok, the old wiring that I didn't mess with (that goes to the firewall/bulkhead connector), was all burnt to **** like the previous attempt.

I'm not sure what the heck is going on.

It sounds like Bill gave some good advice about finding the short to ground, I just need to figure out how the heck to do that.

I just saw that multimeter/ohm meter at harbor freight, so I'll go grab one. I think they are $5 or something.
What reading am I looking for on the meter to find the short?

At least those melted connectors are easy to find and replace. They are termed "56 terminal" or "Packard 56" and can be bought on ebay or on-line auto electric sites. Re-wire w/ same color & gage wire. No sense fooling with an old harness since most 40-yr old underhood wires are degraded. I totally re-wired my 64 & 65 engine bays. Find the short to gnd before powering. You need a multimeter w/ ohmeter (free at Harbor Freight).

Re alternator. Easiest way to prove it works is to disconnect the factory field wires, jumper 12 V direct from BATT+ to one terminal (doesn't matter which, blue wire is factory) and jumper other terminal to ground. That applies full field current. The alternator should now give max output, which you will see on the dash ammeter. All that current goes thru the bulkhead connector (thick red & blk wires). Those often melt due to corrosion. Before that, verify that both field terminals are isolated from ground (ohmmeter), since a field short in the alternator could be why your IGN1 wires fried.
 
I wish you had, too. The BEST way to look for shorts is to THINK "what might happen" and then protect against it. Here's some of what I used to do

"Rig" yourself a selection of test lamps. You want these to draw various amounts of current

A good way is as follows:

Buy a store bought 12V test lamp. This is your "lowest current" lamp

Get an old stop / tail socket and bulb. You can rig this different ways..................

Twist both leads together and use the socket ground.........Lights both filaments, and is the "highest" current

Use the stoplamp filament only and socket ground.........second highest

Use the tail filament and socket ground...........third highest current

Use each wire lead for a terminal, and leave the socket unconnected. This runs juice through (in series) with both filaments and is your LEAST current draw

HEADLAMPS. Use an old headlamp. If you have a "good" low beam, this, just like the stop / tail lamp, gives you different wattage / current combinations

==========================

HOW TO protect

Easy. Disconnect battery ground. Hook one of your test lamps IN SERIES with the battery NEG post to ground. Now, if something shorts, the worst that can happen is that the lamp lights

NEXT............Let's say you THINK you found the short, aren't sure.

Remove your test lamp, now you can burn something up? What to do? EASY. Get a universal fuseholder from the parts store and about 3 boxes of 20 or 30A fuses. Make sure everything in the car is OFF, and pull out the dome light. Now, when you do your testing, with the fuse in series with the ground cable, you can NOT run the starter. But you can turn on "other stuff" like the key, and the worst? that happens?

You blow the inline fuse..............

Dad gummit I tried to warn you..............the ignition circuit is NOT fused.

The thing is, the ignition circuit is NOT fused except for the fuse link, which is nearly no protection at all

.
 
Del, I can't thank you enough!
And yes sir, you sure did! I just didn't get what you meant...yet. I get it now though! :)

I am on my way to get some supplies to do my testing.
I actually have an old working headlamp, so I'll use that method...

Since I'm kind of, almost, already there - I think I'll perform the MAD Amp bypass mod also. Probably a good thing anyway.
 
Why do I get the impression that the box grounding from an internal problem could be the problem there?
That would melt those wires wouldn't it?

What do you mean by the "box grounding"? Sorry, I'm not up to speed on these terms.

It's odd to me that only the ignition circuit wire melted. That leads me to believe that that circuit is not properly grounded somewhere.


I went ahead and performed the amp bypass mod. I removed and soldered the two wires (one red, one black) at the amp gauge. Maybe I should have just put them both on one lug...oh well.

I then went and drilled through the firewall connector and dash connector, making damn sure I had the right wires. Then added (soldered) the extra wire as detailed in the MAD walkthrough.

I'm not going to even think about trying to fire this up until I can make sure I check the shorted ground connection. The problem is, I'm kind of confused on how...or what...to actually check.

I'm asking myself, "where would the grounds be for the ignition circuit?" If I think about the wire routing, I come up with the same areas Del already mentioned:

1. Choke heater
2. Ignition balast
3. Alternator
4. VR

MadDart mentioned something about the alternator actually being shorted.

I had a thought, what if the VR connector is shot? On the VR connector side (part of connector that attaches the actual VR), there is no way to see how that connection looks without destroying it.

Sorry for thinking out loud, I'm just getting frustrated. Time to put down the tools and do some reading and thinking.

If you have any ideas, I'd love to hear them.
 
You need to follow what "melted." Those are your clues

Let's say power comes FROM the bulkhead on that ignition "run" feed and goes to the choke. Is it melted UP TO that point? Where does it branch off and go to FROM THAT POINT? If it uses that terminal as a junction and feeds from there off to the alternator and it's melted up to the alternator, then the alternator is a suspect

I "hope" you did not cause this in your testing. The blue alternator field wire is in that circuit. That blue field wire feeds power TO the alternator field. If that should become shorted, either because of something you did, or something wrong in the alternator, it could easily have caused that damage.

You have to go "back in time." Up until "smog stuff" there was not much stuff "under the hood" which the blue ignition FED

About all on my original 67 was the ballast and the VR IGN terminal. This is before the new style isolated field alternators, and before electric chokes, or any other smog gear

I guess Ma figured "it was worth the gamble." The original regulators had a "sort of" fuse built in. It was not replaceable, but it would blow out and protect the harness, and if lucky, would allow the car to run and limp home. What I'm saying there is "example" as in a problem / short in the alternator field.

BUT if you did "something" like say, allow the harness to become abraided, worn, bare wires, and short "on the body" ETC, then you could easily burn down the harness.

Now this happened to ME

In the early 70's some girl a-holed my 70 V code RR. While it was being ("fixed") by McCune Chrysler Plymouth in National City, and I do mean "fixed" the insurance co. lent me a loaner car, a beat up 70? Valiant.

One cold morning I started the car at the RADAR shop, let it warm up. My leading Chief, who was ALWAYS doing an impression of Columbo, came into the shop

"I have a question, just one question?"

"Yeh, Chief?"

"Is that loaner car of yours, is is supposed to squeal and smoke under the hood??"

So I go out there, and the alternator is STOPPED. Except the engine and belt are still GOING.

So I shut it off. I get a wrench and a rag. I loosen the belt, and I wiggled the thing for no good reason. And HERE is what happened, "follow along."

It TURNS OUT that a DIODE had fallen out of the frame of the alternator and down inside and STOPPED the alternator. But it had not SHORTED. BUT........LOL.......the WIRE was still connected. And when I came along and wiggled the damn thing, I got to stand there and watch the underhood harness go sssss.s.s.s..ssssssssssssssssss...ppphhhhhhhhhiiiiiiisssssisisiisishitssssssssssshitssssssfffffphphssssTTTT!!!!

And after it got done, the fuse link went "!!phft??!!" and blew out.

It was a mess. A smoking, black, smelly, smoldering mess. And now, I had no car

So I called the dealer, and I said to them, like this:

Send a wrecker out here, and send out another loaner car, because the underhood harness just completely burned up.

So they sent out the green card holder who could barely speak Heenglessh, in a beat up pickup with a set of booster cables.

And he looked under the hood. And he says to me, like this:

"Theese theeng won't run..........ees all burnned up een there!!!"

So I got to wait ANOTHER two hours while the dealer "sent out a wrecker" and "sent out another loaner car."

Hell I could 've had the thing half rewired by the time I got out of there, and it was my day OFF!!!


81sruds.jpg
 
Great pictures Del! That's a great looking car!!
 
Guess what?
The VR was NOT grounded. And you guys tried to tell me that. When I pulled the old one off, the screw flanges on the body were painted! I busted out my continuity tester and sure enough, not grounded.

I filed all the paint off, re-tested and my tester lit up nice and bright.
 
ok, so I thought I'd post about my progress since I still have a couple of questions...Please keep in mind that this is my first attempt at any kind of car electrical "stuff"...aka....I'm a big time rookie...

Del gave me some great advice about tackling one problem at a time, and that's exactly what I did.

My first step was the ignition circuit on the engine side (the one that got fried), hopefully I can explain this without making it too confusing:

I re-wired the ignition RUN as outlined in the master wiring diagram (Zone "E", listed as: J2 18 DBL/*).


What I did is run the Ignition RUN wire from the bulkhead harness, routed it the same way it went through the white connector (shown in the photo from my previous post), to the alternator field connection.

Important: I didn't re-use the white connector, just used it as a guide for wire routing.

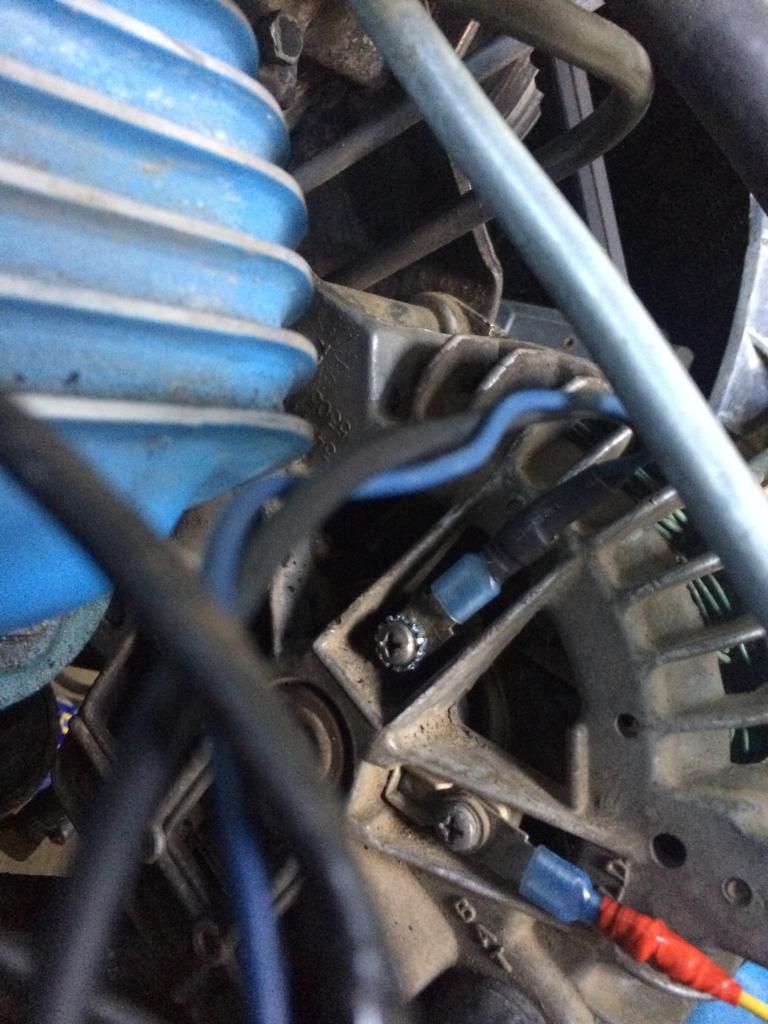
I then joined in the BLUE alternator field/voltage regulator wire into this same connection at the alternator field terminal. Here is what that looks like, it's the field terminal on the top (note: all connections are either crimped with butt connectors or soldered, and then heat shrink):


I then spliced in yet another wire from the Ignition RUN, going to the BAT of the electric choke, as shown in the wiring diagram. Here's what that looks like (I used the red wire):


While inspecting the wires at the white connector, I noticed the NEGATIVE wire (even though in this picture it has red heat shrink on it) to the ignition coil itself was exposed, so I replaced that wire as well.


Now this is where my question comes in...I could have sworn that there were two wires going to the electric choke before this all got burned up (see the photo in my earlier post with the charred wires). There was someone who mentioned on a different website that a coil wire, as well as the ignition run wire, connected at the electric choke. I studied the wiring diagram, and I just don't see a wire coming from the coil to the choke (do you???).


I opted to follow the diagram and only hook up the splice from the ignition run to the choke so, if that is not correct, I hope someone will chime in!

I verified all of the other wiring and inspected everything and they all looked ok.

Next step was a continuity test of the new Ignition RUN wiring I just did on the engine side of the harness.

I hooked up my tester and much to my surprise, the light came on and was steady and bright! :cheers:

THEN, I left the continuity tester hooked up, and checked the ignition RUN wire at the bulkhead connector and got.... a really dim flickering light.

With that said, it looks like tomorrow I'll be chasing down the (obvious?) short on the dash side of the ignition RUN.


Here are the other things I did today:
I did the AMP Bypass modification as detailed in the MAD walkthrough (http://www.madelectrical.com/electricaltech/amp-gauges.shtml

As described in the article:
- the alternator output "BAT" wire now goes directly to the BAT+ on the starter relay.

- the ammeter was bypassed at the dash by unscrewing the ring terminals and soldering the red and black wires together.

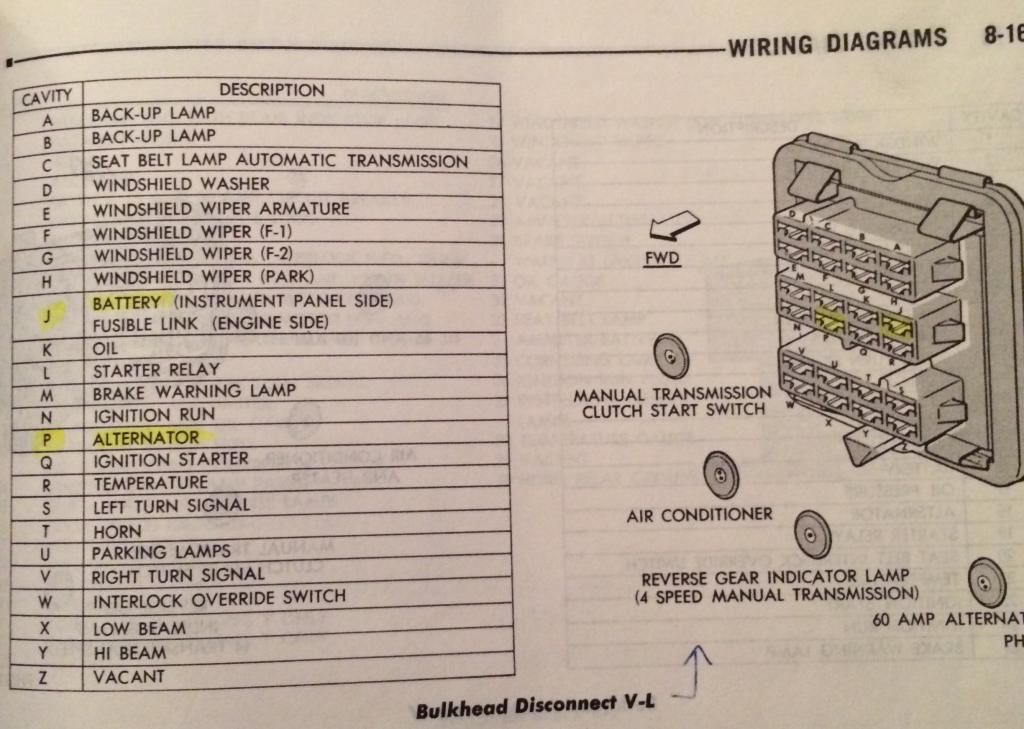
- the bulkhead connector was bypassed in the same manner they suggested. I drilled out holes for the Battery (shown as 'J') and Alternator (shown as 'P') wires:


- (This one sort of confused me) On the engine side, the Battery (J) and Alternator (P) wires were spliced together and then connected with the existing battery wire coming off the starter relay.

- I checked continuity of the bypass modification and my tester was steady/bright, so it appears I did it correctly.


Does everything sound correct to you all, up to this point?

For someone who has never done anything like this before, I'm having a lot of fun learning and am almost wanting to rewire my entire car. :D I'll take it one step at a time though...

I look forward to your comments/help/advice....
 
-
Back
Top