Legend of the Gold Duster... Well project that is !

-

DartThis74

Well-Known Member
Joined
Jan 6, 2008
Messages
486
Reaction score
5
Location
Houston,Tx
Hey yall ! I thought I would now start a lil thread on the '74 Gold Duster project that I am working on now. I figured since I've been asking yall help on it that you should see what you are actually getting to help me with lol. It's not much now but hopefully in a couple of months it will be making the neighbors very mad hehehe.

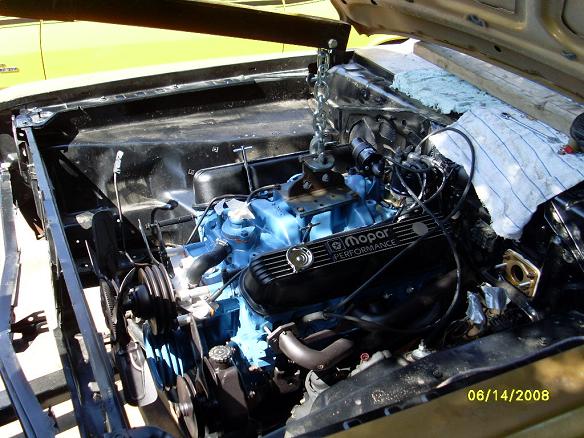
I guess I could say a little something about the car anyway now that I'm about to let yall see it. To start with, last summer I finally decided that since I had a new job and a source of income I would buy another mopar for me to drive to college when I move off when May rolls around. Well.. we were at a car show in a town near by and a fellow heard that I was looking for one. The guy said he knew of a gold duster that was a mile away and took us to see it, I thought it was a potential candidate for a good project so I called the guy up who owned the shop it was at and met with him. He wanted $900 for the car and it came with the ever so popular slant six. Already owning a dart with a slant I wanted to go the 360 route this time, so I am now in the process of converting over to the 360. I plan to just shoot the car in flat black primer and drive it to college. Anyway here are some pics now that you know the story on the Duster.

Bringing the bundle of joy home for the beginning of a new transformation !
2qlfqiv.jpg

oka96t.jpg

2rgg9hs.jpg
 
Congratulations on the new ride! It looks like a good foundation car. BTW: I like the spare tire carriers on the trailer. That is great!
 
Now here are some pics of the engine bay painted with the new front suspension rebuild along with the new k-frame and master cylinder. Also a pic of when I was fixing the finder, I had to replace a lost bolt where it goes through a tab on the firewall and fix some rust issues.

263iwxd.jpg

ra6fc9.jpg

2rmqff8.jpg

2u3xx6t.jpg

b6a3rm.jpg
 
Thanks I appriciate it !! yeah.. they came in handy when we were trailering my Dart back home one night from Dallas. One of the tires blew on the trailer and we had to pull over in some vancant lot in an area that didn't seem safe of course. and the funny thing is, is that the jack in my dads truck wasn't able to lift the trailer up high enough so I thought I'd whip out the handy jack from the dart.. That bad boy lifted the trailer up just fine hahah.
 
Here's a few more pictures of the progress on the Duster.

Got a blanket of snow a few weeks back.
2369418239_650247cfdc.jpg

2058261048_0448809dc3.jpg


Went to Tractor Supply for some metal to patch in the rust holes. Passenger side was the worse as you can see.
2370254036_5e26c04e84.jpg

2370254508_5d85604b4e.jpg

2369420323_aff4322f3f.jpg


Haha I got myself a good farmers tan this day from welding. Not a good idea to weld in short sleeves, but hey it was hot outside lol.
2369418847_d2ef5f1af7.jpg


More to come in the near future. I should be getting the engine back in a few weeks along with some new seats hopefully... Stay posted Ya'll8)
 
Here are some new pictures of what I have been doing this weekend with the duster. I cleaned out the truck to see what I was dealing with, found some rusted holes as you can see, but other than that it was a very clean truck. I was surprised !!

Also, we started to install the new wiper seals since the old ones were brittle and leaked.

i2vija.jpg

11r4rae.jpg

2entj7m.jpg

245wq6d.jpg

907x8l.jpg


Got more pictures coming soon after we install these bad boys!!
 
Alrighty ! finally got the fresh 360 back from the machine shop yesterday morning and I'm very pleased with the work done on it:cheers:.
The 360 was bored .30, installed hypereutectic flat top pistons, picked up a dual plane M-1 intake. Installed a lunati voodoo cam and spring kit (kit 60401lk) and feeding this little monster is a 750 Holley 3310. Bought some Dynomax headers and can't wait to get this puppy started. Hopefully in a week or so we can get a video for yall to see on this new engine.

This is the before pictures of the engine.
33dau4p.jpg

fcinvn.jpg


And these are the after pictures !
(notice the water pump pulley is on backwards, I stuck it on just so I wouldn't lose it lol)

2rw98nm.jpg

35c4ltt.jpg

1w8ix.jpg

vs2tc0.jpg

 
You folks may have noticed some tell-tale signs that this engine came out of a van - very tall alternator bracket. Can some of you with small blocks post some good close-up pics showing your engine from a few different angles. Aaron and I need to see your alternator, A/C, and power steering brackets and how they are mounted.

Jerry (Aaron's dad)
 
was that a miller welding helmet i spy?

thats a nice looking 360.

whats that other emblem on the tail light panel?
 
Yes you are correct. I have 4 autoshade helmets and I love them, those auto shade helmets are one of the best things since sliced bread, as far as welding goes haha.

What you see on the tail panel is the emblem put on by the dealership where the duster was bought, which apparently was sold about 30min north from us !!
 
Here it is, the moment of truth... will it fit?

2585478512_fd699b5b4b_o.jpg


YES! It does...

2585478604_5024f83831_o.jpg


What a Father's Day weekend we had!!!

Got the engine, transmission, and headers installed. And, amazingly enough, it all seems to fit, so far. Talk about a tight fit with those Dynamax headers, but they're in there. I'll post some close-ups later.

Overall, a very productive weekend. Now, for the rearend and drive shaft...

Jerry
 
Still need a pic?

I have a 360 from a truck that stil has all brackets on it.

Could post a pic if you think it'll help.
 
Looking good!

You said those are headers? Is that #3 cylinder tube routed over the # 5 & #7 plugs and drops behind the #7 tube?

Any issues with plug wire routing or starter wiring? What is your overall opinion of them?
 
Wow nice project you have going there! I really wish I could find such a clean car for 900$ around here! Hope to see more progress in the future.
 
Still need a pic?
I have a 360 from a truck that stil has all brackets on it.
Could post a pic if you think it'll help.

Thanks resto, but I believe we have it figured out now. Aaron bought an alternator bracket from Bouchillon and it worked out great. We also figured out the power steering pump brackets.

Here's a clue for you newbies...
Don't degrease and clean up your old parts until you know where they all go back together. Thankfully, we were able to match up old lines in the grime and marks where washers or nuts were tightened down, to mate up the old pieces.
 
Looking good!
You said those are headers? Is that #3 cylinder tube routed over the # 5 & #7 plugs and drops behind the #7 tube?
Any issues with plug wire routing or starter wiring? What is your overall opinion of them?

Yep, that's exactly what the #3 tube does. The #5 and #7 plugs are a pain to get to, but I think a swivel joint socket extension will be the ticket there. Aaron bought a cut-your-own set of ignition wires. The plug boots for those two cylinders were too tall, so we cut off the straight ones and replaced them with 90 deg boots. They tuck nicely under the #3 runner. I'll post some pics soon.

The instructions for installing the headers said to put the starter in first, while the headers are loose. Of course, we didn't read that sheet until everything was bolted up tight, but thankfully, Aaron managed to get the mini-starter installed without much trouble. It's a good thing his hands are smaller than mine.

Jerry
 
Thought I would show what we had to contend with on Aaron's new Mopar Performance aluminum valve covers. They come with one hole and one knock-out. He used the hole in one cover for the oil filler cap and the hole in the other cover for the breather. When we popped out the knock-out in one of the covers, we found that the PCV grommet he bought from them (MP) would not fit - way too tight.

Fortunately, I had a sanding sleeve and drum that was just the right size to fit into the hole. I chucked it up in the drill press and Aaron and I were able to enlarge the hole, bit by bit, making small circular patterns, until the grommet fit neatly inside.

2710766653_3d7f22b3a6.jpg


The next problem was the thickness of the reinforcing boss that was cast in the underneath side of the cover. The grommet was not as deep as the boss. So, I chucked up a 3" abrasive cut-off wheel and used it lying flat in the drill press to grind down the boss until the grommet would fit.

2710766753_5cffc2e220.jpg


I always say, "There's more than one way to skin a cat."

Jerry
 
-
Back
Top