My "new" '74 Duster- or why I need a project like a hole in the head

-
I know at least one guy that has run 275's on the front of a Duster on 17's, FWIW. But it would certainly solve the potential issue of the tie rod end.

I understand about the utility. I brought an 8.25" axle home for my Duster in the trunk of an '86 LeBaron 4 door back in the 90's, because that is what I had.

Sorry, I should have research instead of asking you about the shocks. I usually try an find my own answers if I can and didn't think before I asked, could have figured it out and saved you from the early onset of carpel tunnel. ;-)

I'm loving the gauge cluster, wish it had been an been an option in '74. Don't really want to cut my dash up, but it makes it tempting.

Any full interior shots?
 
Yeah I've seen one car for sure that had 275/40/17's on 17x9's, but after talking with the owner it was right on the fenders and the tie rods. Going 18's at least solves the tie rod issue. Plus I can run 14" rotors :D.

I love the rally dash, it looks so much better than the standard 72+ dash. But I wouldn't cut up another standard dash like I did for this one, the rally dash metal is easy enough to come by and modifying the standard sheet metal isn't the easiest thing to do and have look right. Swapping the wiring and everything else wasn't that bad though. I'll try to get some decent interior pictures up in a day or two.
 
He bro you have done nice work at your duster i hope you have many fun with it :)))

and i hope you give us a nice burn out video.
 
Plus I can run 14" rotors :D.

:thumleft:

I love the rally dash, it looks so much better than the standard 72+ dash. But I wouldn't cut up another standard dash like I did for this one, the rally dash metal is easy enough to come by and modifying the standard sheet metal isn't the easiest thing to do and have look right. Swapping the wiring and everything else wasn't that bad though. I'll try to get some decent interior pictures up in a day or two.

I'd swap dash frames in a heart beat if I didn't have the issue of a VIN tag riveted to it. Rather not swap it between frames and have the wrong rivets and I don't want to find some place to store the original dash as I don't have a garage. So, other than the custom cluster ideas I have floating around in my head, I'm stuck living with the later cluster. Oh well.
 
Sweet I am glad I found your thread on the home page. You have done ton of work and it looks great. The video is awesome.
 
Enjoying every minute of this build, good work.
Boy, does that cam sound good!
 
Thanks again for the replies guys!

The burnout video is going to have to wait until I get the 8 3/4 in it, I think any attempt at a burnout with the 7 1/4 will probably leave the ring gear laying in the street. Once the 8 3/4 is in I need to look for a dyno, would like to get the final tuning on the 340 dialed in.

@ Dion, there are places you can get the rosette rivets...

Here's a few pictures of the interior as it is at the moment. I've still got a few things to clean up to finish up the fold-down conversion, then I'll get a thread about it up and some more pictures here.

IMG_5170_zps9709f862.jpg


IMG_5173_zps20a8aa1b.jpg


IMG_5176_zps782af97e.jpg
 
Wow! That came out great!

Can't wait to see it with the 18's on it.

What are your plans for brakes?
 
The brakes are kind of a long story...

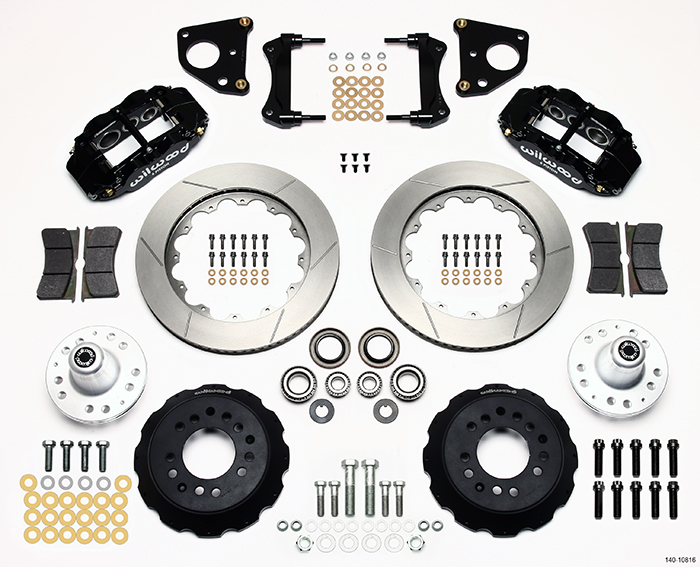
I bought my rims thinking they would fit with the 11.75" rotors I already have on the car. They don't. :violent1: The hub bore is too small, and I don't want to machine this particular set as there isn't a ton of material if I take it all the way out to fit over the center register of the 11.75's. Unfortunately, I also bought a set of rims that have the absolute minimum backspacing I need to run 275's.

So, long story short, I'm looking at a set of 6 piston Wilwoods, and since the 14" rotors are only $150 more than the 12.88's I'm looking at getting the 140-10816 kit. I already have the B body drum spindles for that kit anyway, and it's the only kit I've found so far that doesn't increase the track width any at all, the 10816 has a 0 offset change. And that's for a set of B body drum spindles, so I may actually gain a little space on the fender.

140-10816_kit-lg.jpg
 
Why not machine the rotor hubs down to fit the rims? Assuming I am understanding that there isn't enough meat in the rims to machine them out to fit the rotors.

Do the B-Body spindles use the smaller inner bearing? Or do they use the later large inner bearings? Not familiar with the B-Body spindles and how they are different than the A-Body spindles. I assume they use the same geometry, though.

Because of the geometry of the rims I'd need to take about .2" out of the hub, and it would have to go pretty deep into the hub as well because the face of the rim is pretty narrow (7/8"). Basically its needs enough taken off the hub to make me start thinking about the strength of the hub. It would probably be fine, but I'm pretty committed to running larger brakes at this point. I've come to the conclusion that I bought the worst possible set of rims to try to stick on this car. They look awesome, but there aren't a lot of options to actually make them work. But like I said, buying a new set of rims AND brakes will set me back as much or more than just the "right" brakes, so what the heck.

The B body drum spindles use the smaller inner bearing, but the larger upper ball joint. And after measuring the offset on the spindles it looks like the track width is about 3/16" narrower than the 73+ disks, so they should buy me a little bit of rim offset as well. The rest of the geometry is the same.
 
Ok, not to bump myself but here's the final product for my fold down seat conversion.

The beginning...

IMG_1435_zps7d079e8e.jpg


IMG_1436_zps03d3084b.jpg


And the end!!! One fully functional, although not 100% stock, fold down seat. :D

IMG_5184_zps640fc7a1.jpg


IMG_5186_zps7586c942.jpg


IMG_5114_zpsc214ecc7.jpg


IMG_5191_zps79c756b7.jpg


IMG_5216_zps081d9461.jpg


Is that carbon fiber vinyl? Why yes, yes it is...:D

IMG_5182_zps7108e18f.jpg


Anyway, there it is. I have a full "how-to" written up in the thread linked below, including everything I did to make the fold-down seat conversion without totally sacrificing the structural integrity of the car, and maybe even improving it along the way.

http://www.forabodiesonly.com/mopar/showthread.php?t=258695

It will definitely help in hauling the larger parts back from the swap meets (fenders, for example) for my other projects. Always need more room!

IMG_1332copy.jpg
 
Wow, that came out nice!

Makes sense about the brakes. 14" rotors will look better in 18" wheels anyway.
 
Wow, that came out nice!

Makes sense about the brakes. 14" rotors will look better in 18" wheels anyway.

Thanks!

Yeah I just screwed up with the rims. And unless I sell the rims local without taking a big price hit (yeah right!), I'll end up spending the about the same amount. And there's always the wild card of another set of rims having a different fit issue, gets entertaining when you get down to a 1/4" of clearance here, 1/4" there etc. Better to just take my lumps now instead of ending up spending more money trying to fix it cheaper.

They will look nice! :D
 
Another update!

8 3/4 is in FINALLY. 742 case with 2.93 rear gears and an original clutch-style Sure grip. I also installed the hanger/shackle offset kit and AFCO leaf springs. The Afco's are 121 lb/in springs with a 5" arch (#20231M). I think typically these are circle track springs, but they're set up with a reinforced front arch so they fit the bill. Only minor snag was the 1" rear eye, but I found a set of poly's for a Jeep that fit the bill.

IMG_1541_zps06a3f1bc.jpg


I was hoping that the 121 lb Afco's would end up close to zero arch, as they're only a bit stiffer than the stock rear springs. Looks like I hit it right, as they sit pretty close to zero arch, just a little above. I'm a little concerned how much they'll sag, but since I'm slow in posting this they've been fine for the last couple weeks. My XHD's on my Challenger had already sagged significantly at that point. If they do I can always bump to the next step up at 142 lbs, but since I'm planning on an adjustable rear sway bar I don't want to go too stiff on the rear spring. 225/60/15's are still on, look at all that room for bigger tires! 8)

IMG_1544_zps2edc759e.jpg


Here's the ride height as it sits right now. I've still got some room to lower it in the front, but it's getting close to where I want it.

IMG_1550_zps77c5efc4.jpg


Next up is showing off my new March serpentine pulleys, and installing a Ford Contour electric fan set up so I can get rid of the power sucking flex fan I've got on there right now.
 
Last edited:
Alright, next installment. Wiring hell.

I had a mechanical flex fan and the stock skinny fan belts on my 340 to start out with. I quickly found that no matter how I shimmed the pulley's or how tight I made the belt I would toss it whenever I really stabbed the throttle. Probably because of the stupid flex fan grabbing a tremendous amount of air. Not good! I was also having a hard time warming the car up and keeping it at temperature, the combination of flex fan, 26" aluminum radiator, and high flow water pump was actually cooling the car TOO well.

So, I bought a March serpentine conversion with alternator bracket, and upgraded to a 100amp Tuff Stuff alternator to handle the load from my new electric set up. Goldduster318 was kind enough to post up his conversion to dual electric fans using a set up from a Contour, so I did a little research and decided that was the way to go!

The fans come courtesy of a 1995-2000 Ford Contour. Dual electric fans, high and low speed, with a shroud that just about fit my 26" Champion radiator like it was made for it. To get it mounted I added a couple of 1/8" by 2" aluminum bar, and used the original mounting brackets on the fan.

IMG_1558_zps3b79216a.jpg


I bought the fans new (Dorman 620-104), but hit the local PickNPull and picked up a spare set up that had the complete harness still attached. The entire set up is routed through a Dakota Digital controller, PAC-2750. It lets you program all the on/off temps, uses my autometer water temp gauge sending unit, and even allows me to program the fans to run after shut down for up to 5 minutes (and kills the fans if the battery gets low).

Dakota Digital Programmable Dual Fan Controllers PAC-2750

I did have to buy an extra relay for the dual fan set up Dakota Digital Relays with Wiring Sockets RLY-3

Followed by what I like to do LEAST, I wired this whole set up, along with finishing my battery cut off switch and relay to finally complete my battery to trunk relocation. I had been driving the car, just not with the cut off.

Anyway, the final product. Pulley's installed, no more belt throwing. Fan installed with 180* thermostat. No more flex fan, more horsepower, and shorter warm up times.

IMG_1559_zpse3b2d10c.jpg


IMG_1563_zpsdd343921.jpg


Special thanks to goldduster318, he made up an AWESOME pdf presentation about how to set up the whole fan installation and wiring. :thumbup:

And just as a bonus, the diagram I made up for my battery relocation, cut off, and relay...

batt-cuttoff_zps468a9a9f.jpg
 
Last edited:
great build with lots of great ideas. your dash looks awesome.
 
great build with lots of great ideas. your dash looks awesome.

Thanks! :thumbup:

My budget kind of requires that I have "great ideas", which is why this forum is so great. :D I see all kinds of great ideas on here all the time, like goldduster318's Contour fan install. Sure, it was a little labor and fitting, but I only have a little over $250 into the whole thing. It's great to be able to re-task OE parts that I can find in the junkyard or at the local parts place for a fraction of the cost of some fancy aftermarket piece.

The dash was just a lot of time, and a little legwork getting Detriot Muscle Technologies to make the lower rallye dash overlays. Makes the whole dash restoration process A LOT easier.
 
I'm glad you're happy with the Contour fan setup. It's worked very well for me. I know the OEM ones last a very long time. The originals were Bosch. An OEM design is usually more proven out than the aftermarket ones. The contour V6 is a great example of 10 lbs of crap in a 5 lb bucket and having a small radiator opening, so this is a beastly fan. If anyone else wants my PDF, I'd be happy to e-mail it.
 
Ok, here we go again. As I'm sure you've noticed by now, my Duster is a '74. I was never really a fan of the '74 bumpers, and I'd heard that they're pretty heavy. So, I picked up a 71/72 bumper to lighten things up and improve the cosmetics. So here we go with a '74 rear bumper swap.

This is my starting point. Your basic 1974 Duster bumper. Big, ugly, and with the old plastic filler that's seen better days.

IMG_5222_zps27c2398d.jpg


IMG_5226_zps33efebe1.jpg


So out come the tools, and off goes the bumper. I'd heard these things were heavy. Let me tell you, they're REALLY HEAVY. Like, difficult to move by yourself heavy. Anyway, so here we are without the bumper.

IMG_5227_zps7702bd3e.jpg


See the arrow in the picture above? Well, thanks to Ma mopar not changing the tooling for the rear frame stubs, there's a hole behind that panel...

IMG_5231_zpsa80af90a.jpg


That hole is actually one of the locations for the bumper brackets on the 71/72 cars. Drill that out, and bolt up the bumper. This is where I get an "F" for my "how to", as I didn't take any pictures of the 71/72 bumper at this stage. Needless to say, I used a 71/72 style bumper with the matching brackets. I didn't use the far outer "C" brackets, as there's no bracing behind the panel there like on the 71/72 cars.

Now, the problem comes in that the old shock mount brackets go through the spot where the other hole in the 71/72 bracket is located, it goes pretty much right in the middle of that big hole the shock goes through. But, the shocks bolt to the frame about 8" back, and rather than weld a fill plate into the hole, I just made a new set of bumper brackets to bolt to the old mounting holes. I just used some 1/8" angle I had laying around.

IMG_5235_zps124ab82c.jpg


And used that to back up the bracket on the 71/72 bumper.

IMG_5237_zps5212332c.jpg


No, that's not as beefy as the shock mount was. But, I suspect its fairly close to on-par with the original 71/72 mount. I could have just welded a piece of 90* angle to the frame, or just welded a patch into the lower panel, but I felt the bracket was a decent way to go. While it really isn't an issue on my car, it would be reversible as well should someone ever want to put a '74 bumper back on.

And here's the finished product! Nice, neat, tucked in bumper. And a weight savings that probably approaches 3 figures. No, seriously, not kidding. Removing the original bumper and replacing it with the earlier version actually raised my suspension in the back by almost a 1/2". The springs, which sat almost exactly at zero arch before, now have a slight arch to them.

IMG_5238_zps8c2c1f04.jpg


I still have a little work to do. Notice the exhaust pipes? They were pretty much flush with the old bumper, which tells you how far that '74 bumper really sticks out! And, there's still the matter of a slight gap at the quarter. The '74 and up cars had a larger section cut out of the quarter for the bumper and that rubber filler, so a larger gap than normal is left between the bumper and quarter here.

IMG_5239_zps989e8713.jpg


It's just big enough for it to look "wrong", especially since the bumper fits so well everywhere else. In my case, I'm not worrying about it for now because I plan on putting a Demon tail panel on my car, and when I do I'll weld in a filler strip to take care of the gap between the quarter and new tail panel. Otherwise, a piece of weatherstripping or similar could be used to fill the gap.

So, that's it for the moment. I have my last few big ticket items on order, trying to have this thing sorted out soon so it can make some appearances at the shows and track this season.
 
Great job on the bumper.
I was thinking about doing just that on my '74 Dart Sport just the other day!
Amen to the weight of those things, they must weigh over 100 lbs on their own, i know i had a heck of a time lifting mine when i did some quarter panel repairs last year. I just thought i was weak!

Thanks!

It's a pretty simple job, you can probably even get it done without having to weld anything if you just bent a piece of flat bar. 3/16" would probably be ideal. I'm happy with how the bumper looks, but I may re-do the brackets at some point. They work, but aren't exactly what I envisioned. The nice thing about the whole thing is that the outer mounting holes support the bumper just fine, so its easy enough to take the brackets off and make new ones. Maybe when I swap the tail panel.

As far as what the shock mount rear bumper weighs, I'd put it around 100lbs no problem. I might have to buy a scale, I'm curious now.
 
I have a Hang 10 rear bumper with the aluminum brackets and it weighs about 45 lbs without the shock absorbers, i thought of going this route too and keeping my '74 bumper.
I don't know if i would use a bumper jack on your set up though, what do you think?
 
I have a Hang 10 rear bumper with the aluminum brackets and it weighs about 45 lbs without the shock absorbers, i thought of going this route too and keeping my '74 bumper.
I don't know if i would use a bumper jack on your set up though, what do you think?

As it sits right now, no I wouldn't use a bumper jack on it. But I wouldn't use a bumper jack anyway, those things are scary. I keep a bottle jack under the spare tire. :D

I may rework that inner bracket, I have an idea to beef it up. I'd have to add another captured nut in the frame though if I really wanted it to work well. I may not worry about it, it holds the bumper on. I don't think those bumpers were that strong originally anyway from a collision standpoint.

Wow, I just read through this thread. I am very impressed with your work!

Thanks! :thumbup:

I do what I can. Not all of its "pretty", but I'm not building a show car. I don't think I really understand show cars anyway. I like to drive the crap out of my cars, so most everything is function based.
 
-
Back
Top