My "new" '74 Duster- or why I need a project like a hole in the head

-
I bought a 75 shock mount bumper for the front of my duster just because it was reasonable and the chrome was really nice, just for the bumper not the guts.
I bet that SOB weighs 150 lbs.
I bet the stock 73 weighs 1/2.
 
Really a good build. Well thought out and executed and some good ideas there.
Since you aren't a stranger to AFCO products, and if you want to adjust your rear height, consider adding some rear spring sliders and get rid of friction and 30 year old shackles to boot. Also negates the change in spring rate as the rear shackle moves through their arc. Depending on how you mount them you can alter your rear height too.
Read more than you probably want to know about them here. Happy reading!

Especially the Yellowbullet posts. Tons of good information to be found.

https://www.google.com/webhp?sourceid=navclient&ie=UTF-8#q=spring+sliders+yellowbullet+forum

Alan
 
You know the "It's just going to be a driver" thing is a lie we all tell ourselves don't you?
 
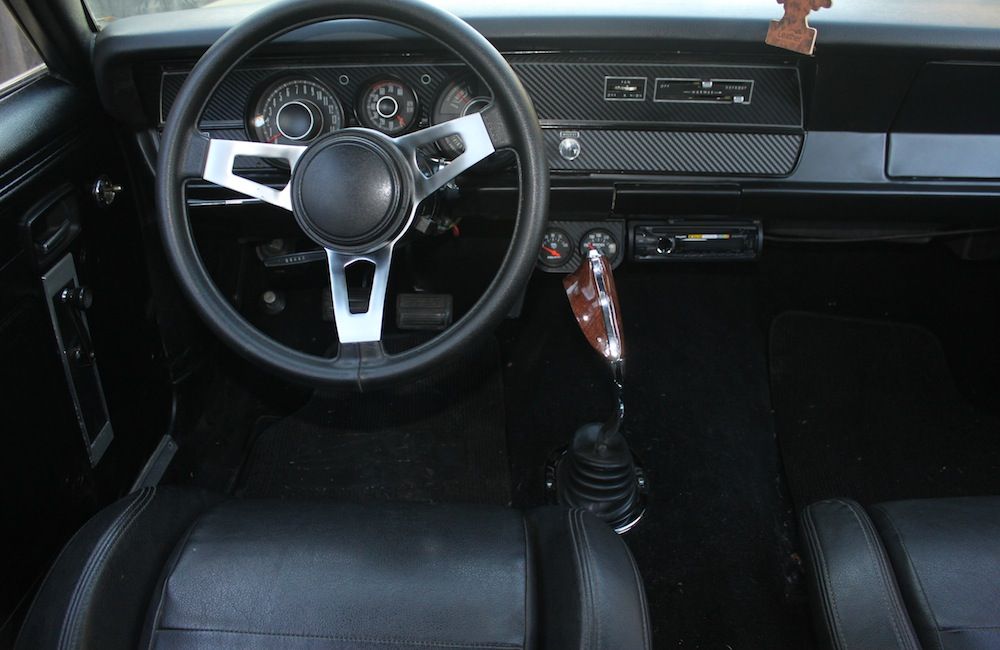
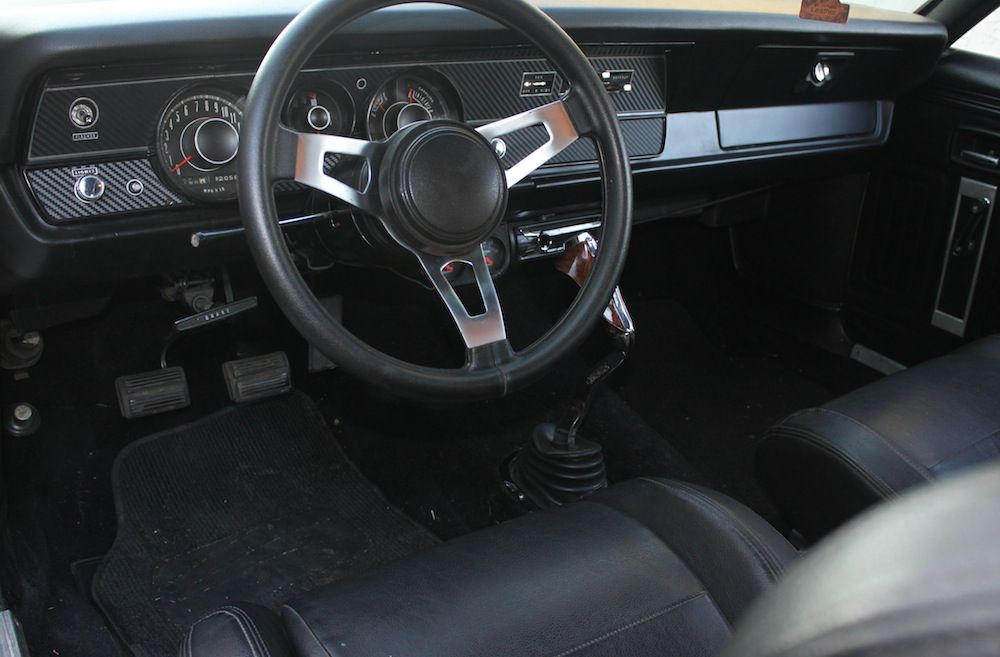
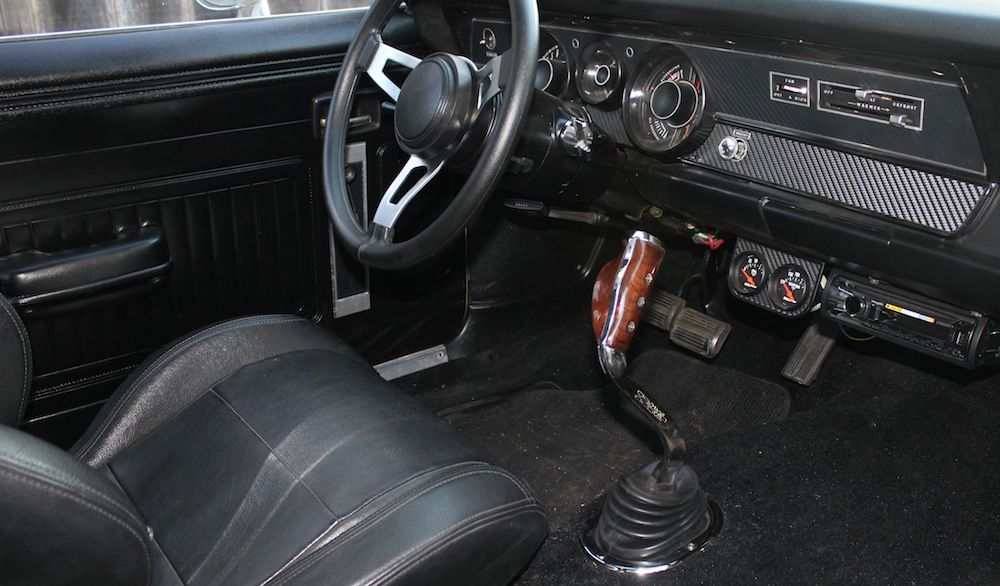
that is the coolest instrument cluster I have ever seen, where can I get one?

The cluster itself is just a rally gauge cluster out of a '69 Barracuda. I added the 150 mph speedometer from a 70/71 340 rally cluster, and bought a reproduction tach. Because the rally dash bezels are often broken (mine was), and I didn't have the originally rally dash in my car, I cut the bezel down and when I repaired it to make it even instead of having the stock "leg" hanging off. All of that is covered in pretty good detail earlier in this thread.

The carbon fiber is just an overlay, made by Detroit Muscle Technologies. He made the upper overlays already, but I was able to send some bezels back and forth and he now makes the lowers as well. His store is here http://stores.ebay.com/Detroit-Muscle-Technologies-LLC

Rally clusters are easy enough to find used. The entire metal dash is different, but you can find those as well. Or go the cheap, labor intensive route like I did and modify the original dash. And the overlays can be purchased from DMT.

But my cluster has a lot of custom work, so if you want one "just like" mine I guess the short answer is you have to make one, because you can't "get" them.
 
Really a good build. Well thought out and executed and some good ideas there.
Since you aren't a stranger to AFCO products, and if you want to adjust your rear height, consider adding some rear spring sliders and get rid of friction and 30 year old shackles to boot. Also negates the change in spring rate as the rear shackle moves through their arc. Depending on how you mount them you can alter your rear height too.
Read more than you probably want to know about them here. Happy reading!

Especially the Yellowbullet posts. Tons of good information to be found.

https://www.google.com/webhp?sourceid=navclient&ie=UTF-8#q=spring+sliders+yellowbullet+forum

Alan

Thanks!

I actually considered going to sliders, but with as much as I was changing already I kept the shackle set up. I didn't really know what the ride height of the AFCO's was going to look like, since I hadn't seen them mounted on a Duster before. So that was part of it too. And I already had an offset hanger shackle set.

Might be something I look into in the future. Hopefully this thing will get some autocross or track events this year and I can get a better feel for how its set up.

You know the "It's just going to be a driver" thing is a lie we all tell ourselves don't you?

Well, yeah. :D But believe it or not, its still going to be my driver. I'm making progress on my list, when I get to the end the Duster will become my daily and the Challenger will get some overhaul work done on it. I'm already driving the Duster more than the Challenger.
 
Another addition to the thread. I actually installed this before the bumper, but hadn't got around to posting it up. Wideband A/F gauge from Summit. I'd been thinking about getting an A/F, then summit put their's on clearance for $175. :D

Summit Racing SUM-G2995

Uses Innovate's LC-1 controller and a Bosch 02 sensor. I welded the bung into the exhaust a little behind my header on the driver's side exhaust, drilled a hole in the 4 speed hump and put the LC-1 controller under the driver's seat. Used an el-cheapo plastic gauge mount and cut it up, made a bracket to bolt to the dash under the steering column cover. I may have to re-think my bracket, the gauge needs to be a little higher. The calibration LED and button are next to the lighter in the dash ashtray.

IMG_5251_zps3f2d8a41.jpg


Turns out I'm not too far off with the stock jetting and set up on my Holley 770. Going to go up a bit on the pump squirter and maybe a couple sizes on the secondaries, primaries seem right on.

Also dropped my rims off at the machine shop to have the center register opened up a bit. Waiting on one more package for the brakes. :-D
 
Last edited:
As it sits right now, no I wouldn't use a bumper jack on it. But I wouldn't use a bumper jack anyway, those things are scary. I keep a bottle jack under the spare tire. :D

I may rework that inner bracket, I have an idea to beef it up. I'd have to add another captured nut in the frame though if I really wanted it to work well. I may not worry about it, it holds the bumper on. I don't think those bumpers were that strong originally anyway from a collision standpoint.


Thanks! :thumbup:

I do what I can. Not all of its "pretty", but I'm not building a show car. I don't think I really understand show cars anyway. I like to drive the crap out of my cars, so most everything is function based.

You're right, they weren't very strong from a collision standpoint. That's probably why they went to the heavy impact bumpers in '74. I might leave my heavy bumper on for another year to help my new super stock springs settle......:D
And i agree with your philosophy of the show car thing, and going with a function based build. Driving them and driving the crap out of them is the most fun anyway. Who cares about rock chips? Not people like us! :glasses7:
Car shows just bore me anyway.......
 
Here's the rear bumper on my '71 Demon Sizzler, it got rear ended at about 5 mph. No kidding.
 

Attachments

  • 2011 spring 146.jpg
    78.3 KB · Views: 1,543
  • 2011 spring 147.jpg
    66.5 KB · Views: 1,522
You're right, they weren't very strong from a collision standpoint. That's probably why they went to the heavy impact bumpers in '74. I might leave my heavy bumper on for another year to help my new super stock springs settle......:D
And i agree with your philosophy of the show car thing, and going with a function based build. Driving them and driving the crap out of them is the most fun anyway. Who cares about rock chips? Not people like us! :glasses7:
Car shows just bore me anyway.......

Here's the rear bumper on my '71 Demon Sizzler, it got rear ended at about 5 mph. No kidding.

The heavy impact bumpers in '74 were because of a new 5mph impact standard. But realistically a 5mph impact still screws up the bumper, so it wasn't that big of an improvement. Just adds 100+ lbs to the car.

Yeah I don't understand show cars. Why have some awesome car that you only drive a few times a year? Its a car! Drive it! That's the fun part, not parking it in the garage and telling everyone how you have a cool car parked in the garage.

Nice looking Demon! Doesn't look too bad. I wish I had a tail panel for mine. Once I get the mechanicals sorted out I'll get to working a little more on the Demon conversion. Just need to prime the '71 Dart front end I have and find a tail panel. Should have just started with a Demon, but then I might feel bad about modifying it so much. With a /6 '74 Duster it doesn't matter. :D
 
Watching

Love what you did with the rallye dash panel and with the bumper-can't wait to see more!
 
72bluNblu what brand of seats did you use and how do you like them
 
72bluNblu what brand of seats did you use and how do you like them

I believe they're the Summit brand sport seats. I say "I believe" because I bought them second hand. But they're identical to the Summit seats, so at the very least they're probably from the same manufacturer.

I love 'em. They do make getting in and out of the car a little more difficult because of the height of the side bolsters, but it's not that big a deal. Once in the car they're great. They're firm, but still plenty comfortable. And unlike the stock buckets they actually keep you from sliding all over the place.

Only complaint about them is some of the plastic covers, the plastic on the hinge covers and the pass throughs for the harness are pretty easy to break, most of mine are. But again, I bought mine used. Still, that's just cosmetic stuff. And for the price they're pretty much impossible to beat.
 
Ok, time for another update.

I've been waiting to pull the trigger on a new set of wheels. I bought a set awhile back, only to find that they really weren't the right offset. Part of that was figuring out how narrow a BBP 7.25" rear end really is - 51.5" flange to flange. Since I had assumed it was close to the same width as an A body 8 3/4, well, I got the wrong wheels. :banghead:

Anyway, after a lot of measuring, consulting the spreadsheet of wheel combo's I keep, and some math, I finally settled on some specs. And then I had to pick some wheels.

I finally went with a set of Enkei RPF1's. They're pretty well known as a performance wheel, lightweight but also strong. The 18x9's I went with up front weigh only 17.1 lbs, the 18x10's I went with out back weigh only 18.45 lbs.

I went with a set of BFG KDW 2's for tires. I've run them before, they were the OE wheel for my 2004 SRT4. They're a great tire, grip very well. They are a noisy tire, but I'd wager I won't hear them over my Ultra Flo's anyway. I decided to put my math where my pocket book was, and went with 275/35/18's and 295/35/18's.

Some folks have asked why I converted to a fold down seat. Well, here you go! 275's in the back seat, 295's in the trunk! :D

IMG_5253_zps6643d51a.jpg


IMG_5252_zps349f909e.jpg
 
Last edited:
Before I get too far, I'll post this up too. I've heard a lot of talk about how heavy these big rims and tires are, and how the stock steel rims with smaller tires are lighter. So, I thought I would weigh in with my new wheels. The old 15x7 cop rims with 225/60/15 Falken's weighed in at 50 lbs on the nose. By my tire specs that tells me the 15x7" cop rim weighs ~25 lbs. So how much did my 275's and 295's weigh? Less.

tireweights_zpsf3d39dce.jpg


The 275/35/18 KDW's on the 18x9" Enkei's weighed in at 45.8 lbs. That's 4.2 lbs lighter, per wheel. Even the 295's on 18x10's were lighter at 49.4 lbs. Not a lot, but considering the size of the wheel, that's huge. So, myth dispelled.


Did I mention the 295/35/18 is a HUGE tire? Here's a comparison shot with the 225/60/15's I had on the car before. :D

IMG_5256_zps9f4a2a43.jpg
 
Last edited:
Finally, let's get them on the car. In the back, in addition to my 1/2" spring offset, I took another 1/4" off of the quarter lip.

tireB-A_zps4efb0119.jpg


The front was a little more complicated. I added a set of Magnumforce tubular UCA's, which I had bought for the car awhile back and hadn't got around to. I also installed a 13" Cobra brake kit, courtesy of Dr. Diff. That added 3/16" to the track width, which worked with the 18x9's and 35mm offset. The center bores of the enkei's started at 73.1mm like a lot of rims, but necked down to 66mm, still not enough to clear the hubs. So I had my machinist open them up to clear the hubs.

While I was at it, I installed a new set of Hotchkis Fox shocks I picked up from another forum. Not the fancy new adjustable ones, but good enough for me. I also upgraded to FFI's 11/16" solid adjuster tie rods.

They do look nice...

IMG_5297_zpsec8230f1.jpg


Still working ride height a bit, and the alignment is just roughed, but here she is for now...

IMG_5264b_zps4c31ed25.jpg


So the almost final verdict? The fit. No rubbing so far, but it is definitely close. About a 1/4” to the springs in the back, and no more than that to the cut down quarter lips. I don’t think I could go much lower in the back without re-working the inner fender well a little, there’s a “bump” that narrows the well not very far up.

Anyway, final specs-

Front: 275/35/18 on an 18x9” rim with 35mm offset (6.4” backspace). Dr. Diff 13” brake kit, so effective offset 30mm, effective backspace 6.2”

Rear: 295/35/18 on an 18x10” rim, 38mm offset (7” backspace). 68-70 B body 8 3/4 (54 15/16” flange to flange) with 1/2” spring offset and 1/4” lip trim
 
wow those wheels look awesome on there! any chance you could let me know the section & tread width of the fronts and back?

im thinking what will set you car off is some demon stripes. once its ready. i can see it now with those wheels.

thanks for sharing your build.
 
wow those wheels look awesome on there! any chance you could let me know the section & tread width of the fronts and back?

im thinking what will set you car off is some demon stripes. once its ready. i can see it now with those wheels.

thanks for sharing your build.

Section width for the 275's is 10.9", section width on the 295's is 11.9".

Tread width doesn't seem to be listed anywhere for the BFG KDW 2's, but BFG g-force rivals are listed with the same section width and they have tread widths of 10.2" and 11.1", so I would imagine they'd be fairly close to that.

Thanks for the compliments! I really like how the wheels look. Perfect would have been 26" tall tires all the way around, but I wanted to stay with the 275 in the front so 25.7" will have to do.

An actual alignment is up next, followed by sway bars front and rear. Then I may be getting on the the Demon conversion. I like the Demon side stripes as well, so that will probably happen once I get the front clip swapped over and some new paint on the car. :D
 
I did read to whole thread and you were going to get the Wilwood 14" kit, but ended up with dr diffs 13" cobra kit. Is there a reason? Like it didn't protrude out further than the 14" kit etc?
 
I'm a big fan of those wheels, but only when you don't have to worry about the really curved spokes on certain offsets. They really add a modern flavor to your car.

I hear you on the loudness of the BFGs. I couldn't wait to get rid of them on my SRT-4 when I had them and it wasn't necessarily a quiet car either. They do seem to be a pretty good performing tire though.
 
I did read to whole thread and you were going to get the Wilwood 14" kit, but ended up with dr diffs 13" cobra kit. Is there a reason? Like it didn't protrude out further than the 14" kit etc?

I was planning on using the wilwoods originally because the first set of wheels I bought had a 26mm offset, so I didn't have the space to give up the 3/16" that Dr Diffs kit adds. But then I figured out that I could fit 295's out back, and that I had calculated the offset in the back wrong. With the RPF1's I had the room up front, and that wilwood kit costs almost $1k more than Dr Diffs kit. Plus, the Dr Diff kit uses OE rotors and calipers, so if I need parts later they should be easier to come by.
 
Thanks again for the replies guys!

The burnout video is going to have to wait until I get the 8 3/4 in it, I think any attempt at a burnout with the 7 1/4 will probably leave the ring gear laying in the street. Once the 8 3/4 is in I need to look for a dyno, would like to get the final tuning on the 340 dialed in.

@ Dion, there are places you can get the rosette rivets...

Here's a few pictures of the interior as it is at the moment. I've still got a few things to clean up to finish up the fold-down conversion, then I'll get a thread about it up and some more pictures here.

IMG_5170_zps9709f862.jpg


IMG_5173_zps20a8aa1b.jpg


IMG_5176_zps782af97e.jpg

Hi
Maybe missed something here but what are the seats from
Looks really really gd
 
-
Back
Top