71DodgeDemon340
Well-Known Member
Does this help any?

1. If removed, install new bearing cups using suitable tool. Ensure cups are properly seated in their bores. If a 0.0015 inch feeler gauge can be inserted between a cup and the bottom of its bore at any point around cup, the cup is not properly seated. Whenever cups are replaced, the cone and roller assembly should also be replaced.
2.Using proper rear axle pinion depth gauge tool, assemble appropriate aligning adapter, gauge disc and gauge block to screw.
3.Place rear pinion bearing over aligning disc and insert it into rear pinion bearing cup and assemble tool handle to screw. Roll assembly back and forth a few times to seat bearings while tightening tool handle by hand. Torque tool handle to 20 ft lb The gauge block must be offset 45° to obtain accurate reading.
4.Center gauge tube into differential bearing bore, then install bearing caps, torquing bolts to specifications. Select thickest shim that will enter between gauge tube and gauge block. Insert shim directly along gauge block to insure a correct reading. The shim fit should be a slight drag-type feel. Shims used for gauging must be flat to obtain correct feel.
5.Place selected shim(s) on pinion and press pinion bearing cone and roller assembly until it is firmly seated on shaft. The same rear pinion bearing used in this procedure must be used in final assembly of axle. Ensure press load is not applied to bearing cage.
6.Check splines on pinion shaft to be sure that they are free of burrs. If burrs are evident, remove them with a fine crocus cloth, working in a rotational motion, then wipe pinion clean.
7.Place collapsible spacer on pinion shaft against rear bearing.
8.Working from rear of axle housing, install drive pinion assembly into housing pinion shaft bore.
9.Install front cone and roller and the oil slinger on pinion shaft.
10.Clean oil seal seat surface, then, using suitable seal installation tool, install seal in carrier and pack lips of seal with suitable lubricant. Installation without proper tool may result in early seal failure. If seal becomes cocked during installation, remove it and install new one.
11.Apply small amount of suitable lubricant to companion shaft splines, align mark on companion flange with mark on pinion shaft, install flange and install new nut on pinion shaft. If a new companion flange is being installed, disregard scribe mark on pinion shaft. The companion flange must never be hammered on or installed with power tools.
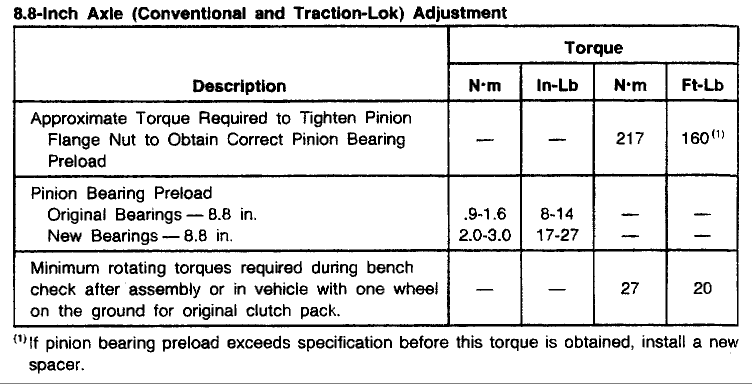
12.Hold companion flange with suitable tool and tighten pinion nut to 217 ft lb , rotating pinion occasionally to insure proper bearing seating. Take frequent pinion bearing preload readings until original recorded preload reading is obtained.
NOTE : If pinion bearing preload exceeds specification before torque is obtained, replace collapsible spacer.
13.If original recorded preload is lower than 8-13 inch lb for original bearings, or 16-29 inch lb for new bearings, tighten pinion nut to 217 ft lb . If preload is higher than specification, tighten to original reading as recorded. Under no circumstances should pinion nut be backed off to reduce preload. If reduced preload is required, a new collapsible pinion spacer and pinion nut must be installed.
14.Apply suitable lubricant to new wheel bearing and install bearing into housing using suitable tool.
15.Pack lips of seal with suitable lubricant and install axle shaft seal using suit able seal installation tool. Installation of bearing or seal assembly without proper tool may result in early bearing or seal failure. If seal becomes cocked in bore during installation, remove it and install new one.
16.Place differential case subassembly in carrier.
17.Install a 0.265 inch shim on left side.
18.Install left bearing cap and tighten bolts finger tight.
19.Install progressively larger shims on right side until largest shim selected can be assembled with a slight drag feel. Apply pressure towards left side to ensure bearing cup is seated.
20.Install right side bearing cap and tighten cap bolts to 70-85 ft lb .
21.Rotate assembly to insure free rotation.
22.Check ring gear and pinion backlash, noting the following:
If backlash is 0.008-0.015 inch , proceed to preload shimming steps in this procedure.
If backlash is zero , add 0.020 inch to right side and subtract 0.020 inch from left side.
If backlash is not zero and not 0.008-0.015 inch , proceed to next step.
23.Recheck backlash, noting the following:
If backlash is not within 0.008-0.015 inch , correct backlash by increasing thickness of one shim and decreasing thickness of other shim by same amount.
If backlash is within 0.008-0.015 inch , continue to next step.
24.Install shim and bearing caps, torquing cap bolts to 70-85 ft lb .
25.Rotate assembly several times to ensure proper seating of differential bearings.
26.Recheck backlash, noting the following:
If backlash is not within 0.008-0.015 inch , correct backlash by increasing thickness of one shim and decreasing thickness of other shim by same amount.
If backlash is within 0.008-0.015 inch , continue to next step.
27.Increase both left and right shim sizes by 0.006 inch and install for correct differential bearing preload. Ensure shims are fully seated and assembly turns freely.
28.Using white marking compound, obtain tooth mesh contact pattern. Pattern legibility can be improved by connecting driveshaft and rotating both tires in drive and coast direction. If gross pattern error is detected, recheck pinion shim selection.
29.Install bearing caps and tighten cap bolts to 70-85 ft lb . Recheck backlash. If backlash is not within 0.008-0.015 inch , repeat steps for correcting measurement.
30.Install axle shafts, then install differential cover and fill differential with suitable lubricant.
NOTE : On models equipped with limited slip differential, to prevent noises on turns, add four ounces of friction modifier part No. C8AZ-19B546-A, or equivalent, with lubricant when filling differential.
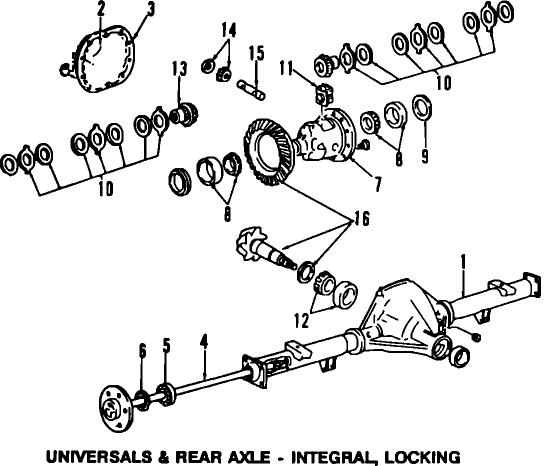
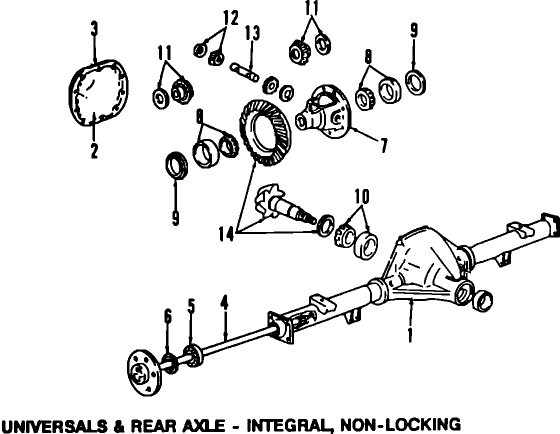
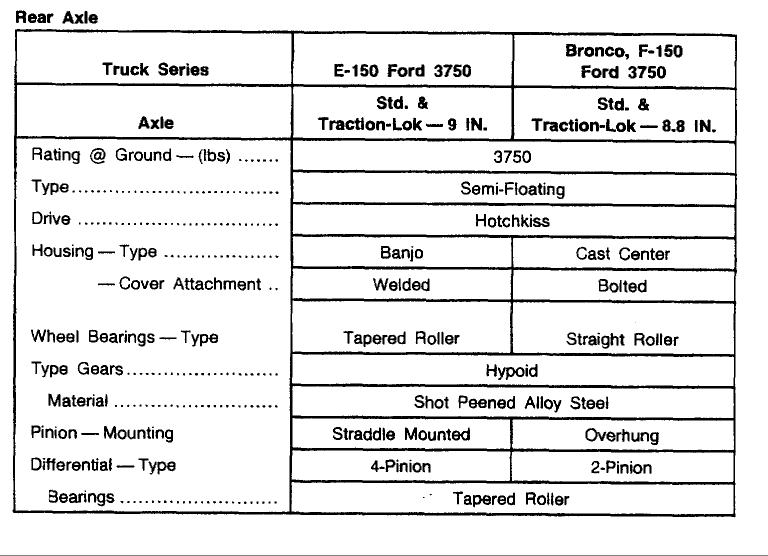
The rear axle is an integral type housing, hypoid gear design with the centerline of the pinion set below the centerline of the ring gear. The hypoid gear set consists of a ring gear and an over hung drive pinion which is supported by two opposed cone and roller bearings. Pinion bearing preload is maintained by the differential drive pinion collapsible spacer on the drive pinion shaft and adjusted by the pinion nut. The rear axle housing consists of a cast center section with two steel tube assemblies and a stamped axle housing cover.
1. If removed, install new bearing cups using suitable tool. Ensure cups are properly seated in their bores. If a 0.0015 inch feeler gauge can be inserted between a cup and the bottom of its bore at any point around cup, the cup is not properly seated. Whenever cups are replaced, the cone and roller assembly should also be replaced.
2.Using proper rear axle pinion depth gauge tool, assemble appropriate aligning adapter, gauge disc and gauge block to screw.
3.Place rear pinion bearing over aligning disc and insert it into rear pinion bearing cup and assemble tool handle to screw. Roll assembly back and forth a few times to seat bearings while tightening tool handle by hand. Torque tool handle to 20 ft lb The gauge block must be offset 45° to obtain accurate reading.
4.Center gauge tube into differential bearing bore, then install bearing caps, torquing bolts to specifications. Select thickest shim that will enter between gauge tube and gauge block. Insert shim directly along gauge block to insure a correct reading. The shim fit should be a slight drag-type feel. Shims used for gauging must be flat to obtain correct feel.
5.Place selected shim(s) on pinion and press pinion bearing cone and roller assembly until it is firmly seated on shaft. The same rear pinion bearing used in this procedure must be used in final assembly of axle. Ensure press load is not applied to bearing cage.
6.Check splines on pinion shaft to be sure that they are free of burrs. If burrs are evident, remove them with a fine crocus cloth, working in a rotational motion, then wipe pinion clean.
7.Place collapsible spacer on pinion shaft against rear bearing.
8.Working from rear of axle housing, install drive pinion assembly into housing pinion shaft bore.
9.Install front cone and roller and the oil slinger on pinion shaft.
10.Clean oil seal seat surface, then, using suitable seal installation tool, install seal in carrier and pack lips of seal with suitable lubricant. Installation without proper tool may result in early seal failure. If seal becomes cocked during installation, remove it and install new one.
11.Apply small amount of suitable lubricant to companion shaft splines, align mark on companion flange with mark on pinion shaft, install flange and install new nut on pinion shaft. If a new companion flange is being installed, disregard scribe mark on pinion shaft. The companion flange must never be hammered on or installed with power tools.
12.Hold companion flange with suitable tool and tighten pinion nut to 217 ft lb , rotating pinion occasionally to insure proper bearing seating. Take frequent pinion bearing preload readings until original recorded preload reading is obtained.
NOTE : If pinion bearing preload exceeds specification before torque is obtained, replace collapsible spacer.
13.If original recorded preload is lower than 8-13 inch lb for original bearings, or 16-29 inch lb for new bearings, tighten pinion nut to 217 ft lb . If preload is higher than specification, tighten to original reading as recorded. Under no circumstances should pinion nut be backed off to reduce preload. If reduced preload is required, a new collapsible pinion spacer and pinion nut must be installed.
14.Apply suitable lubricant to new wheel bearing and install bearing into housing using suitable tool.
15.Pack lips of seal with suitable lubricant and install axle shaft seal using suit able seal installation tool. Installation of bearing or seal assembly without proper tool may result in early bearing or seal failure. If seal becomes cocked in bore during installation, remove it and install new one.
16.Place differential case subassembly in carrier.
17.Install a 0.265 inch shim on left side.
18.Install left bearing cap and tighten bolts finger tight.
19.Install progressively larger shims on right side until largest shim selected can be assembled with a slight drag feel. Apply pressure towards left side to ensure bearing cup is seated.
20.Install right side bearing cap and tighten cap bolts to 70-85 ft lb .
21.Rotate assembly to insure free rotation.
22.Check ring gear and pinion backlash, noting the following:
If backlash is 0.008-0.015 inch , proceed to preload shimming steps in this procedure.
If backlash is zero , add 0.020 inch to right side and subtract 0.020 inch from left side.
If backlash is not zero and not 0.008-0.015 inch , proceed to next step.
23.Recheck backlash, noting the following:
If backlash is not within 0.008-0.015 inch , correct backlash by increasing thickness of one shim and decreasing thickness of other shim by same amount.
If backlash is within 0.008-0.015 inch , continue to next step.
24.Install shim and bearing caps, torquing cap bolts to 70-85 ft lb .
25.Rotate assembly several times to ensure proper seating of differential bearings.
26.Recheck backlash, noting the following:
If backlash is not within 0.008-0.015 inch , correct backlash by increasing thickness of one shim and decreasing thickness of other shim by same amount.
If backlash is within 0.008-0.015 inch , continue to next step.
27.Increase both left and right shim sizes by 0.006 inch and install for correct differential bearing preload. Ensure shims are fully seated and assembly turns freely.
28.Using white marking compound, obtain tooth mesh contact pattern. Pattern legibility can be improved by connecting driveshaft and rotating both tires in drive and coast direction. If gross pattern error is detected, recheck pinion shim selection.
29.Install bearing caps and tighten cap bolts to 70-85 ft lb . Recheck backlash. If backlash is not within 0.008-0.015 inch , repeat steps for correcting measurement.
30.Install axle shafts, then install differential cover and fill differential with suitable lubricant.
NOTE : On models equipped with limited slip differential, to prevent noises on turns, add four ounces of friction modifier part No. C8AZ-19B546-A, or equivalent, with lubricant when filling differential.
The rear axle is an integral type housing, hypoid gear design with the centerline of the pinion set below the centerline of the ring gear. The hypoid gear set consists of a ring gear and an over hung drive pinion which is supported by two opposed cone and roller bearings. Pinion bearing preload is maintained by the differential drive pinion collapsible spacer on the drive pinion shaft and adjusted by the pinion nut. The rear axle housing consists of a cast center section with two steel tube assemblies and a stamped axle housing cover.


