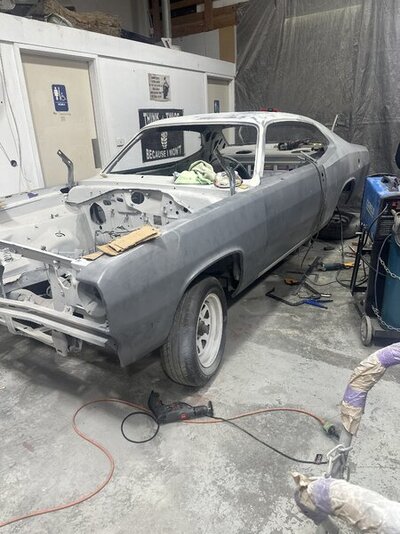
OzyDuster74 body ready for paint!!

-

Ozyduster

Well-Known Member
Joined
May 16, 2023
Messages
205
Reaction score
269
Location
Australia
Feel free to chime in with any ideas, love, hate gives me the motivation to get it done.
I always wanted a chrome bumper but something American not Australian as too expensive to restore Australian muscle and limited parts, something to take my two boys in as my ute is only a two seater and they fight over who gets to go in it.
My mates put me on to the Plymouth Duster as at the time still cheap and every part available for when rebuilding. I ended up finding one in August 2021 that had been in storage since 2012. As all others were already built or too expensive.
It was a gamble at 12k (Australian), as paint was all cracked and looked like painted with a brush, interior was killed by UV as California car but looked to be rust free..... time would tell. The rear quarters had some questionable repairs that had me worried. I ran a magnet over the car and didn't look to be full of bog.
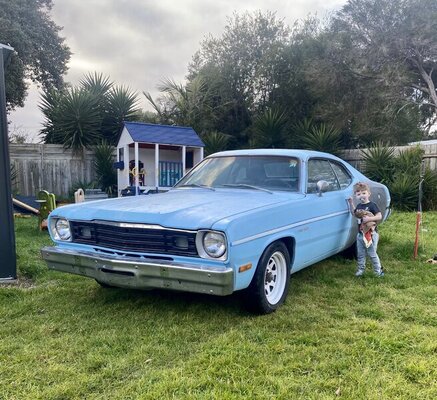
She was no beauty queen thats for sure. 74 model with a 318 in a light blue with blue interior.

Ill be asking a lot of questions as not many people to talk about Dusters here, we have our own A body styles here tho.

The plan is to do a Resto/Mod with pro street look to it.
Body-Go back to bare metal and start again, custom colour dont care for the standard colour. Twin scoop and duck tail.
Rear End- Found a 8, 3/4 diff out of a B body cheap will be shortened, trutrak, Calvert Caltracs, Calvert monoleaf and spring offsets,
Box- Rebuilt 904 with all the fruit and custom stall
Engine- Hemi 6.4 swap
Suspension- To be all rebuilt rear, mono leafs and Caltracs with chassis stiffening etc
Wheels- Street Pro 2 Convo Pro Bead lock, Rear 8.5/15, Front 4.5/17
Interior- To be all new and all black for ease of parts (Was lucky as it came with perfect A pillar black plastics, some new rubbers, new black carpet and new rear bench)

This is how my car was
IMG_3329.jpg
This is how it is today

IMG_2327.JPG

IMG_1501.jpg


IMG_2041.JPG
 
Last edited:
I had to quickly strip the entire car in my backyard as was about to start a large extension and would end up building the car in. Actualy most of the area where i stripped the car is a house and deck. I only have a single car garage and needed to get it to my factory to store. Didn't want to strip at factory as wife was pregnant and was stripping car at night after work etc. My whole car is now in take away containers, lunch bags and bigger stuff in palett racking in my shed. Thank god i took time to take pics of everything and label everything as the project sat on ice for over a year as buisness copped a hit through Covid. Was nice as my son would "help" strip the car and even tho quite some time ago..... renovation is completed to the home, he still remembers and asks about the car

IMG_3390.jpg


65069621891__496108C5-E0EF-4875-9449-30FB9CBBC5E5.jpg


IMG_3395.jpg


IMG_3585 2.jpg


IMG_3472.jpg
 
And off it went to be bead blasted and then put into an epoxy primer. We did not blast under side that will be hand stripped, acid washed, primed and raptor liner. We also did not blast centre of roof, bonnet or boot to not risk heating panel and denting it.

IMG_3902.jpg


IMG_3939.JPG


IMG_3901.jpg
 
Lucky and unlucky at the same time, from B pillars forward near flawless, rust pin hole in drivers door, rust where A pillar meets the roof and little rust in top of boot under rear window in the drip rail.
However drivers quarter panel is cooked and passenger quarter had some bodgy repairs

65431808499__04C911AD-8C8B-4B11-900C-42890205F9F6.jpg


65451594881__02AD63BB-7A4A-4695-A1FA-91B379D070A2.jpg


65431789047__FFDEE8E4-4D02-4935-8B37-8E5C94BB8E33.jpg
 
So the car then sadly sat in undercoat for over a year. I would purchase parts along the way tho, new wiring harness, rubbers and all small items as to not kill me with freight given we are 24 hours away by plane. Managed to localy get a 71 rear bumper, good plastic sale planes and pretty much brand new uper door trims.
I finished the entire house extension renovation in the time it sat in case i had to sell my home due to the hit i took in Covid........ buisness did a full U turn and cranking along and very healthy so its time for this build to move! This room is built where i pulled the car apart hence had to happen quickly.


IMG_1014.JPG


IMG_6934.jpg
 
So the car then sadly sat in undercoat for over a year. I would purchase parts along the way tho, new wiring harness, rubbers and all small items as to not kill me with freight given we are 24 hours away by plane. Managed to localy get a 71 rear bumper, good plastic sale planes and pretty much brand new uper door trims.
I finished the entire house extension renovation in the time it sat in case i had to sell my home due to the hit i took in Covid........ buisness did a full U turn and cranking along and very healthy so its time for this build to move! This room is built where i pulled the car apart hence had to happen quickly.


View attachment 1716188891

View attachment 1716188892
Congratulations on the car, house and business.
 
Door and guard on the passenger side were near perfect other than shopping trolly dents to be nocked out and smoothed over. Now to try and find a quarter panel not going to be easy given my location. Fast forward to April 2023 and finally started work on the body. Strangely enough found a guy in Australia selling the exact patch repair i needed for the passenger side.
Also found a panel beater who only does old cars, at a good price and happy for me to bring the car in and out as i please. We deleted the antenna hole and have deleted the rear side lights. Finding a drivers quarter for the drivers side was the next task.

IMG_9449.jpg


IMG_9619.JPG


IMG_9635.JPG
 
Last edited:
Picked up some wheels cheap of market place as exact size and back set i was after. Street Pro 2 Convo Pro Bead lock, Rear 8.5/15, Front 4.5/17. Its an australian company i dont think they sell them in the USA. Front rubber is an Outlaw tyre and rear a Nangkang Sportnex 2r
I also have a set of mono leafs on order, spring offsets and kaltracs. Will be tight getting the wheels to fit, but by shortening the diff shouldn't be an issue. May have a play with the tub especially around the lip to quarter panel

IMG_1537.jpg


IMG_1536.JPG


IMG_1532.JPG
 
I looked high and low for drivers quarter panel but was getting ridiculous postage fee quotes or not wiling to even try. However i finally managed to get a AMW quarter panel from Year One and was a strange experience. As purchased it for full amount and shipping, to then wait weeks and weeks as they had to get stock in. Should mention with shipping was nearl 3500 to Australia.
It finally arrived after months and had to pay another 800 to release from customs haha.

Original panel was removed and time to see what lay behind.
IMG_1113.JPG

Some one had tried to pull the quarter damage and damaged the space frame, as looks like put a bolt or something through it trying to pull the panel. The space frame was repaired with a new welded in section to patch hole and all behind the quarter acid washed after getting into bare metal
IMG_1264.JPG

The only proper rust was just behind the wheel near the drain hole so cut out and repaired. Then all primed ready for new panel
IMG_1244.JPG
 
Last edited:
I dont want to tub however i have noticed that the duster has quite a large wheel arch lip and then also the wheel tub doesnt go straight up like in other cars, is there any ways of making the tub a bit more roomy without mini tubbing for example?
 
Not sure how tight a 275/60/15 is in a stock Duster wheel well but mini tubbing at a minimum will give you a greater margin of error to avoid the tires rubbing when you put the car in weird angles or when your kids are in the back seat compressing the suspension. Proper deep wheel tubs would be even better and allow you to lower the car if you wanted that kind of stance.
 
Not sure how tight a 275/60/15 is in a stock Duster wheel well but mini tubbing at a minimum will give you a greater margin of error to avoid the tires rubbing when you put the car in weird angles or when your kids are in the back seat compressing the suspension. Proper deep wheel tubs would be even better and allow you to lower the car if you wanted that kind of stance.
I am starting to lean that way, just have to run it past my engineer to see what they think about it. But yes i think to tuck the tyre would require this. However still not sure how to address the outer tub issues
 
Last edited:
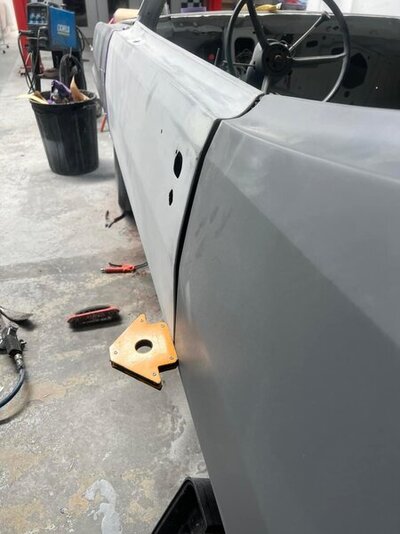
Drivers quarter panel all fitted up, we cut the roof section off so could tidy the lip up as the quarter slides up and under.
IMG_1296.JPG

One thing i notice is many people online cant get the bottom of quarter to sit factory it has a triangulated gap to the underside. The reason is, is the amd panel is 20mm too long underneath, so we cut it and shortened with to get a perfect fit.
IMG_1505.JPG


IMG_1517.JPG


The sill was perfect and required no work, front guard just needed a little tap here and there. The rear sale plane required a lot of tapping and rubbing but has come up perfect and we have got the light chrome surrounds to sit perfect and confident with the gasket will seal water tight
Door has a rust pin hole we will tackle next.

IMG_1501.jpg
 
So have a wheel tub question, when you tub using the traditional kits it doesnt address the isssue of the outer part of the tub. As simply stretching an inch to the inner of car.
A lot of cars tubs go straight up but the A body tub darts in meaning if wheel runs close to lip of gaurd it will rub unless jacked up in the back. How are people getting around this?
See in this picthe tub goes in an inch from the quarters quite quickly.
IMG_1244.JPG


My friend had his diff all folded etc and when fitting found that with the ten inch wheels and 315 tires to sit in the tub had to be back spaced as seen in the pics and doesn't look right.
IMG_2733.JPEG


IMG_2731.JPEG
 
I have gone with the holley 6.4 hemi engine mounts and 904 gear box mounts as everything shuffles forward. I know i cant get the headers so will most likely have a set made, saves notching fire wall and as i am in oz postage would of been a fortune.
Question, what should i do to the 904 strength wise and what is needed to marry it to the hemi 6.4?
 
there is also a duster only site on FB

 
there is also a duster only site on FB

[/URL]
Thanks mate, yea been on that page fore few years, i dont rate fb for information as get a lot of people who dont know what they talking about putting their two cents in. Also can literally see someones build thread on a forum to see if they have half an idea. Also easy for fb to get lost in the comments so hard to get detailed info.
 
Thanks mate, yea been on that page fore few years, i dont rate fb for information as get a lot of people who dont know what they talking about putting their two cents in. Also can literally see someones build thread on a forum to see if they have half an idea. Also easy for fb to get lost in the comments so hard to get detailed info.
true you kinda have to sift through it all to find the good info there is some knowledgeable people on there but some of them are also on here too
 
On the 904, the case bolts directly to the gen 3 as it would a regular small block. The only piece needed is the appropriate flexplate from ATI or Bouchillon performance. You will want the absolute best parts inside. GPZ frictions, replace the direct clutch return spring. A&A Transmission in Indianapolis can get you everything you need.
 
true you kinda have to sift through it all to find the good info there is some knowledgeable people on there but some of them are also on here too
Yep true, this forum looks to be pretty active. When i built my last car forums were a lot more active but a wealth of information. Fb definitely better than it was now you can search info.
On the 904, the case bolts directly to the gen 3 as it would a regular small block. The only piece needed is the appropriate flexplate from ATI or Bouchillon performance. You will want the absolute best parts inside. GPZ frictions, replace the direct clutch return spring. A&A Transmission in Indianapolis can get you everything you need.
Yep i figured just throw the book at it, i know the 904 has got a lot better credibility these days and can be built a lot stronger than the past. Few guys here running 700+hp through them. Any preference between the ati or the bouchillon
 
Yep true, this forum looks to be pretty active. When i built my last car forums were a lot more active but a wealth of information. Fb definitely better than it was now you can search info.

Yep i figured just throw the book at it, i know the 904 has got a lot better credibility these days and can be built a lot stronger than the past. Few guys here running 700+hp through them. Any preference between the ati or the bouchillon
I have not used the Bouchillon. However, I will the next time I need one. It has the holes for the 5/16 holes on a stock/ish convertor. The ATI has the holes for 7/16 bolts.
 
I have not used the Bouchillon. However, I will the next time I need one. It has the holes for the 5/16 holes on a stock/ish convertor. The ATI has the holes for 7/16 bolts.
I will have a custom convertor as the motor will end up with a cam etc, so would think ill try get it with a tapped thread to make it easier to install box etc
 
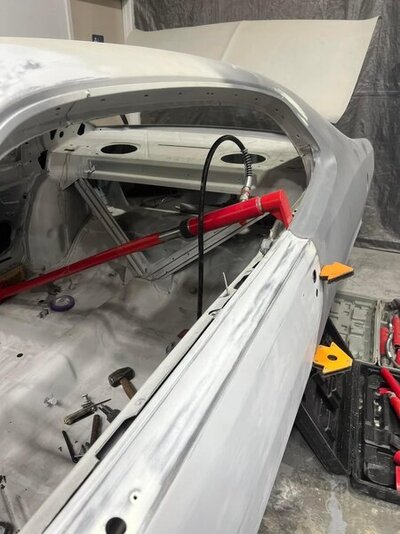
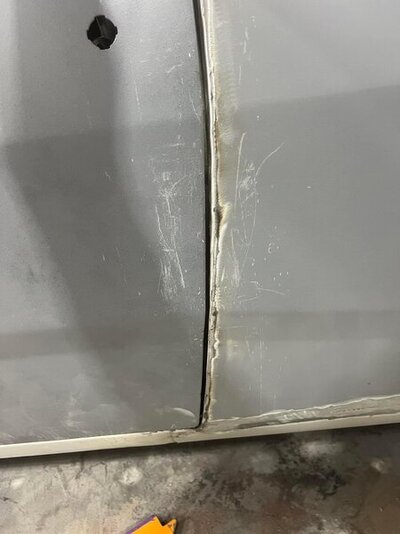
So we found that from slamming the doors the B pillars had rolled in. Very common on old coupes, the dead give away was guard to door was perfect and only half the door gap correct from door to quarter as the B pillar rolling in. Pretty much impossible to have bottom half of door correct and top half wrong
IMG_1364.JPG
So porta power and fixed!! Its things like this many people miss and wonder why they could never get their gaps correct and everything to line up when done.
IMG_1365.JPG
Drivers side now pretty much all completed other than a very small rust repair at the bottom of the door.

IMG_1502.JPG
 
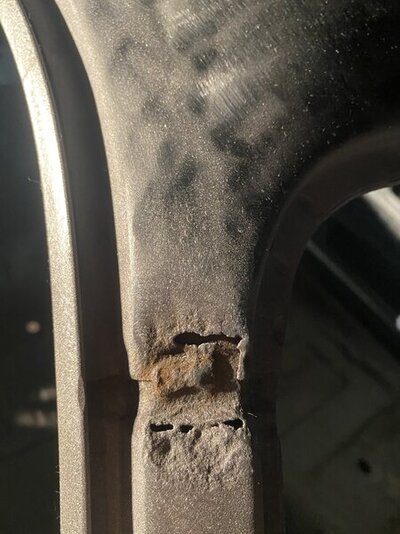
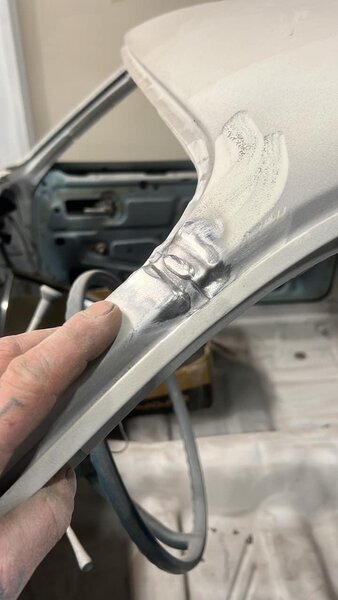
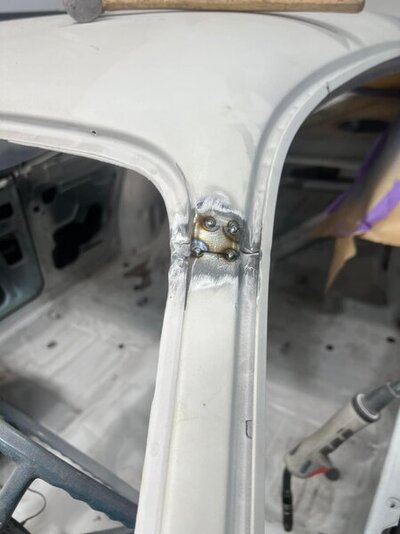
The original A pillar to roof seams have been patched and seam welded rather than lead whipped or bog to avoid cracks with power being put through the A body, same was done with the roof to quarter seams. One side had some signs of rust
IMG_3946.jpg
Cut out and patched hopefully stronger than original and less chance of getting the common hair line crack
IMG_1348.JPG

IMG_1347.JPG
 
-
Back
Top