1965 Dodge Dart Charger

-
The NOS letters on the side was excellent but now I did add the rechromed ones from Don. It looks awesome.

However while getting the nuts I comparedthem with theones offered at Ebay as NOS nuts for emblems. First of all these nuts has a stamping PAL. Not sure what it stands for but someone might have answer for me?
Compared to a new one they factory ones has a larger "washer".

So now it looks like it did on the inside of the trunk as well!

The rear window mouldings has been going through a sanding and polishing process so they looks like new. Adding them was easy. But, the clips that goes on the inside has a wrong angle with the result that it can't lock the inside chrome moulding!

Next job will be to get the angle right.

Ulf, I have to ask. Did you fill the inside of the PAL nuts with dum-dum sealer? I believe they were done that way at the factory as a result of water leaks past the letter studs. Normally there is enough of that dum-dum applied, that it's visible around the outside edges of the nuts.
 
Ok! The last clips in place with correct screws.

I took the advice to put the weatherstrip on the rear glass and that was quite a challenge but now it's there.

I did cut the last isolation for the front passenger floor. Next would be to cut up all the sewings on the carpet so I can peel off the heel pad.

The armrest pad was next. I took an NOS(NOT) green metallic old armrest pad w/ash tray and cut it apart. Now I could get an idea how the steel plate inside was done. It seems that there will be some drilling and then a small saw to open up the hole for the ash tray. Then just a small bend and we are ready to go!

So it was time to open up the white arm rest pad. I must admit that this product is great and I can highly recommend Laysons Restoration for these pads.

I can't say for sure whether or not the rear glass weatherstrip was applied to the glass or the window opening, but given that you'll need a fine cord to fit the weatherstrip into the opening, I'd venture to guess that pulling on the cord between the weatherstrip and the metal lip is much safer for the glass than pulling between the weatherstrip and the glass itself.
 
Ulf, I have to ask. Did you fill the inside of the PAL nuts with dum-dum sealer? I believe they were done that way at the factory as a result of water leaks past the letter studs. Normally there is enough of that dum-dum applied, that it's visible around the outside edges of the nuts.

Yes! I filled it with some kind of dum-dum sealer inside. However it takes som time cause if you just fill som sealer it will be a bubble. You have to put in a small amount and then take a small screw driver and turn around the sealer so it reached the bottom and don't get that bubble.

So after they dried and they were mounted you could see some sealer around the nut!

By the way, do you know what PAL stands for?
 
By the way, do you know what PAL stands for?

PAL is an acronym for Phase Alternating Line, for Pakistan Academy of Letters, for Polish Academy of Literature, for the now-defunct Progress in Automotive Lighting symposium, and for the Police Athletic League. It is also a frozen dessert on Raisa, and a mytho-historical figure on Chantil 3.

redbeard.gif
 
PAL is an acronym for Phase Alternating Line, for Pakistan Academy of Letters, for Polish Academy of Literature, for the now-defunct Progress in Automotive Lighting symposium, and for the Police Athletic League. It is also a frozen dessert on Raisa, and a mytho-historical figure on Chantil 3.

Now that is the kind of illuminating answer I expect from SSDan!
 
I think PAL is a registered trade name along with Tinnerman. There used to be a guy that sold auto body supplies that came by my shop every so often and he had a huge cabinet of those items in his truck. If I remember correctly it said Precision Specialties at the top and then all of the specialty fasteners were in the drawers. I think the name is kind of like "Kleenex". Any tissue gets referred to as Kleenex and any tin nut gets referred to as PAL.
 
By the way Ulf, what do you have going for windshield lock strip? Any new updates? I think there are a quite a few early A guys who would love to find a reasonable replacement.
 
By the way Ulf, what do you have going for windshield lock strip? Any new updates? I think there are a quite a few early A guys who would love to find a reasonable replacement.

Thanks for sharing the PAL story.

Re the locking strip I got a 1966 locking strip. Keith will take care of that one. I have found two old Mopar guys that might have what I'm searching for. If I'm able to buy two sets I'm thinking of it might be repopped in US. I have checked several posibilities here in Sweden but nothing found. I think the posibility to have it done in US is way much bigger.

If I just found one set I have a set of Mylar covered locking strip for a B-body wagon for the quarter windows. That moulding can be used to make a copy for the A-body. They just need to make it a little wider. I Think too that alot of A-body owners what be interested in a better looking locking strip. The technique is better today too so it will probably last longer too.

Not sure how much it will cost to have it repopped but I think if a bunch of members here on FABO would be interested it wouldn't be so expensive to do. But not sure who has the contacts or who could be the project manager!
 
Today I had a wonderful day with my wife Gunilla and our friends Joakim and Kristina driving an old car rally on beautiful winter roads with Joakims one owner 1960 Valiant.

Finally coming home I spent 3 hours searching for spot welders for car industry.

The only spot welders I have located is Machines and small spot welders with two arms.(not sure what the two welder contacts are called!) I found out that the spots on my VIN tags must have been done with a one arm spot welder. Has anyone seen one and are they possible to locate?

Thanks FABO for any help with this matter!:glasses7:
 

Attachments

  • spot-welder-m20.jpg
    32.7 KB · Views: 493
Would it be possible to mount the negative cable to the body and positive in the handle? One "arm" cannot get in on the backside!

Yes I hope I can describe it where you understand. You put both ends on the panel you are welding and push it against what you are welding to. Then you push the button that is on the one handle. At that time they both weld through from the panel you are pushing from to the panel below it. They are great for doing any restoration work to make it like factory and I believe the only one you can use where you cannot access the rear of the piece you are welding to. Or you could push one end somewhere on the body and one on the tag push the button and be done if you only want one spot weld on the tag. Be sure to play with it first and get the timer set correct so you dont burn through the tag.
 
Yes I hope I can describe it where you understand. You put both ends on the panel you are welding and push it against what you are welding to. Then you push the button that is on the one handle. At that time they both weld through from the panel you are pushing from to the panel below it. They are great for doing any restoration work to make it like factory and I believe the only one you can use where you cannot access the rear of the piece you are welding to. Or you could push one end somewhere on the body and one on the tag push the button and be done if you only want one spot weld on the tag. Be sure to play with it first and get the timer set correct so you dont burn through the tag.


chryslerfat! Thanks for clearifying the process. Now I need to start calling some welding companies here in Sweden to see what they can offer. So far I have just found the one that spot weld from both sides. Thanks again!
 
Not sure how much it will cost to have ['60-'65 A-body windshield & backglass lockstrip] repopped but I think if a bunch of members here on FABO would be interested it wouldn't be so expensive to do. But not sure who has the contacts or who could be the project manager!

Scroll back up thru this thread til you find where I pointed you at a lockstrip company in the USA.
redbeard.gif
 
Scroll back up thru this thread til you find where I pointed you at a lockstrip company in the USA.
redbeard.gif

Thanks Dan! I must have forgot about it! I need an index where to find different information!!

Tonight was the "mount the first front shock absorber Monday"! Yesterday it looks like an over the counter shock. Glass beading and a new shot of black paint incl correct nut, washers and lock nut. The lower bolts and nuts are assembly line stuff from this car. Glassbeaded and new finish by Eric in US. Has an M embossed on top and the nut is self locking.

This is the way it looks after mounted correctly. The bolt was mounted from the fron and back. Guess the reason was if you dropped the nut the bolt would still be in place!
 

Attachments

  • 009.jpg
    22.3 KB · Views: 439
  • 008.jpg
    36.3 KB · Views: 472
  • 007.jpg
    34.2 KB · Views: 436
  • 005.jpg
    33.8 KB · Views: 436
  • 003.jpg
    20.2 KB · Views: 464
  • 002.jpg
    16.8 KB · Views: 479
  • 001.jpg
    30.7 KB · Views: 435
  • 010.jpg
    33.2 KB · Views: 433
I've had some concerns about the undercoating inside the front wheel house. the Picture is taken after the upper control arm was de-assembled. As you can see there has been some kind of cover for the mounting tabs for the UCA.

I have also started to wonder if the front shocks was in place when they sprayed the undercoating? In that case it could be some overspray on the front shocks too!

Any info out there?
 

Attachments

  • Restoration DartCharger 008.jpg
    46.9 KB · Views: 396
On my 66 Barracuda it had tape over the clutch pivot mount holes that was pulled after the under coat was done factory. It may have been the same for the A-arm mounts but I never looked at mine to know. I only know this because I converted mine from auto to manual transmission.
 
On my 66 Barracuda it had tape over the clutch pivot mount holes that was pulled after the under coat was done factory. It may have been the same for the A-arm mounts but I never looked at mine to know. I only know this because I converted mine from auto to manual transmission.

Thanks for sharing! I need tofind more pictures showing how it was done.I have some tejp in the wheelwells. But that is more of protection the engine compartment from getting splashes of undercoating- You see where the tejp has been located here.

Today was a day I have been worried about for weeks. The stencils for making the date codes on the glass was ready. Mr Gacken called me and said I'm at your house within 30 minutes. He had tested the Printings on a vent window glass and it looked exactly like factory!

So we did front and rear glass as well as all the side glasses. One stamp for front window (laminated), one stamp for vent window (PPG) and the rest of the glass was one stamp (tempered).

It turned out better then I thought and now I'm able to mount the front and rear glass! Yes!
 

Attachments

  • 007.jpg
    18.8 KB · Views: 401
  • 006.jpg
    22.4 KB · Views: 380
  • 005.jpg
    24.3 KB · Views: 400
  • 004.jpg
    26.4 KB · Views: 387
Glass markings look fantastic.

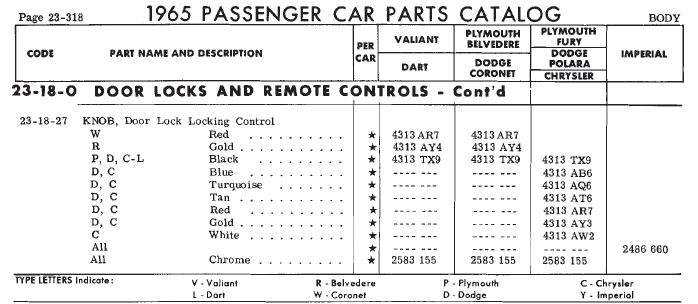
Chrome door lock knobs: Are ya sure? It's possible; there's a p/n for chrome knobs in the FPC, but I was under the impression that this was primarily to give the parts departments the option of just one stocking p/n for service replacements. Most of my A-bodies have not been the highest-trim models (Dart GT, Valiant Signet, etc.) but the originals I'm familiar with in that timeframe including '65 are colour-moulded to coördinate with the paint colour (yellow cars tended to get gold or black). Maybe other Dart GT owners can chime in.

Here's from the '65 U.S. FPC:

Door_Lock_Knobs.png

Dan! Thanks for the input. I will get some more info about the door knobs. I know that they were delivered with different models. But my car had chromed ones when I got it but that's no garantee!

Today arrived the last aluminium moulding from US. Dave Ferro at Totally Auto did an excellent job. Now there is only one moulding left and that a matter of time!:banghead:
 

Attachments

  • 001.jpg
    20.5 KB · Views: 364
  • 003.jpg
    27.8 KB · Views: 347
  • 004.jpg
    26.1 KB · Views: 359
Glass markings look fantastic.

Chrome door lock knobs: Are ya sure? It's possible; there's a p/n for chrome knobs in the FPC, but I was under the impression that this was primarily to give the parts departments the option of just one stocking p/n for service replacements. Most of my A-bodies have not been the highest-trim models (Dart GT, Valiant Signet, etc.) but the originals I'm familiar with in that timeframe including '65 are colour-moulded to coördinate with the paint colour (yellow cars tended to get gold or black). Maybe other Dart GT owners can chime in.

Here's from the '65 U.S. FPC:

Door_Lock_Knobs.png

DS, I think I'm voting with Ulf on this one. In the FPC excerpt you included it shows black knobs for P,D,C-L (low line) cars. The listing also doesn't show much in the way of other specific car lines (V, L, Y), so I'm likely to go with "chrome" when there isn't a specific interior colour to co-ordinate with. Given that V/L models all had painted upper door shells, and there's no yellow knob listed, I think the chrome knob would be the part of choice. Gold knobs would look dark & discoloured against the yellow paint. Also, what colour do you think 2486 660 would be?
 
Take another look now I've expanded the view of the FPC page. The vertical list of models is spurious; it might just as well read "All" (once) -- if you follow that vertical list across, you would then have to think that all Coronets came with red lock knobs, all Belvederes came with gold lock knobs, all Plymouths and Dodges as well as low-line Chryslers came with black lock knobs, etc. In this particular corner of the FPC, we have to look primarily at the column headings to see which car lines had what colour selection of lock knobs.

I have seen enough unrestored yellow A-bodies with enough gold and enough black lock knobs to stick to my guns on that one. I installed chrome lock knobs on several of my own vehicles over the years because at the time I thought they looked keen, and they were readily available right on the parts store shelf. I'd happily update my knowledge, but for that to happen somebody (or preferably several somebodies) will have to step forward and say "my '65 Dart GT had chrome lock knobs the day we picked it up new from the dealership".

Dan!

I vent out to the barn where I have all the doors etc.

Picture #1 shows my newly accuired 1965 Dart 270 2 dr sedan. One owner, assembled in early June of 65 in Detroit. Black door knobs.

Picture #2 shows 65 Valiant V100 three owner car with light red door knobs.

Picture #3 shows right rear door from a 1965 Dart 270 wagon sold in Portland and assembled in Los Angeles in early 1965. One owner car.

Picture #4 shows black door knobs on a black 1965 Dart 270 V8 one owner car assembled in Detroit.

Picture #5 shows my original right side door with factory chromed door knobs. Assembled in Los Angeles on January 27th 1965.

Picture #6 shows black door knobs on my one owner 270 V8 wagon assembled in Los Angeles.

Picture #7 shows the turquise door knobs from my Dart 270 assembled in early August 1964 in Detroit.

For sure I know that all Dart GTs, Barracudas and Valiant Signets sold new here in Sweden had the chromed door knobs. All those care were assembled in Detroit.

All 1965 Dart GTs what I know of came equipped with chromed door knobs. BUT, I have no documentation to back it up! And yes Dan, there must be some kind of documentation of this but during my 35 years into 65 Darts I haven't seen anything about it! But somewhere.........

Some FABO members must have a picture of the door knobs of their one owner Dart GT, Valiant Signet or Barracuda!
 

Attachments

  • 009.jpg
    27.3 KB · Views: 298
  • 008.jpg
    27.2 KB · Views: 295
  • 007.jpg
    26.2 KB · Views: 323
  • 006.jpg
    25.3 KB · Views: 342
  • 005.jpg
    23.5 KB · Views: 326
  • 001.jpg
    27.4 KB · Views: 300
  • 013.jpg
    29.1 KB · Views: 305
-
Back
Top