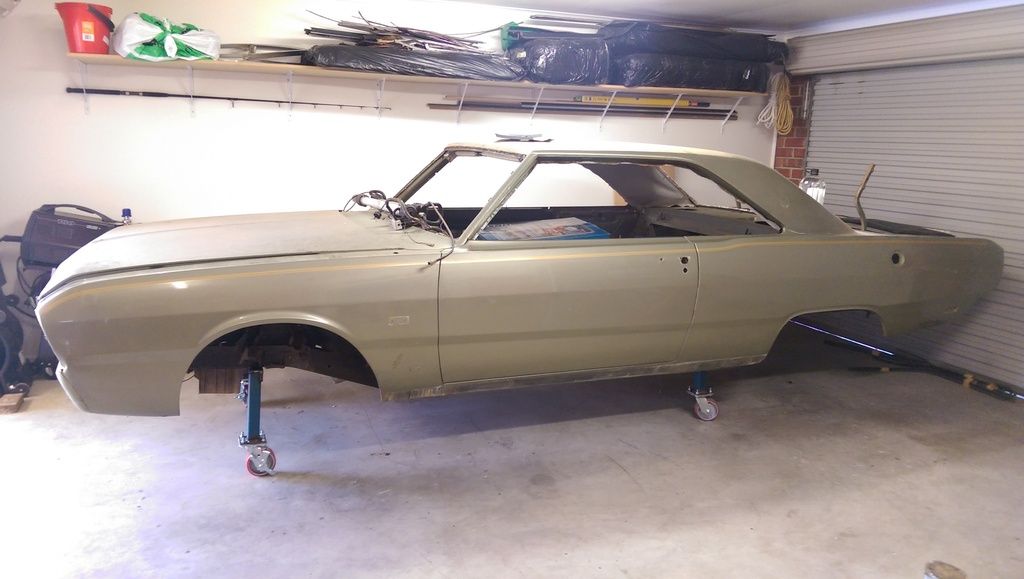
1972 Canadian H-Code 340 Dart Swinger Special Resto - Finally started!

-
Wow, you're moving right along! It's looking great so far.. I still think you'll catch up to me by the time I get back to my car, haha.

Haven't done much in the last few weeks Randy, needed a little break to do some other stuff and rest some achy joints. Need to get back at it soon, there's no threat of me catching you or Kevin, lol.
 
It's time to ease back into my project after taking a couple months off, I decided before tackling the right quarter I'd get some of these parts that I had dipped and have been sitting around in bare metal prepped and epoxied.

The hood was straight forward, a good scuff with red scotchbrite and sanding with 220 on the orbital, hang and epoxy.

IMG_2625_zpsdudifunj.jpg


IMG_2626_zpso51wnvx1.jpg


IMG_2627_zpsup07lmd1.jpg


IMG_2628_zps6oidcanf.jpg


The fenders were in pretty good shape with the exception of a rust hole at the lower back of both of them, the dipping really made visible the extent of the rust holes and also made it a bit easier to fix since its all bare metal now. A lot of members would be intimidated at replacing a quarter panel and tub themselves but this small repair is something most people could tackle if they have a bit of welding abilities and some tools to cut sheet metal with. I should have taken a few more pictures but I tend get into the repair and forgot to take a few of the welding. Anyhow these are the steps I used for this simple and solid repair.

IMG_2678_zpsydca2nkz.jpg


IMG_2679_zps1r0pi1z2.jpg


First was to clean the fender and sand it down with 220 grit and red scotchbrite to clean it up before fixing the hole.

IMG_2683_zpsbawymexp.jpg


IMG_2686_zpscuzpgmbx.jpg


Next I drilled the two spot welds on the inside lip that holds the section of skin on the outside I was removing and cutting out the section that needs to be replaced.

IMG_2691_zpsuqgkagym.jpg


IMG_2692_zpslu6gl0fa.jpg


I cut most of it with my body saw and the long cut with my cutoff wheel but you could use the cutoff wheel for all the cuts. When I remove the section it revealed that the brace on the inside was rusted thru as well so that would be the first section to be replaced.

IMG_2693_zpsgg3mfxhv.jpg


I didn't take any pics of this but I cleaned the rust off and cut a rectangular section out back to solid metal and traced a new piece from that hole, cut and stitch welded it in with small spot welds and ground it smooth.

IMG_2694_zpsuthpbeif.jpg


IMG_2695_zpsxpoytpug.jpg


Next step was to take some thin cardboard ( cereal box cardboard ) and make a template off of the section I cut out, I had to straighten it out some to do that. Then cut the piece out from the sheet steel and fine tune the fit leaving a small gap to weld into.

IMG_2701_zps0y7v4sk7.jpg


IMG_2702_zpshh0hk96l.jpg


I clamped it into position and folded the lip around the brace with a hammer and dolly, take your time and use the dolly on top of the patch to support and dampen the hammer blows while you roll the lip around and flatten it to the brace.

IMG_2696_zpsu12stdgf.jpg


Then I slid it off and final checked the fit, drilled a few holes on the inside lip for plug welding lip and sprayed weld thru primer on the brace and inside of the patch, clamped it in position and stitch welded it in place keeping it cool with air in the process.

IMG_2697_zpsk9duvoyv.jpg


Then grind inside and outside smooth and you've got a good solid repair, try to seal it well from the inside, a little tricky because the brace is in the way but there are different products for sealing in concealed areas.

IMG_2703_zpsd9kwf89g.jpg


IMG_2705_zpsajnucqmb.jpg


Hope this helps anyone who would like to try a small rust repair.

Next the other fender, same repair.
 
Last edited:
Any updates?

Been a little slow getting back in gear 813Demon340 but thanks for the interest. Haven't posted what I've done lately because its not a whole lot, lol!

Got my left fender and trunk lid prepped up and in Epoxy last week,

IMG_2718_zpsvvxillim.jpg


IMG_2719_zpsugoxrgkf.jpg


IMG_2720_zpswcytuswk.jpg


IMG_2721_zpsyvtxlsrd.jpg


Started working on the right fender last weekend, it had some previous damage that revealed itself after the dipping that needs some attention so I began some pic and file work trying to massage this old damage out and keep the filler down to a minimum.

IMG_2725_zpsthltr3sz.jpg


IMG_2734_zpsoz0uv1if.jpg


IMG_2736_zpsapupyjui.jpg


IMG_2737_zpstp5vdubs.jpg


IMG_2749_zpszpnxyxb1.jpg


IMG_2750_zps3ntow72n.jpg


This weekend I want to try and get this mostly fixed and fix this rust hole in the back of the fender,

IMG_2726_zpsbyj957bk.jpg


Once I get this fender into Epoxy its time to get back on the right quarter panel which is a little tougher then the left side but just got to jump in and " Get er Dun "

Thats where I'm at, shame on me, LOL!
 
Last edited:
Awesome step by step photos and descriptions of the progress!
You do great work, i can't wait for more.......
I hear ya about the aches and pains!
Tom.
 
Great progress on the dart, looking awesome so far. I haven't been out your way in a few months, but kids' soccer season is coming so I will look you up then. I'd love to check it out again in person and have a BS session! I have been working on my car. I installed the vinyl top, the sunroof, just finished repairing and polishing the stainless trim. Those drip rails are a nightmare! Now I am reconstructing the headliner and rebuilding the heater assembly. Maybe this summer I can drive it again
 

Attachments

  • duster.jpg
    30.8 KB · Views: 570
Awesome step by step photos and descriptions of the progress!
You do great work, i can't wait for more.......
I hear ya about the aches and pains!
Tom.

Thanks Tom, hopefully it might provide some info. others can use.


Great progress on the dart, looking awesome so far. I haven't been out your way in a few months, but kids' soccer season is coming so I will look you up then. I'd love to check it out again in person and have a BS session! I have been working on my car. I installed the vinyl top, the sunroof, just finished repairing and polishing the stainless trim. Those drip rails are a nightmare! Now I am reconstructing the headliner and rebuilding the heater assembly. Maybe this summer I can drive it again

Good to hear from you Rod, looks like your going to be driving your car this summer, looking really good. That stainless polishing looks like a ton of fun, lol, I've got a bunch to do eventually.
I'm around most weekends so drop by when your in the neighbourhood.
 
Getting after the hole on the right fender,

IMG_2752.jpg


IMG_2754.jpg


Metal on brace is pretty thin, not a hole like the other side but lets replace it doesn't take long and then its solid.

IMG_2757.jpg


IMG_2758.jpg


IMG_2759.jpg


IMG_2760.jpg


IMG_2762.jpg


IMG_2764.jpg


IMG_2766.jpg


Now get back to working on the wavy areas.

IMG_2764.jpg
 
Last edited:
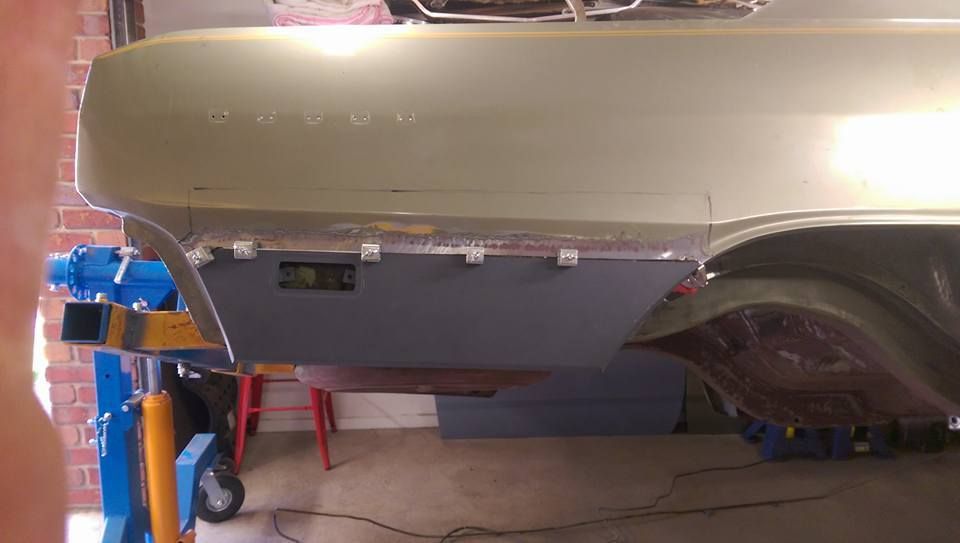
Did a bit of fitment on the right quarter this evening, some more tweaking required on this side compare to the other,


The biggest issue that I didn't have on the left side is this large gap where the three replacement panels come together inside the wheel well. I can't touch the quarter so it looks like the wheel well and trunk drop will need to be cut about an inch above the lip and brought down to properly
meet the quarter.

IMG_2771.jpg


And just like the left side I'm going to have to cut the front of the quarter and add some steel to bring the quarter all the way down to meet up with the rocker,

IMG_2772.jpg


Hopefully spend all of tomorrow out working on it and get these alterations made.
 
Last edited:
Glad to see you making steady progress!

I'm surprised to see you have such major fitment issues with the quarters! AMD are supposed to be the best. :wack:
 
Not where I liked to be by now Captain Canuck but trying to make some progress, get this quarter on then I can get it on the rotisserie. The AMD quarters are nice and straight and have good body lines but unfortunately have the two significant issues that they are an 1/8 inch short in length which causes a door gap issue and they are short in hight at the rocker. I measured them for length against my originals and they are without a doubt short. Hard to understand they would be like that and it would be nice to know if others could confirm that, I know Hemiorangeswinger had the same problem with his.

Tackled the wheel well gap problem today and "crap" that small problem took a lot of time to fix,
started by cutting the lip free from the tub and brought it down to meet the quarter,

IMG_2774.jpg


Then I made a couple of templates of the gaps so I could cut two pieces to fit that space on the tub and trunk drop, and welded them in

IMG_2779.jpg


IMG_2781.jpg


IMG_2782.jpg


IMG_2784.jpg


Now they're close and will clamp together nicely for spot welding.

IMG_2786.jpg
 
Last edited:
Love your work on this car, nothing but top shelf.

Can I ask what you use to grind your welds down and finish them so well? You can't see where your even welded them. Im slowly fitting new lower rear quarters on my Aussie built VF Valiant hardtop and Im having a hard time grinding the welds back to a nice finish.

Thanks mate

 
What size are the tires ? the wheel and tire combo looks great on this car
 
Love your work on this car, nothing but top shelf.

Can I ask what you use to grind your welds down and finish them so well? You can't see where your even welded them. Im slowly fitting new lower rear quarters on my Aussie built VF Valiant hardtop and Im having a hard time grinding the welds back to a nice finish.

Thanks mate

Sure lets see if I can help you out, I was going out to the garage this evening to knock down the weld for my lengthening part of my quarter panel,

Like the other side cut the quarter at the same spot,

IMG_2787_zpstbdlb8on.jpeg


IMG_2788_zpsmyp9mun6.jpeg


Then make the piece to splice on and clamp in place, and weld up with the blower in the other hand and keep everything cool,

IMG_2790_zpssyk3gqy0.jpeg


IMG_2791_zps4x9lv5rg.jpeg


IMG_2792_zpsf64pgd4e.jpeg


IMG_2793_zpshlm7vfqt.jpeg


Now I ran a narrow weld down the backside of the weld to fill the areas that you can see don't have full penetration just because I had access to the back side and it would insure a pinhole free seam and did this while I had the unground weld on the front side to prevent blow thru's.
Most of the previous welds that you seen ground down nicely didn't have this benefit but I made sure I had as much penetration as I could get.

IMG_2794_zps03elkb2y.jpeg


IMG_2795_zpsgf0eq9iu.jpeg


Now to the grinding process these are the weapons of choice for me,

-An angle grinder with flapper discs, I use 60 grit

- A die grinder with a stone disc

- A mini angle grinder with quick change discs ( 60grit, 80grit, 100grit)

IMG_2802_zpslwzfpfif.jpeg


I like to use the stone set on an angle and ride the top of the weld taking it down about 85 percent, the nice thing about this is you can remove most of the weld without touching and removing any of the adjacent sheet metal,

IMG_2800_zpsus29zywn.jpeg


Then I switch to the grinder with the flapper disc and take it down to about 95 percent,

IMG_2808_zpsix9iscdn.jpeg


Then I switch to the mini grinder and work my way thru from 60grit down to 100 grit and by this point the weld is pretty much invisible, then I switch to a medium coarse scuff pad and that usually look pretty decent. It sounds like a lot of work but once your finished with the stone the other steps go pretty fast.

IMG_2809_zpsjzdupf8n.jpeg


IMG_2810_zpsfuywngg5.jpeg


At this point its safe to grind down the backside weld but I left a little bit more meat on it since its not seen.

Hope that helps out some, and that's a great looking Valiant looks like its pretty solid, have you got a resto thread started? Like to keep and eye on your progress.
 
What size are the tires ? the wheel and tire combo looks great on this car

That's a good question mopar jimmie, I put those tires on back in the late 70's when I got the car, their up on the rack but they are 14inch with 70 series on the front and 60 series on the back, I'll have to pull them down and get the sizes.
 
Coming along nicely! Thanks for posting the welding and grinding process you use.

Not a problem, I checked out your build thread on the Duster project you did a few years ago beautiful job thats one sweet ride, I hope the new owner appreciates the work involved to make a car that nice.
 
Hung the quarter panel on and clamped the lower portion in place so I can find exactly where to cut the new metal and clamp it all up and welder up,

IMG_2788.jpg


IMG_2816.jpg


IMG_2817.jpg


IMG_2818.jpg


IMG_2820.jpg


Grind the welds down some, its getting late so just want to hang it on the car and check the gaps,

IMG_2823.jpg


Pinch weld gaps look good now so the worst part of the alterations to get this quarter to fit are done, need to do some more work on the weld area since like the other side some warpage to deal with and some tweaking for trunk gap.

IMG_2825.jpg


IMG_2826.jpg
 
Last edited:
Hi

Thanks for reply and outlining how you finish the weld, very big help. I ready to tackle it in the next couple weeks.

I have a little build thread on an Aussie site but I haven't updated it for a little while, its on my list to do. I might even start a build thread on here also.

http://www.moparmarketforum.com/forum/viewtopic.php?f=31&t=30277

Thanks Paul


Checked out your build thread on your Aussie site Paul, great looking project, the welding on your tunnel replacement looks really good I think you know what your doing! Love to have you set up a build thread on FABO there would be tons of interest.
 
-
Back
Top