1972 Dodge Colt

-
Cam is around 260 duration at 50 and the lift is in the 550 range.
Pistons are advertised as 12.5.
I will bushing the rods after I find a source for the wrist pins.
Won't know what happened till sometime in January.
I have to blow the Colt up to remove the engine, trans, mid mount, front mount, etc.
 
That should be a decent cam. I'd steer clear of the MP .528 because too many of them have had lobes wiped out with very low miles on them. Of course you probably already know all that! Oregon will do a regrind for @ $80 and they are great to work with. Hope you get this Colt screaming in the spring. I'd still like to meet up somewhere and race together. Keep plugging away.
PS Maybe we can get Dennis to meet us too! And Greg, And Lou.....etc
 
Back at it.
Great thing about the Colt is you can take most of the car apart to work on it.
Bad thing is you have to take it all apart to work on it!
I spent the afternoon getting stuff off the engine.
Tomorrow the interior comes out to remove trans and bellhousing.
Then the engine can come out.
Then the Autopsy begins!

Pile of Parts.jpeg
 
Wait what did I miss? Did you hurt the engine?
Evidently so. It quit running and doesn't operate the rockers or turn the distributor. He said he thinks it's the timing chain. Read the previous page.

Stan, you'll get it, buddy. That's what it's all about!
 
Yea, what Rusty said.

Last run it quit and then started back up but didn't want to keep running.
Then it started some BIG backfires on cranking so that was it for the track.
I did some checks, looks like nothing broke on the top end, but some issue somewhere.

I need more horsepower, so I was going to take it apart anyway, so here we go.

Thanks Rusty, I will get it! Last runs gave me some hope when it went a good bit faster.
 
It is fun taking apart something that is clean. I learned that from you back some, what... 4+ decades ago now? We are old. :) Best of luck and enjoy.
 
Drive shaft, 29 inches u-joint to u-joint.
View attachment 1716190733

View attachment 1716190734
Just an observation, but the front joint is in wrong as it puts the grease fitting hole under tension, should be turned a 1/4 ....or replaced w/a joint with the fitting-in-cap style,...or best w/a HD non-greasable unit with no holes.
Given the slicks & clutch, may be something to address even tho' the car is light.
 
Jerry, I still got dirty today, but I do hate a dirty car, and yes, we are getting old!

Killer, yea I had seen that but I figure 100 HP won't bother it!
I should change it out.
 
I had to quit early today to help my son with some electrical issues at his house, 2 hour round trip.

But I have the engine just about ready to come out.
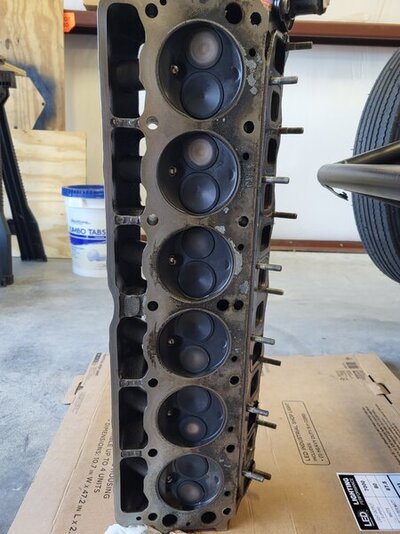
Here are a few pictures of the disassembly.
Details for me to remember and maybe some stuff to work on.
Real happy with the head gasket seal, the remflex intake/exhaust gasket and clutch wear.
Also the mixture looks pretty close even with the engine issues and trying to get it restarted,
Exhaust color on 1-2-5-6 looks great, 3-4 are a little dark for me.
I do see a little oil on the top of some pistons, so ring seal needs some work if I reuse the engine.
Resized_20240111_150712.jpeg


Resized_20240111_141958.jpeg


Resized_20240111_141103.jpeg


Resized_20240111_140930.jpeg


Resized_20240111_140955.jpeg


Resized_20240111_150720.jpeg


Resized_20240111_150735.jpeg
 
More disassembly today.
I have pulled countless slants since my first one at 15 years old.
I never thought to run a chain from the transmission brace boss to the main lifting chain.
It came out at a 30 degree tilt!
I guess someone else had figured this out before, I hadn't!
Engine Rebuild 2024 (1).jpeg


Engine Rebuild 2024 (2).jpeg


Engine Rebuild 2024 (3).jpeg
 
Looks like the low-edge on exh.valves #2-4-6 have a "clean" edge, last half of firing order, 6,2,4..
 
Sheared cam dowel.

Crank also has a booger on the snout.

Valves all good. Push rods, rockers same,

So making a plan forward.

Engine Rebuild 2024 (13).jpeg
 
Sheared cam dowel.
Just a FYI incase you are not aware. That is usually caused by the cam bolt loosening. The correct cupped cam washer is critical, and blue locktite should be used on the bolt.
Also if using a offset cam bushing, make sure the cam washer goes over at least part of the bushing (or stake the bushing into the sprocket) so the bushing can't fall out.

You caught me Charrile, I didn't find any locktite on the bolt.
I think/pretty sure I forgot to do that.
At the track I was feeling a tick with my hand on the valve cover.
I took the cover off but didn't find anything.
It was that bolt loose, dowel slop, tapping thru the valve chain.
I had the pill covered with a washer, but that wasn't the issue.
Going back with the multiple keyway roller chain now.
 
You should be able to drill out the old dowel and put a new one in.

Yea, I can save the cam, but I don't want to reuse it.
I am going with at least a .550 and a little more duration.
And a little more compression, and a little more everything!
 
Jerry, I still got dirty today, but I do hate a dirty car, and yes, we are getting old!

Killer, yea I had seen that but I figure 100 HP won't bother it!
I should change it out.
:rofl:
Oh just stop it!!! Leave the jabs to Us!!! :lol:
 
Going back with the multiple keyway roller chain now.
Personally, I don't like changing cam timing with the crank sprocket. I do like the JP/Rollmaster timing sets, but the crank sprocket fits extremely tight to the crank. It is very hard to get on and off, unless the ID of the sprocket is "honed "out a little bit. The reason I like the cam bushing better. You need to remove the cam sprocket and timing chain to be able to remove the crank sprocket and change the keyway, then you need to use a puller/installer to R&R the crank sprocket. Why do the extra step of removing the crank sprocket, when the cam sprocket is already off. Just change the bushing.
 
-
Back
Top