66 dart LED prototype working for now

-

66Dvert

Working on my custom car parts again!
Joined
Nov 2, 2008
Messages
2,630
Reaction score
977
Location
Webster , florida
IT WORKS!!
I've been prototyping my rear led's (cheap china LED's 4 chip 70ma) and let the magic smoke out of a few. until i finally figured out what to do. now I"ll order the good lumileds and have some boards made that actually have copper traces and good circuit work on them for voltage regulation.
I'm upgrading the wiring harness for the light's and ignition/charging plus checking out whatever else is bad in a 40+ year old wiring harness.
here's a link to the operation
[ame="http://youtu.be/300aTVMaVXA"]302 Found[/ame]
and yeah before you ask, they are going to be 12 volt power regulated for voltage spikes(waiting on the regulators to come in ) 12volt lock to 10.5 volt unlock . that means that it'll lock voltage @ 12 volts After I get to 10.5 volts and won't let it go over 12 volts up to a (?)50 volt spike.
I had it PWM'd but didn't like the differential in the cheap variable dc motor/PWM modules. so I used 2 different set's of resistors to give me variable light setups. I am waiting on a good set of PWM modules/with regulationbuilt in to arrive and I'll test that setup out on the good lumileds I'm ordering
the front ones I'm still working on to get the differential correct looking. only 20MA led in there right now you can see it brighten up but it looks like crap with the parking lights on.
 
Very nice I plan to do the same thing to my Valiant. Do you have a parts list?
 
Looks like you are doing thoughtful, skillful good work on this. Please be aware that the exterior lights have to work properly in all respects -- eyeballing it, even with an expert eye, and assessing it "Yep, looks good!" isn't enough to guarantee adequate safety performance from homemade vehicle lights. It sounds like you're building these for your own car and not for production and commercial sale; I'm not suggesting you have to go to the trouble and expense of sending your lamps for compliance testing (though liability with uncertified safety lights is an issue worth keeping in mind), but you should at least be aware of the factors that go into whether a brake light, tail light, parking light, turn signal or other safety light works adequately.

Factors to pay attention to include:

•Rear intensity in dim tail mode (2cd minimum on axis, 18cd maximum anywhere in the beam)

• Rear intensity in bright brake mode (80cd minimum on axis, 300cd maximum anywhere)

• Front intensity in dim park mode (4cd minimum on axis, 125cd maximum anywhere)

• Front intensity in bright turn mode (200cd minimum on axis, no maximum)

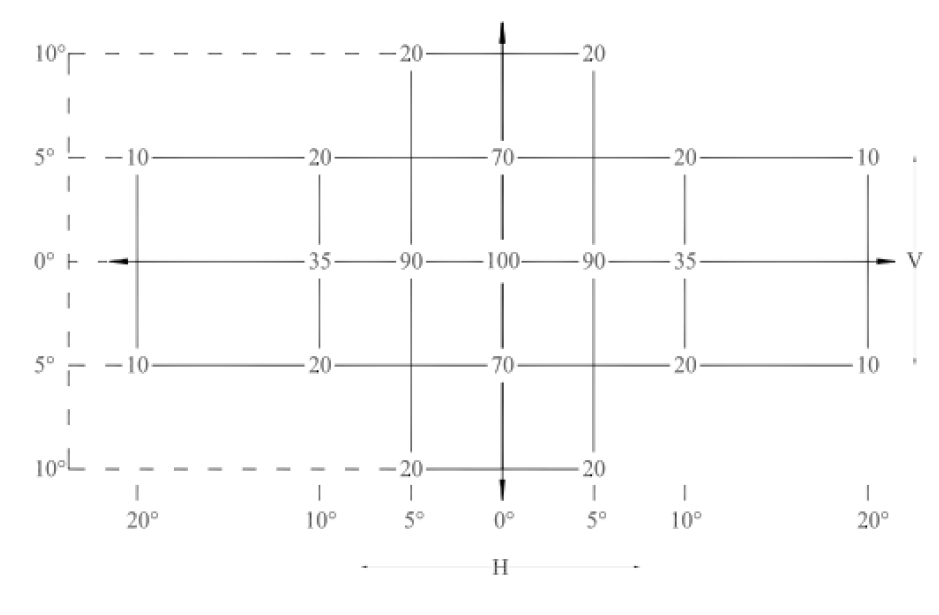
•Intensity throughout the required spread range of vertical and horizontal angles; multiply the minimum requirement by the percentage values in this table to get the requirements for the various test angles:

Lighting_Standard_Grid.png


You can see the center of the grid is "100", that represents 100% of the axial minimum intensity values listed above. At 5° left and 5°right on the horizontal, you need 90% of the minimum axial intensity value. At 10°left and 10° right on the horizontal, you need 35% of the axial minimum, and so on. These requirements are so that the lights convey their message accurately and unambiguously to drivers located anywhere within relevant seeing range...up high in a semi tractor, down low in a Corvette, one or two lanes over or approaching on an on-ramp, etc.

• Intensity ratio, bright:dim. The brake (or front turn) lamp must give at least three times the intensity of the tail (or front parking) light, except on axis as well as 5°left and right on the horizontal and 5° up on the vertical, at which points the brake (or front turn) lamp must give at least five times the intensity of the tail (or front parking) lamp. This is important so that other drivers can immediately discern whether they're seeing a brake light or a tail light, or a turn signal or a parking lamp, without having to spend seconds watching the state change (bright to dim or dim to bright).

•Intensity maintenance at high and low ambient temperatures and with prolonged use. This is a toughie; LEDs' light output increases with decreasing temperature, and decreases with increasing temperature. You need to design your driver circuitry such that the lamps will produce light within the correct intensity ranges no matter how cold or hot it is outside, and the brake lights will remain above the minimum requirement even in traffic with extended usage. Either you need to seriously underdrive the emitters or you need very good heat sinking.

Please keep us up to date on how this project evolves!
 
View attachment DSCF2042.jpg
Very nice I plan to do the same thing to my Valiant. Do you have a parts list?
not a parts list exactly. but you will need to plan it out one of two ways.
common parts for both
12 volt regulating for both types. (sharps regulators).
led's for pattern you'd like for both types. (GET LOT's of extra if you haven't done this before, I didn't order enough +40, to fix all my "magic smoke" booboo's)

PCB boards (I used a pre drilled 4x6 prototype board).

schottky diode (it's like a one way valve) power won't go the other way to overpower the dim tail light.
(1 for each row(brake/blinker and tail) 2 per light)

usual soldering stuff.
cutting instruments to shape PCB with to fit inside lenses.
Copper or Aluminium heat sink material (heat stabilizer for PCB)I use 1/8 inch soft tubing soldered to the ground link from led to led row.
(1) power regulated PWM style needs extra

PWM Module between 10.00 and 50.00 depending on style you get.
thais style does not use resistors and uses PWM mode for tail lights brightness adjustment(dim function).
still 2 rows for power (Turn/Brake and Tail)
this works like this

sharps regulator on both tail and bralke wires
1 tail light wire to PWM module to schottky diode to led's to grounding wire.
2 brake/turn to schottky diode to led's to ground
adjust dimmable PWM to desired brightness (cheap ones do NOT work good) I ordered new ones from "HIDPLANET LED forums and paid 35.00 per module plus 5.00 extra for the regulators (I got 2 module and 4 regulators)
pro's
less parts
more usable space in taillight housing
"looks like a caddy light"

con's
more expensive
more wiring
switching on the ground circuit. not a positive switching.
so don't ever let the ground go weak or it'll blow the PWM

(2) Resistor regulated function

2 resistors for each row of led's (tail function Dim)(brake/blinker function)
on mine i have 6 rows of 6 led's with 6 set's of resistors controlling the bright/dim function.
ie
tail light power to schottky diode resistor-to led-led-led-led-led-led to ground

brake/blinker to schottky diode to resistor-back up to the led's to ground

then you just add rows.
there's a led serial/parallel resistor wizard at Linear1.org to calculate you resistor value

pro's
less wiring
cheaper
constant resistance
easier to prototype

con's
less room in the tail light housing
resistors add heat to the housing(that's why i use the 1/8 copper tubing flattened as a grounding lead strip.)
more soldering connections(double check you circuits)
harder to change the bright dim ratio


I use the resistor method on the prototypes, my dc motor control(PWM) didn't work out to dim the light as much as I needed them to.

mine happen to be cheap china 4 chip leds for a prototype
2.0 forward voltage and 70MA . control voltage is 12 volts
soooo 6x2.0 =12 volts
I cheated and did a 25MA and a 45MA to get the 2 different levels of light
(your results may/will vary)
my amber front ones are cheaper single chip amber leds at
2.8 forward voltage 20MA and 12 control voltage
so 4x2.8 = 11.2 voltage and I have to resistor it down for both levels
my calc's were for this one was 7MA and 19MA. (I overdrove this from 13MA to 19MA to get a corrected resistor) hopefully it won't blow the led's.
(I've run the blinker for 9 hours with a trickle charger on the battery and it hasn't blown yet)


View attachment DSCF1418.jpg
View attachment DSCF2664.jpg
the resistor setup for both bright and dim. basically is on the bottom for the back lights and I have the fronts done in cad to make a cleaner setup
I'll redo the backs as soon as I'm sure I don't loose brightness due to heat.
I'll see if I can get some better pic's of the back side
I did run my wires to the regular light socket. I took a blown 1157 bulb and took the glass out by de-soldering the 2 leads and pulling out the glass bulb. that way I use stock harness connection without cutting any wires
hope that helped
 
Looks like you are doing thoughtful, skillful good work on this. Please be aware that the exterior lights have to work properly in all respects -- eyeballing it, even with an expert eye, and assessing it "Yep, looks good!" isn't enough to guarantee adequate safety performance from homemade vehicle lights. It sounds like you're building these for your own car and not for production and commercial sale; I'm not suggesting you have to go to the trouble and expense of sending your lamps for compliance testing (though liability with uncertified safety lights is an issue worth keeping in mind), but you should at least be aware of the factors that go into whether a brake light, tail light, parking light, turn signal or other safety light works adequately.

•Rear intensity in dim tail mode (2cd minimum on axis, 18cd maximum anywhere in the beam)

• Rear intensity in bright brake mode (80cd minimum on axis, 300cd maximum anywhere)
• Front intensity in dim park mode (4cd minimum on axis, 125cd maximum anywhere)
• Front intensity in bright turn mode (200cd minimum on axis, no maximum)
•Intensity throughout the required spread range of vertical and horizontal angles; multiply the minimum requirement by the percentage values in this table to get the requirements for the various test angles:

Lighting_Standard_Grid.png


You can see the center of the grid is "100", that represents 100% of the axial minimum intensity values listed above. At 5° left and 5°right on the horizontal, you need 90% of the minimum axial intensity value. At 10°left and 10° right on the horizontal, you need 35% of the axial minimum, and so on. These requirements are so that the lights convey their message accurately and unambiguously to drivers located anywhere within relevant seeing range...up high in a semi tractor, down low in a Corvette, one or two lanes over or approaching on an on-ramp, etc.

• Intensity ratio, bright:dim. The brake (or front turn) lamp must give at least three times the intensity of the tail (or front parking) light, except on axis as well as 5°left and right on the horizontal and 5° up on the vertical, at which points the brake (or front turn) lamp must give at least five times the intensity of the tail (or front parking) lamp. This is important so that other drivers can immediately discern whether they're seeing a brake light or a tail light, or a turn signal or a parking lamp, without having to spend seconds watching the state change (bright to dim or dim to bright).

•Intensity maintenance at high and low ambient temperatures and with prolonged use. This is a toughie; LEDs' light output increases with decreasing temperature, and decreases with increasing temperature. You need to design your driver circuitry such that the lamps will produce light within the correct intensity ranges no matter how cold or hot it is outside, and the brake lights will remain above the minimum requirement even in traffic with extended usage. Either you need to seriously underdrive the emitters or you need very good heat sinking.

Please keep us up to date on how this project evolves![/quote

>>>>>>_________________________________________
nope just for my car(s) I hate the single outboard light that acts as a turn/brake/tail and the inboard one just a bright tail light

I was afraid of that.(my looks good wasn't going to work )

I did take a (don't know the name of the thing) photographer's light sensor/meter and check the readings @ 1 foot increments past 10 ft in varying degrees of up/down and left/right combo's (I wish I knew what the sensor was reading I'll see if I can borrow that thing again and google it)

stock was directly behind the car in a horizontal line with a cleaned and repainted housing (standard aliminium paint to match the original as close as possible and all lenses washed and polished
(when I went about 10 degrees down or up it didn't make much difference approximately 1-2 drop up to 25 degree's off horizontal) for the led's
90 degrees being directly behind going to either side until the light was blocked by the bezel. after 25 degrees going vertical it dropped 5-7 on the reading each 5 degrees again for the led's

degree ft intensity tail/brake
90 @ 10 1100 1645
80 10 1100 1645
70 10 1096 1644
65 10 1096 1643
60 10 1095 1643
55 10 1095 1643
50 10 1094 1643
45 10 1092 1642
40 10 1092 1642
35 10 1090 1642
30 10 0 hit the chrome bezel
25 hit the bezel on the other side
going the other way was with in 1-2 of the light sensor reading

led's were
degree ft intensity
90 @ 10 1628 2121
80 10 1628 2121
70 10 1627 2121
65 10 1627 2121
60 10 1627 2121
55 10 1627 2120
50 10 1625 2120
45 10 1625 2119
40 10 1625 2119
35 10 1624 2119
30 10 0 hit the chrome bezel
going the other way was with in 1 of the light sensor reading not much drop horizontal and verticle was in 5 degree increments similar to horizontal until 25-30 degree mark. then I lost about 5-7 each 5 degrees untill it was blocked by the bezel
>>>>>>>>>>>>+_____________________________________

I can tell you now that the front's won't make any of those untill I get the new Led's. then the front's are/should be close.

the back's are/should be close. (yeah I know the looks good enough syndrome) but it's all I have at this moment. I have a second car that I was using as a base for the lights and a friend has a caddy that I went against for the led's. mine are (look) more intense(again looks good syndrome). I want to cast some lenses that match his (reluctor?)inside of his lense has shapes that re-direct the leds differently than mine do.
really crisp light pattern,mine's not as crisp with pillow or pyramid style shape(you can see individual LED's through the lense but blurred instead of a row of leds like the caddy with circles over each led to diffuse it into the other led.
I'd settle for a better diffusion that what's stock.

as for heat sinking I have a row of 1/8 inch copper tubing flattened and shaped on the PCB
and large solder pads and I've got a friend that has a mill and he'll make custom heatsinks that fit my grounding strips for me cheap after I finalize a design.
and when I do have the pcb's made for me I'm having the copper pads and traces made as large as I can to help heat sink the led's
I have run the light on a 12 volt regulated power supply for over 24 hours each in both modes (brake and tail)using a digital thermometer saw a rise in temp of only 5 degrees in the housing on 95 degree days during those 24 hour runs. the last test I forgot to unhook the charger and left them running in brake mode friday night and all weekend until I got back out there on tuesday evening, the housing was 10 degrees hotter that the first test. I am going to use 12volt regulators for all led wiring to limit voltage spikes.
the only oops I made was trying to check the leds with power on and shorted a couple(bunch) of leds when a wire got loose and racked across the back side of the PCB took out a row and some singles. I'm replacing the led pcb with a complete new design that uses a better led from phillips
single chip 70 MA red/orange for the rear and yellow amber 70 MA for the fronts. it'll take a little different grouping but the shape and size stays the same.
thanks for your input on my led's. I'm excited about them and I hope they work out.
 
here's the pattern for the rear led's
this lets me test fit things by cutting out the outside shape. the heavy black outline is (or will be) the copper traces that I'll have made to solder the led's to and use as a heat sink material.
the top 2 bar's are what power from the tails and brake wires solder to.
bottom lead is the ground. (BIGGER is better in this case)
View attachment DSCF2706.jpg
and a sample of the front with resistors on and working
front side you can see the schottky diodes and both set's of resistors going to the leds.
View attachment DSCF2708.jpg
back side (excuse the soldering it'll look a lot nicer after I get the boards made) one red is brake/turn and the second one is tails. black is ground.
View attachment DSCF2710.jpg
here is how it all connects without cutting wires
View attachment DSCF2709.jpg
here's the pattern ,you can see the power taps and everything
View attachment DSCF2728.jpg
 
Your meter readings give cause for concern; the bright/dim intensity ratios aren't anywhere near sufficient. Only a 49% difference axially for the original bulb, and only a 30% difference axially with the LEDs. I'd be inclined to try to rule out a problem with your measuring method/equipment as a first step, because the original lamps did comply with the 5:1 and 3:1 ratios. You may need to tweak your driver circuit to reduce the intensity in dim (tail) mode.
 
Your meter readings give cause for concern; the bright/dim intensity ratios aren't anywhere near sufficient. Only a 49% difference axially for the original bulb, and only a 30% difference axially with the LEDs. I'd be inclined to try to rule out a problem with your measuring method/equipment as a first step, because the original lamps did comply with the 5:1 and 3:1 ratios. You may need to tweak your driver circuit to reduce the intensity in dim (tail) mode.

ok will do,umm 5:1 and 3:1 (i have the 3:1 down pat but need clarification on the 5:1)
3:1 = differential between running light and turn/brake intensity
5:1 = ??? difference between tail and turn/brake on the center/main viewing angle(directly behind or offset to a small degree up/down, left/right) yes/no??


I thought the tails were quite bright in regular running mode but chalked it up to my old tired eyes but left the configuration that way until I was sure of what I was doing. I can set the dim ratio down real easy by redoing the resistor packs in the run mode. hopefully I can get that light meter thingy from the photographer again and do a comparison. plus have him show me how it works.(wayyyy to many buttons on that thing)
both front and rear are too bright in normal run mode then.
the front's will be harder to change but easier to do after I do get the change done and I have to use better Leds. or my new PWM controller comes in. I think that the stock readings were skewed a little since the inner lights stay on brighter that the outboard light untill you hit the brakes or turn. then they match up in brightnessI'll disable the inboard light and just test outboard light next time .

BTW that the only reason I wanted to go to led's (other than the cool factor) was to get both/all lights to do brake/turn and tails
 
You've created a system of four stop/tail lamps (left and right, inboard and outboard). The intensity and ratio requirements apply to each lamp, that is, inboard and outboard are treated as separate lamps, so make your test on only one lamp at a time.

Test points are specified in degrees Up or Down from Horizontal, and Left or Rright from Vertical, plotted on cartesian coordinates as you can see in the grid I posted above. So for example, a test point (H,V) refers to the intersection of the vertical and horizontal axes, that is straight back from the optical center of the lamp. (H, 5L) means zero degrees up or down from the horizontal axis, and 5 degrees to the left of the vertical axis. (5U, 10R) means 5 degrees up from the horizontal axis, 10 degrees to the right of the vertical axis. And so on.

Get a sturdy flat board and mark it up as a square grid with a ruler. Make your grid lines just a hair under 10.5" apart (the actual figure is 10.47"). Make sure the board is big enough so that the center of the grid can be aligned with the optical center of the lamp being tested. With this board held or mounted vertically (on a wall makes life easiest) exactly 10 feet away from the lamp, each grid line intersects at 5-degree intervals. So you can easily and repeatably measure at the relevant points to get the performance dialled in just right.

Mount the lamp in the car so it will be at the correct attitude (tilt angles, etc.). Align the center of your grid (which you should mark conspicuously so you can easily keep track of it as you do the test) carefully with the optical center of the lamp. This is easy enough to do vertically; measure the height from ground to optical center of lamp and then measure up that same distance from ground to grid center. It's important that the ground be at the same level between the lamp and the test board. It's harder to align horizontally, but an adjacent wall can help here, too, as long as it's straight: measure over from the wall to the optical center of the lamp, then shift the grid horizontally til its center is that same distance from the wall.

Use a good luxmeter (or the luxmeter mode of a multipurpose light meter). Wait til it's well and truly dark out. Turn off all the extraneous lights you can (house, garage, etc.), then take and record a baseline reading because there'll still be some stray light around. Now turn on the light to test in the dim (tail) mode and take readings at every grid intersection point in the range 10U to 10D, 20L to 20R. Try to take multiple readings at each point as a sort of on-the-fly reality check. Write down each reading. Now switch the lamp to bright (stop) mode and take readings again throughout the same grid. While you're at it, double-check for intensity maintenance with prolonged operation: take a reading at (H,V) immediately after switching to bright mode, then take another reading after 10 minutes' steady operation, and another reading after 30 minutes.

Now go to a desk and do some math. Subtract your baseline "all lights off" reading from each of the grid readings you took. Now multiply all your grid readings by 9.29 to turn the lux values into candela values; these can be used to check against the applicable technical standards (send me a PM and I'll send them to you) to make sure you're within the required intensity range for the lighting functions you're doing. Basics: the maximum allowable intensity from the stop lamp function is 300 candela; for the tail lamp function the maximum is 18 candela. The minimum for both functions varies by test point.

The bright:dim intensity ratio must be at least 5:1 at points (H,V); (H,5L); (H,5R), and (5U,V). At all other points, the ratio must be at least 3:1.

You may want to complete the LED upgrade with a CHMSL -- if you decide to make your own, the CHMSL function has its own requirements; I can send those to you, too.

If you can wring at least 500cd at (H,V) out of the fronts in bright mode, while keeping the emitters well enough heat sunk to keep intensity above 500cd with prolonged operation, they qualify to be operated as DRLs.

You may have started out just wanting to get the whole rear cluster to light up for brake/turn mode, but it looks like you're going to wind up with a system that is a real safety performance improvement over original. If you've read this far, let me say I appreciate and respect how you're considering the importance of the safety aspects of the kind of upgrade you're working on. Some others have been dismissive and less thoughtful.

(Also, I like that you're using a resistive control circuit rather than PWM. It will mean your lights won't produce that irritating "bead effect" visible to observers whose gaze scans across your lamps when they're operating in dim mode.)
 
thanks! I now have a better understanding of what I need to do. I may not get it quite perfect but I will get it in range to be safe. all my readings were with the lights (all 4 of em)on ,uhh and with the garage lights on. screwed that one up bad didn't I? I do know that my ratio on the front's are not good enough and I've ordered some good leds to replace those low 20Ma led's and i will have to play a bit to hold the running/parking lights down on both the front and rear lights
for the rears I'll have to add a removable daughter card on the back for different resistor packs to get to the correct ratio.

the instructions are clear enough that I had no problem understanding them. I'll try to hit it on the button to get the correct ratio

I worked in a automotive glass plant (MCGraw glass plant Detroit Michigan) and we used the CHMSL designation for the cutout that went into the black band on the rear window(backlight) area that the 3rd brake light was installed into. since I'm doing a convertible I'm not going that route,but your probably not talking about the same CHMSL that I am.

I'm going to try to set up the grid(with the garage lights off and one at a time) and do the test's to see where I'm at. may take a little while though. I called my friend the photographer and asked to borrow that meter again plus I told him what/how I did it, he's pretty booked up right now so it may take a while to get back to me.

IF/When he does come over to drop the meter off I'm gonna kick him as hard as I can. it took him 20 minutes to call me back after he dropped his cell phone because he was laughing so hard at me.(hey I didn't know and he didn't tell me)

thanks for your help and helping me understand my lighting a little better.
 
Glad to help out.

(And yeah, the CHMSL I linked won't work for a convertible, but I bet you can come up with a nice external-mount solution)
 
Another method you may consider to get the proper variance between dim and bright is to make the inner-most 12 led's (per your drawing(and keeping the "outer ring" for running) activate only in brake/signal mode. Eliminating these 12 will reduce your lumens (hopefully enough) to get you the variance you would be looking to acheive.

This may not work. Just a suggestion from someone who has ample time at the soldeing iron.

I thought about that and tried it first (didn't like the looks) and decided I wanted to get the maximum allowable brake/turn lumens (when I stop I want you to know it) that's why all 4 are used as turn/brake along with running lights.

I'm waiting on the photographer to drop off his meter and show me how to read it correctly (this time) I checked it wrong and read it wrong, also on the wrong setting too! total screwup and my fault for not asking.

Since I'm doing this for both my cars I'm going to make a pattern and add a daughter card for the resistor packs so I can just make the packs in different levels and just plug them in using male/female pin strip connectors to test instead of having to re-solder the resistors in each try.
full bright looks to be ok, I'll really know more when I can test it correctly using SlantSixDans instructions. I'm working on the front's now because I know they weren't up to snuff as they say.
 
Please keep us posted. I love this kind of creativity. And if you want to sell these things you probably could. If you decide to, let me know. i have a pair of 65 cuda tails you could borrow for mock up.
 
I thought about that and tried it first (didn't like the looks) and decided I wanted to get the maximum allowable brake/turn lumens (when I stop I want you to know it) that's why all 4 are used as turn/brake along with running lights.

I think what Hemitheus meant was using only some of the emitters for the tail function, and all of them for the stop/turn function.

I'm working on the front's now because I know they weren't up to snuff as they say.

Get those fronts as bright as you can. Maybe a phosphor-converted amber emitter?
 
I think what Hemitheus meant was using only some of the emitters for the tail function, and all of them for the stop/turn function.


Get those fronts as bright as you can. Maybe a phosphor-converted amber emitter?

yup I knew what he meant, I tried the outside ring as tails and all the rest as brake and turn. I didn't like the back to back D shape of the tails(wife did though and I might do it for her car) I think I still have it laying around here somewhere. it was different and a wiring nightmare. I'll see if I can post a pic or 2 of that when I find it and yeah it'd cut down on the intensity real easy and probably give me the ratio I need to pass muster.

as for the front I only had 3000@20ma yellow ones from a previous christmas decoration job I did for my friend. I ordered some (200) amber/orange lumileds that are 15000mcd@70Ma and some good(400) agilent HPWT lumileds about 17000mcd@70Ma for the rears that are matched, that way if I goof up I'll have some matched leds to redo things with.

As for the phosphor coated amber I'm looking for some to test for front turns
I'm still waiting on the photographer to drop off his light meter and explain how to use it in the correct mode before I get crazy changing things.
still pluggin along but slowly right now
 
I didn't like the back to back D shape of the tails

Okeh…how about alternate rows of emitters on for tail, all rows on for stop/turn? Or alternate individual emitters on for tail (offset by one location in each row to form checkerboard pattern so as to minimise stripey effect), all on for stop/turn?

Just ideas...
 
Okeh…how about alternate rows of emitters on for tail, all rows on for stop/turn? Or alternate individual emitters on for tail (offset by one location in each row to form checkerboard pattern so as to minimise stripey effect), all on for stop/turn?

Just ideas...

hmmm I just might try out the different types of designs to see if one does look ok (to me) and gives me the 5 to 1 and 3 to 1 ratio. the Wife still likes the outer ring lit in tails and full on for brake and turn so I might do a set for her setup that way just to test out.
 
You could also consider back to back C's instead of D's. The D's would drive me nuts also
 
You could also consider back to back C's instead of D's. The D's would drive me nuts also
I was tinkering with that and ended up liking the design. (still have to see what it looks like) . the Wife likes this one better that the double D's too! here's a bottom view of the pad design. just a little more work to do for the holes
View attachment c-light righ inner.jpg
I'm still waiting on my led's to come in but I'll etch up a board, can't use prototype board on this one. spacing is all over the place on this board and on the Double D one too!
 
I was waiting on my(a friends) light meter to arrive and decided to try a little different approach to the tails on the dart. Left side was the original test and the right side is the newer style,I think I like it better.
here a short video of it
[ame="http://www.youtube.com/watch?v=sBZ6jnxD7Fc"]66 Dodge Dart led (outer ring) taillight test - YouTube[/ame]

So what do you think? better or worse than the full setup for looks?
(Hey SSDan I have those outers rings resistored down to 4MA, so once I get the meter and am able to test I hope it hits the mark)
 
do you plan on selling the lights to be able to bolt into a 1966 dart tail light housing?
 
do you plan on selling the lights to be able to bolt into a 1966 dart tail light housing?
I'm not sure yet, I have been asked a couple of times about selling them,but I'd like to make sure they will be Safe for me and anyone who uses them first. I'll be using SlantSixdans recomendations to correct the lighting errors,shooting for the correct ratios and then go from there. if everything works out then a "definitely maybe" due to safety
and if I can't get them safe enough then I will not be.

It wouldn't be a drop in but closer to a small kit with the 2 extra /turn/brake light sockets and wires with taps to change the inners lights to dual function and voltage regulation so that it doesn't spike the leds and smoke them.

there would be no modification of the housings or bezels needed and I can go back and forth relatively easy to either led's or lights,even though I'll never go back to just the outer set working as brake, tail and turn.
 
-
Back
Top