Woods74
Broke Senior
Hope for the best, although Treblig is doing a damn fine job carrying the torch.
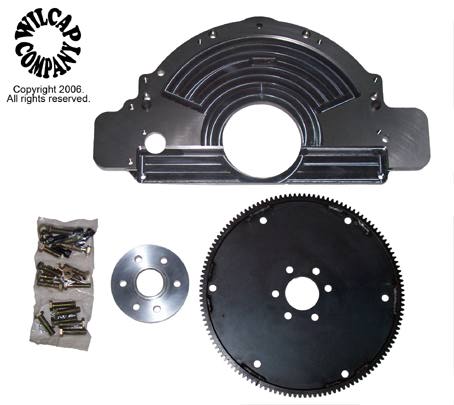
Get the measurement from bell to end of tail shaft and I will see if you saved any length compared to the wilcap.
In the evening, I installed the new bellhousing onto the transmission. I had to cut a few threads off the ends off all the bolts I used to bolt the bellhousing to the transmission. The bottom two bolts required about twice as many threads removed to avoid bottoming out in the holes. Everything went together quickly and I'm sure it saved me days of trimming and fitting the old style plate adapters from TCI & Wilcap.
I've already had to ship it back once because it didn't clear the added depth of the tone ring style flex plate I run for the EFI.
I also had to grind a small relief at the bottom of the bellhousing so the converter would drop all the way in.
I'm going to have to box the converter back up and send it back to Precision to get it modified. It's always something.

Thanks for the effort. I was under the car and measuring where the ring gear and torque converter pads line up on my 5.9 & 727. I also carefully measured the 200R4 with new bellhousing with the new torque converter.
I determined the new converter is spaced like a stock GM converter, and is basically 5/8" too thin from front to rear. In other words, the starter ring gear and mounting pads need to be moved toward the front of the car 5/8". That will leave me with 1/4" to 3/16" freeplay, so the converter won't be binding with the trans pump when bolted up to the flex plate.
I also had to grind a small relief at the bottom of the bellhousing so the converter would drop all the way in.
The last pic is the 5.9 & 727 currently in my car.
I'm going to have to box the converter back up and send it back to Precision to get it modified. It's always something.
If you move the starter/ring gear and mounting pads forward 5/8" won't you have to put a spacer on your starter so that the starter drive gear doesn't overshoot the ring gear??
treblig
sounds a lot faster to just trim the old style adapter plates to me.
this one is sounding better and better...
[URL="http://www.wilcap.com/426350wearsM.jpg"][/URL]
sounds a lot faster to just trim the old style adapter plates to me.
this one is sounding better and better...

No, both the pads and the ring gear are 5/8" too deep into the transmission right now. It's actually in 3/4" with the converter all the way in against the pump with the transmission standing on the tailshaft (dropped it in and rotated it until I got the three clunks), but I have to take away 1/8 to 3/16" to allow the recommended freeplay.
I referenced this web page. http://ls1tech.com/forums/automatic-transmission/821738-torque-converter-installations.html
Once I get the converter measurements sorted out, it "should" bolt right up to the engine and flex plate.
Sounds most intriguing ! Is the bellhousing compatible with the slant-6 ? What is the stall-speed on the torque converter ? I'm weighing a transmission change for my car. I believe it revs too high at highway speeds. I'll follow this thread with interest.
JBC, I see the vise jaw prints in the fittings. The first one I made got ruined because I tightened a little too much in the vise when I was drilling and tapping. If you crush it just a little (.003" -.005") you won't be able to use it. I left out this detail because nobody showed any interest in this method when I was posting...Sorry.
I ended up screwing the mating part into the fitting so that it wouldn't get crushed (but I was still very careful with the torque on the vise. Try them out before you go too far to make sure they still work otherwise they look very nice.
I always hesitated hoping I wasn't writing too much when I configuring the 2004R for installation. So I left out some of the small details. Besides...I felt like a big dummy for not realizing that I was crushing the fitting.
treblig
Thanks for the info, once again, I saw the vice marks on your's and knew they must be very soft. I figured you, as a machinist, knew just how soft they were and still ended up with some vice marks on them. I figured mine would look the same when I was done.
I guess I should fab up some aluminum vice jaw covers for this type of work. I screwed the tube fittings in the end first too, and used the minimum force to hold them steady while drilling and tapping. The tube nuts still screw in and out with ease still. Did you notice I got the 1/8" male /male fittings without the nut in the middle? They were out of those, and I hope I don't have an issue when I screw the adapters into the radiator using the larger nut on the end. I'll use Loctite fitting sealer (not the normal red or blue, but the one made for fittings and pipes etc) when I install them.
They should be pretty strong now using your technique. I picked up a $50 tubing bender from Summit a few weeks ago. They look similar to pliers. I've used the cheaper hand held benders before and ended up with some near kinks in my 90 degree bends. I didn't want that to happen again. I also ordered a 25' box of 5/16" tubing. If I mess up making my lines, I will have another chance or two.
Are these flare fittings on the cooler lines double flared like brake line ends, or are they single flared? I can make either ones.
