One wire lock-up, 4 spd automatic w overdrive into A-body.

-
Hope for the best, although Treblig is doing a damn fine job carrying the torch.
 
Fishing was only OK. I caught and released 24 fish. The biggest was only 3 lbs.

The good news is the core block for the new 408 stroker showed up last Thursday. It's down at the machine shop getting set-up for the bottom end to go together.

I ordered a set of 30lbs injectors at Hemifever's ( he's an SCT Tuner guru) recommendation. They can flow up to 36 lbs at 58 psi, so they should match my target of just under 500 hp. If anyone is interested in the 24 lbs injectors I'm pulling out, let me know. They only have a few thousand miles on them.

The old 5.9 and 727 are coming out this weekend. Once I have them out, I can mock-up the new trans on the old 5.9. and check for proper torque converter positioning, bolt and starter line-up, and any other issues etc.

I'll be sure to get plenty of photos and point out and glitches I encounter.

Here's a pic of the old 5.9 showing some of the EFI plumbing.
 

Attachments

  • IMG_3276 (Large).jpg
    58.3 KB · Views: 716
After having a fuel pump failure in my 1970 'Cuda that left me stuck on a freeway on-ramp with no shoulder partially blocking traffic for nearly an hour, I finally made it back home via flatbed. Not fun! I spent most of the day getting my garage cleaned up and cleared out to make room for the upcoming install. Then I gave the old 5.9 & 727 w 3.23's combo I currently have in my 68 convertible it's last run before removal begins today.

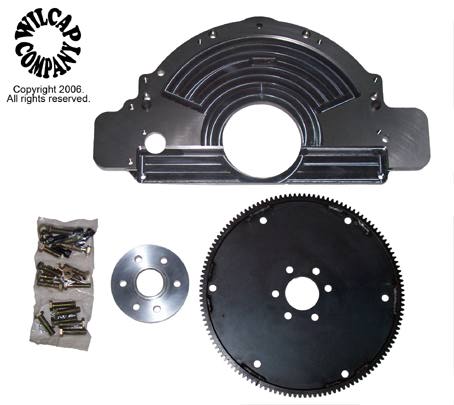
In the evening, I installed the new bellhousing onto the transmission. I had to cut a few threads off the ends off all the bolts I used to bolt the bellhousing to the transmission. The bottom two bolts required about twice as many threads removed to avoid bottoming out in the holes. Everything went together quickly and I'm sure it saved me days of trimming and fitting the old style plate adapters from TCI & Wilcap.

I posted these same pics over on Treblig's post, but here they are again. Sorry for the bad picture quality, I guess will have to use the flash on future pics.
 

Attachments

  • IMG_3550 (Large).jpg
    42.1 KB · Views: 688
  • IMG_3549 (Large).jpg
    33.8 KB · Views: 672
  • IMG_3545 (Large).jpg
    32.7 KB · Views: 684
  • IMG_3547 (Large).jpg
    35.5 KB · Views: 689
  • photo 3.jpg
    37.7 KB · Views: 687
  • photo 1.jpg
    40.1 KB · Views: 695
  • IMG_3548 (Large).jpg
    34.8 KB · Views: 681
Get the measurement from bell to end of tail shaft and I will see if you saved any length compared to the wilcap.
 
Get the measurement from bell to end of tail shaft and I will see if you saved any length compared to the wilcap.

OK, thanks!.
I used a straight edge on the output shaft and hooked my tape measure to the face of the bellhousing . I measured 29 1/16" from the bellhousing face to the end of the output shaft.

When I measured from the bellhousing face to the end of the aluminum tail section where the seal goes, I got 28 3/8".

I found this on the web. It's hard to see, but the stock length appears to be 28 1/4" from bellhousing face to the end of the cast tailshaft. The upper measurement in the photo relates to the centerline of the rear mounting bolt holes, which is shown as 27 15/16".

I'm assuming is 1/8 of an inch longer than a stock 200R4, but my measuring could be off too.

I'm going to go out in a bit and drop the torque converter into it, so I can see if the mounting tabs for the flex plate are going to end up in the right location. I've already had to ship it back once because it didn't clear the added depth of the tone ring style flex plate I run for the EFI.
 

Attachments

  • GM Trans lengths.jpg
    36.2 KB · Views: 675
I measured about 29 inches from face of wilcap to seal. The tranny is in car with driveshaft on so I couldn't measure to end of tail shaft.
 
Thanks for the effort. I was under the car and measuring where the ring gear and torque converter pads line up on my 5.9 & 727. I also carefully measured the 200R4 with new bellhousing with the new torque converter.

I determined the new converter is spaced like a stock GM converter, and is basically 5/8" too thin from front to rear. In other words, the starter ring gear and mounting pads need to be moved toward the front of the car 5/8". That will leave me with 1/4" to 3/16" freeplay, so the converter won't be binding with the trans pump when bolted up to the flex plate.

I also had to grind a small relief at the bottom of the bellhousing so the converter would drop all the way in.

The last pic is the 5.9 & 727 currently in my car.

I'm going to have to box the converter back up and send it back to Precision to get it modified. It's always something.
 

Attachments

  • IMG_3566 (Large).jpg
    42.2 KB · Views: 658
  • IMG_3565 (Large).jpg
    39.6 KB · Views: 660
  • IMG_3563 (Large).jpg
    48.3 KB · Views: 671
  • IMG_3551 (Large).jpg
    27.7 KB · Views: 669
In the evening, I installed the new bellhousing onto the transmission. I had to cut a few threads off the ends off all the bolts I used to bolt the bellhousing to the transmission. The bottom two bolts required about twice as many threads removed to avoid bottoming out in the holes. Everything went together quickly and I'm sure it saved me days of trimming and fitting the old style plate adapters from TCI & Wilcap.

I've already had to ship it back once because it didn't clear the added depth of the tone ring style flex plate I run for the EFI.

I also had to grind a small relief at the bottom of the bellhousing so the converter would drop all the way in.

I'm going to have to box the converter back up and send it back to Precision to get it modified. It's always something.

sounds a lot faster to just trim the old style adapter plates to me.


this one is sounding better and better...
426350wearsM.jpg
 
Thanks for the effort. I was under the car and measuring where the ring gear and torque converter pads line up on my 5.9 & 727. I also carefully measured the 200R4 with new bellhousing with the new torque converter.

I determined the new converter is spaced like a stock GM converter, and is basically 5/8" too thin from front to rear. In other words, the starter ring gear and mounting pads need to be moved toward the front of the car 5/8". That will leave me with 1/4" to 3/16" freeplay, so the converter won't be binding with the trans pump when bolted up to the flex plate.

I also had to grind a small relief at the bottom of the bellhousing so the converter would drop all the way in.

The last pic is the 5.9 & 727 currently in my car.

I'm going to have to box the converter back up and send it back to Precision to get it modified. It's always something.


If you move the starter/ring gear and mounting pads forward 5/8" won't you have to put a spacer on your starter so that the starter drive gear doesn't overshoot the ring gear??

treblig
 
If you move the starter/ring gear and mounting pads forward 5/8" won't you have to put a spacer on your starter so that the starter drive gear doesn't overshoot the ring gear??

treblig

No, both the pads and the ring gear are 5/8" too deep into the transmission right now. It's actually in 3/4" with the converter all the way in against the pump with the transmission standing on the tailshaft (dropped it in and rotated it until I got the three clunks), but I have to take away 1/8 to 3/16" to allow the recommended freeplay.

I referenced this web page. http://ls1tech.com/forums/automatic-transmission/821738-torque-converter-installations.html

Once I get the converter measurements sorted out, it "should" bolt right up to the engine and flex plate.
 
sounds a lot faster to just trim the old style adapter plates to me.


this one is sounding better and better...
[URL="http://www.wilcap.com/426350wearsM.jpg"][/URL]


Before I bought my TCI adapter I called TCI and Wilcap to find out which one was the thinnest so that it would minimize the amount I would have to cut off my cross member (substantially weakening that side) . The Wilcap people said their adapter was 5/8" thick while TCI said their's was only 1/4" thick. I chose TCI for that reason. If the Wilcap is actually 5/8" thick be prepared to cut a substantial amount of metal off the passenger's side cross member and the whole section of the driver's side. In the pics I attached you'll see the driver's side and you can also see how much I had to remove. If the Wilcap is 5/8" thick you will have to completely remove the section that the arrows are pointing to. You will also have to remove approximately 1/2" of the opposite side of the cross member (passenger's side). Just my opinion, many members prefer the Wilcap because it doesn't require all the cutting on the plate. But since my labor is free I didn't mind at all.

Treblig
 

Attachments

  • DSC03318.jpg
    29.5 KB · Views: 688
  • DSC03319.jpg
    33.5 KB · Views: 699
sounds a lot faster to just trim the old style adapter plates to me.


this one is sounding better and better...
426350wearsM.jpg

They are nice, but they won't work with my factory OBDII EFI. because of the tone-ring that's an interagl part of the flexplate on Magnums. Adapter plates have been the go to method for a long time. Really, they were the only game in town, but they have their disadvantages too.

Yes, the converter issue has been a pain, and it would have been nice to get the right converter the first time, but this is a relatively new way to take advantage of the 200R4's without using the adapter plates. I'm sure there is some trimming involved with all the plates too.

Also one has to realize, when using the adapter plate kits, you have to use the 3 mounting lug GM torque converters.
 
No, both the pads and the ring gear are 5/8" too deep into the transmission right now. It's actually in 3/4" with the converter all the way in against the pump with the transmission standing on the tailshaft (dropped it in and rotated it until I got the three clunks), but I have to take away 1/8 to 3/16" to allow the recommended freeplay.

I referenced this web page. http://ls1tech.com/forums/automatic-transmission/821738-torque-converter-installations.html

Once I get the converter measurements sorted out, it "should" bolt right up to the engine and flex plate.


I was worried about this same issue so I bolted the 2004R to a 318 short block I have in my garage with the TCI flexplate, adapter ring and torque converter installed as per instructions. It was the only way I could guarantee that the Torque Converter spacing was correct and with the starter installed I also checked the starter gear to ring gear clearance. I didn't want to have any issues once I pulled the tranny out of my car and attempted to install the 2004R.

Treblig
 
I used the wilcap and no trimming is done to the plate. But you do have to remove a lot of the crossmember. I am using coil overs so that didn't bother me.
 
Sounds most intriguing ! Is the bellhousing compatible with the slant-6 ? What is the stall-speed on the torque converter ? I'm weighing a transmission change for my car. I believe it revs too high at highway speeds. I'll follow this thread with interest.
 
Sounds most intriguing ! Is the bellhousing compatible with the slant-6 ? What is the stall-speed on the torque converter ? I'm weighing a transmission change for my car. I believe it revs too high at highway speeds. I'll follow this thread with interest.

Unfortunately, I don't think they make one for the Slant 6. Currently they only have them for Big Block Mopar, Small Block Mopar and the Gen 3 Hemi's.

Here is a link to all the currently available bellhousings from Reid. http://www.reidracing.biz/transmission-products/bellhousings
 
I contacted Precision Torque Converters this morning. They sent me a return UPS tag, and it is on it's way back for what I hope is the final time. Once we get this sorted out, anyone will be able to call them up and order a proper fitting converter for this bellhousing conversion. They really are great people to work with. It's tough to get it right the first time when all the parts aren't here for measurement and test fitting. I hope I got my measurements right. If it doesn't fit this time, it will be on me. Most all of the previous swaps using the plates have simply adapted the Chevy torque converters using the spacer plates. I am blazing ne ground by using a GM/Mopar hybrid with the 4 mounting lugs vs GM's 3 mounting lugs.

My engine block is fresh out of the hot tank at the machine shop and the assembled 408" short block should be ready to pick up when the converter gets back. I've assembled motors that turned out fine before, but just don't have the time and inclination to tackle this one. The ported Eddies are sitting in boxes on my bench waiting for that day, and a Hughes recommended cam, HER2836-ALN10, with 1.6 to one rockers should make a sweet hot street combo. (see specs below)

In the meanwhile, I ordered a pair of 1" front torsion bars and some LCA stiffening plates from Firm Feel. I have the small block bars in there now and they were ok when it had the slant 6 & 904, but they are too soft with the 5.9 & 727.

The upside of these little delays is that progress is being made, and I get to enjoy my convertible for a few more weeks in this nice weather we've been having.


Camshaft Technical Details
Intake Valve Lift 1.5 .510"
Exhaust Valve Lift 1.5 .533"

Intake Valve Lift 1.6 .544"
Exhaust Valve Lift 1.6 .568"

Intake Duration at .050" 228°
Exhaust Duration at .050" 236°

Lobe Separation Angle 110º

Intake Opening at .050" 7° BTC
Exhaust Opening at .050" 51° BBC

Intake Closing at .050" 41° ABC
Exhaust Closing at .050" 5° ATC


Min. Suggested Cylinder PSI 165

Sweet Spot RPM 2800 - 6600
 
While working with Treblig regarding the transmission adapting the transmission cooler lines to minimize the Mopar small fitting restriction, I found out this from the TCI Tech pages. (Mopar has the smallest fittings at the transmission and radiator 1/8" NPT -5/16" flare, but Chevy & Ford run the 1/4"NPT - 5/16 flare. They all use 5/16" lines though).

We were both trying to maximize the stock Mopar 1/8" NPT fittings by enlarging the internal hole in them to at least .220" to .230". Treblig got the job done by custom making and silver soldering his radiator fittings. It's a clean set-up.

I was going to have the internal, lower radiator transmission cooler replaced with a GM unit, but have since decided to follow Trebligs' lead, because after I contacted my trans builder Lonney at Extreme Automatics and ran all this by him; he said you actually want some restriction to slow the fluid in the cooler lines down enough to let the coolers take more heat out of the fluid. Only a small percentage of the fluid is being directed through the cooler lines at any given time, so the .220" fitting orifices are fine. He even went further and said the feed inside the actual pump is even smaller.

This makes it even easier and slightly less expensive when it comes to adapting the 200R4 to our Mopars.

Some guys would just bypass the radiator and go directly to an auxiliary tranny cooler, but it is important to warm the fluid up to operating temperature( and also take some heat out of the fluid when hot) before sending it to an auxiliary cooler.

The ideal transmission temperature for the fluid looks to be 175 degrees. I'm going to add a transmission temperature gauge at Treblig's suggestion.
 

Attachments

  • IMG_3576 (Large).jpg
    36.5 KB · Views: 654
  • IMG_3574 (Large).jpg
    40.8 KB · Views: 660
Sorry for the lack of updates, I've been upgrading the front suspension on the car in anticipation for more progress on the 200R4 install. The torque converter is still out of town and my short block is not quite done yet.

I have been posting some ideas and learning a lot about what I'm getting into over on Treblig's post regarding using the stock console mount shifter to control his 200R4. He is a wealth of knowledge and there are some other sharp guys pointing out important things to consider too.

Here's the link.
http://www.forabodiesonly.com/mopar/showthread.php?t=252436

Treblig has done some fascinating work and knows a lot about this type of transmission swap. He's using a slightly different approach, but many items are the same. It's a good read if you want to put one of these transmissions behind your Gen 3 Hemi, your big block or your small block.
 
Sorry if you already saw this information oon Treblig's post, but I figure some guys might not be following that and I want to keep this post going.

Following Treblig's method, I drilled, tapped and silver soldered up the transmission cooler fittings to adapt the larger 5/16 by 1/4" GM /Ford sized radiator tank fittings to the 1/8 by 5/16" Mopar fittings on my radiator. They cam out good. I also enlarged the internal hole in all four fittings (2 at the radiator & 2 at the trans) to the next drill size up - 7/64's or from .220" to .234". It's mot a lot, but it is bigger and it didn't affect the sealing seats for the cooler line ends. The picture of the radiator and cooler lines is they way it is currently set-up. I will need to make a shroud soon, as I am going to put a big A/C condenser in front of the radiator. I already have a trans cooler up there too.

I picked up a Mark Williams 1350 u-joint yoke, and stuffed it into my 200R4. I guess I will have to pull it out and ship it back to Strange when I order my driveshaft. The length will have to be determined once everything has been fitted in the car. I had Dr Diff put the 1350 yoke on the 3.91 8 3/4 chunk I bought from him last month, and he told me Strange will make a seamless chrome moly driveshaft for under $300 delivered. My local guy can't even beat that. They also can upgrade to hardened ends for a few buck more putting the cost around $350 if I'm not mistaken.

On the 408 Stroker engine progress, the shop had a guy out with a surgery, and another guy sick. They are a few weeks behind now, and my block has been hot tanked, but is waiting in line. They say the short block should be done sometime next week.

I'm still driving the car everyday to work and about town and really enjoying the front suspension upgrades (1 inch torsion bars, Hotchkis adjustable strut roads and the lower control arm stiffening plates) I haven't even had it aligned yet other than with a tape measure in my driveway and it already rides handles WAY better. It is slightly stiffer though, but still compliant over bumps and potholes. It just feels way more solid.

I did order up the K frame reinforcing kit, and the sector shaft reinforcing kit from Firm Feel, so I can do the final suspension upgrades when the motor and transmission are finally out.

Since I will be pulling the k-member anyway, does anyone have a simple engine/trans dolly I can make up to try when I stuff power train in from the bottom of the car instead of my usual way of installing from the top?
 

Attachments

  • IMG_3607.jpg
    21.7 KB · Views: 600
  • IMG_3608.jpg
    21.2 KB · Views: 627
  • IMG_3574 (Large).jpg
    40.8 KB · Views: 602
JBC, I see the vise jaw prints in the fittings. The first one I made got ruined because I tightened a little too much in the vise when I was drilling and tapping. If you crush it just a little (.003" -.005") you won't be able to use it. I left out this detail because nobody showed any interest in this method when I was posting...Sorry.
I ended up screwing the mating part into the fitting so that it wouldn't get crushed (but I was still very careful with the torque on the vise. Try them out before you go too far to make sure they still work otherwise they look very nice.


I always hesitated hoping I wasn't writing too much when I configuring the 2004R for installation. So I left out some of the small details. Besides...I felt like a big dummy for not realizing that I was crushing the fitting.

treblig

Thanks for the info, once again, I saw the vice marks on your's and knew they must be very soft. I figured you, as a machinist, knew just how soft they were and still ended up with some vice marks on them. I figured mine would look the same when I was done.

I guess I should fab up some aluminum vice jaw covers for this type of work. I screwed the tube fittings in the end first too, and used the minimum force to hold them steady while drilling and tapping. The tube nuts still screw in and out with ease still. Did you notice I got the 1/8" male /male fittings without the nut in the middle? They were out of those, and I hope I don't have an issue when I screw the adapters into the radiator using the larger nut on the end. I'll use Loctite fitting sealer (not the normal red or blue, but the one made for fittings and pipes etc) when I install them.

They should be pretty strong now using your technique. I picked up a $50 tubing bender from Summit a few weeks ago. They look similar to pliers. I've used the cheaper hand held benders before and ended up with some near kinks in my 90 degree bends. I didn't want that to happen again. I also ordered a 25' box of 5/16" tubing. If I mess up making my lines, I will have another chance or two.

Are these flare fittings on the cooler lines double flared like brake line ends, or are they single flared? I can make either ones.


Great!! Just remember that silver solder is much better than regular solder but not as strong as brass. In other words, when you go to tighten the trans line into the fitting (after you've tightened the fitting to the radiator) be sure and put a wrench on the fitting that has the solder so you don't twist off the solder joint while you're tightening the trans line. I think I may have mentioned that in my 2004R posts.
As far as sealer goes, I always use liquid Teflon on threads for trans line and radiator.

Treblig
 
-
Back
Top