66 Valiant Electrical Issue?

-

64 SRT8 Dart

Well-Known Member
Joined
Dec 1, 2010
Messages
2,340
Reaction score
91
Location
Colorado Springs,Colorado
Was driving home from a friends home tonight in the rain in my 66 Val and encountered some weird electrical issues.

Was cruising around 60mph with the headlights on and wipers running. Had been driving for about 15-20 minutes then all of a sudden all lights (headlights and gauge lights) went completely out, wipers quit, and engine stalled for about a second then it all kicked back on, it did this a few times then seemed to correct itself.

I smelled what seemed to be a burnt connection or something electric then it went away.
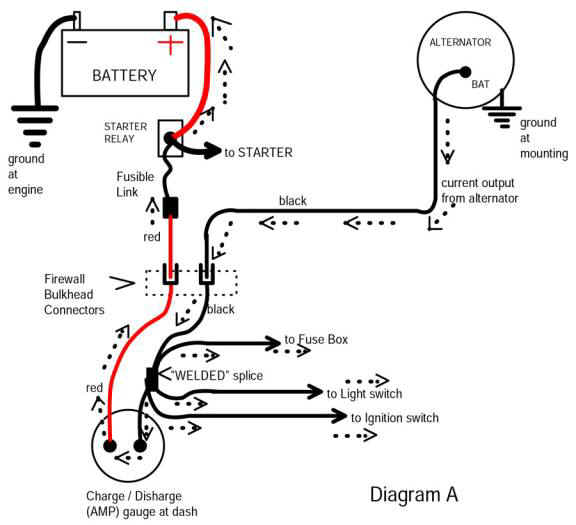
Then just watching the alt gauge it all of a sudden just dropped to the D then all the way to the C then back to the middle. Then the car did the lights out/engine stall again around 2 or 3 more times. Seemed to correct itself again.
Then I made it home.

Any thoughts? Just kinda weird.
 
Yeh. Hundreds of posts on this forum by now. Read up on the MAD article which gives a good explanation of problems in the bulkhead connector with these old girls:

http://www.madelectrical.com/electricaltech/amp-gauges.shtml

A thread of interest

http://www.forabodiesonly.com/mopar/showthread.php?t=191823

Very first thing I'd do is yank the bulkhead connector apart and inspect it

There are other areas of trouble, look at the simplified diagram which is in that article, I posted below:

The main areas of trouble in these old girls are:

THE BULKHEAD connector, which feeds power in/ out of the bulkhead. The main charging line and battery feed, shown in the diagram in red and black is the MAIN culprit

But other terminals in that connector can cause trouble, including the lights, the ignition feed, etc

THE AMMETER which can come loose, etc. The studs inside the ammeter are not actually really fastened, but depend more on the nuts on the studs to hold everything together. The wire ends themselves on the red and black ammeter connections can go bad

THE WELDED SPLICE can and does fail, although rarely. This is a splice, which if you decide to check it, is found by carefully untaping the underdash harness starting at the black ammeter wire and working your way down to the splice

It branches off and feeds

the fusebox "hot" buss

the ignition switch main power

the headlight switch power for the headlights

the wiper switch on some models

On some of the earlier cars, NOT as shown in the MAD diagram, the ammeter wires actually pass through the firewall separately from the bulkhead, but even these can develop problems.

One way to "start" to find the problem is to measure the voltage drop of the battery feed/ charging wire. Start the car and get it running at a good fast idle, to simulate "low to medium" cruise speed. Turn on "as much stuff" as you can, heater, lights, etc. Hook one probe of your meter to the alternator output stud, and the other to the battery positive post

You want "low" DC volts, and you are measuring the voltage drop through the black and red wiring in the MAD diagram. The lower the reading the better. Over 1 or 2 volts is too much. Gently wiggle the bulkhead connector while watching the meter and see if there is change

Another test you might make is to turn the key to "run" but with engine OFF. Hook one of your meter probes to the battery pos post, and the other to the "switch side" of the ignition ballast resistor. Same thing as above, the lower the better, but this time, you don't want to see more than .2--.3V (3 TENTHS of one volt). More than that means a bad connection in the bulkhead connector, the ignition switch connector, or the switch, the ammeter, or .................the welded splice

(My 67 Dart had over 1 volt!!! before I rewired it!!)


Run to the alternator "big stud" that is the output stud. Do this with the battery disconnected.

Now.......................if you are not lost..........................

e

amp-ga18.jpg
 
Well dun 67Dart273, And thank you.
I just wanted you to know your help goes along way here =D>
 
Wow! Thanks 67Dart273!

I know that I've been wanting to update the whole harness in the car (w/aftermarket speedo/tach and other gauges) but just don't know who, what, where to go because there is so much out there!

I'd really like to keep it as simple as I can. I'd like to be able to use the factory heater/switches, wipers, etc; yet run let's say an aftermarket speedo and gauges as I'm prob gonna build my own instrument cluster panel in the future.

The thing that really throws me for a loop is the charging/ voltage reg system. I see so many people running different things I just don't know which one would work best?? Gets very confusing sometimes, lol.
 
You CAN make your old system work, if you have a fairly stock system with no heavy added loads, but probably the very first step is to inspect repair and replace some of the major problem points

Inspect, repair, or figure a "work around" for damaged terminals in the bulkhead connector

Inspect the ammeter for heat/ looseness/ damage.

If problems persist, untape the harness as mentioned and inspect the "welded splice"

Inspect and check the ignition switch connector, the fuse panel, and the headlight switch

Consider installing headlight relays, and you can even use a relay to run the ignition / regulator circuit, which will remove the load from much of the interior of the system

I did a partial rewire of my car, and used a relay box out of a 97? Voyager like this one:

It has relays and fuses enough (did require some rewiring underneath) for ignition/ regulator, fuel pump, headlights, and one for security.

image.php


Bussman also makes some nice ones, and other "wrecks" also use these
 
Okay, well, was driving to work this morning and the Valiant did the same thing then went capoot! Completely died.

Here's was became of the fusible link at the starter relay:

I pulled the instrument panel out on the side of the road with the small tool set I carry and you can see how hot the alt gauge wires were getting.

I wonder if the alt gauge took a crap?? Would that be why the fusible link popped?

After I unhooked the inst cluster, I hooked the battery back up and touched the bare fusible link wires together and it didn't spark. It would spark before I unplugged the cluster.

Getting ready to go through the harness now :banghead:
 

Attachments

  • fuselink.jpg
    122.3 KB · Views: 330
  • Altwire.jpg
    107 KB · Views: 331
A great big short is why the link popped. Those things are not much protection. Lots of harnesses have "welded themselves" into a mass of smoking plastic before the link finally popped


Before you do much, Get a lamp in series with the battery ground. This will limit current if you DO get the short to reappear, so that you don't burn something up.

A good setup for this purpose is a "nice big" lamp. An old headlight, or a stop / tail light socket works good. Just wire it from in series with the battery ground. A quick way to connect to a tail lamp socket is to take a small worm drive hose clamp and just clamp a wire to the socket.

YOU MUST have the two ammeter leads hooked together OR the ammeter hooked up to get power to everything. It IS possible I guess for the ammeter to short to ground, I'm not very familiar with the older clusters.

Look up at the simplified diagram I posted from the MAD article. That IS most of the stuff that will pop the link. Only thing not shown is a couple of things not shown that branch off from the "welded splice."

To inspect the splice, you start at the black ammeter wire, and tie off the harness as you go, untape it down a few inches, following that black. The splice is down in the harness a few inches, I believe less than a foot.

The "in harness" splice feeds:

1 The hot buss in the fuse panel. You should be able to pull fuses and eliminate any shorts there

2 The main feed for the IGN switch. Note that except for the fuse link, this is NOT fused

3 On many models, the wiper switch, which has it's own breaker

4 Headlight (not tail or park) power to the headlight switch, which has it's own breaker

5 Might be one other path, not sure.

LAST NOTICE that from the battery, through the harness, the END of things is the ALTERNATOR. An alternator can generate an impressive short as Steve, 4spdragtop can tell ya. If just one diode in the alternator shorts, or some other internal problems, it will cause a "dead short" which will do this very thing, so the FIRST thing I'd do after hooking up your lamp, and hooking the ammeter wires together, is to remove the wire from the alternator and tape it
 
Current passes through the alt gauge. Once there is a short or overloaded in the system it will melt down at the weakest connections. After you remove the wires from the ALT gauge the short or overload is still there somewhere, just disconnected.
Headlights, wiper motors, and blower motors, can draw much more current than they should due to age and wear. Accumulated load becomes overload.
Consider this... Later models have plastic connectors in the wiper linkage that commonly fail. Owners replace those plastic pieces without considering whay they failed. Its typical for them to fail again in the near future. Aftermarket part quality always gets the blame when the fact is the wiper pivots are so crudded inside that they can hardly be moved by hand. Like they say, "Something's got to give".
How does that apply to yours ?.. 67 and earlier wipers have nearly fail proof linkage connections. If your wiper pivots are worn out that motor works harder.
Same principles apply to blowers. ( I know, you didn't say you were running the blower ).
Worn bearings in it, fan dragging in the housing, restricted air flow, all cause the motor to work harder, draw more current.
Headlights ? I dont know if we can buy new sealed beams today that dont draw more current than OEM.
On a positive note... Once every wire and connection in the car is comparable to battery cables, these other issues should show themselves. LOL
Good luck with it.
 
67Dart273,

Thanks for the advice!

One thing though, Nothing in the car would turn on: no ignition, no headlights/taillights, wipers, gauge lights,....nothing at all.

I pulled the ground off the battery, took the two halves of the fusible link and twisted them together, put the ground back on and immediately the the fusible link glowed bright orange and started smoking badly so I just left the neg off the battery.

And, in your above stated advice, "Before you do much" I already have much of the underdash unplugged, all I have left is the headlight switch, lol. Ooops.

I think I'll go ahead and pull both the dash harness and engine harness and untape everything and do an overall inspection. I'll plug the harness back after fixing anything suspicous and modifying the harness to the diagram you posted and hope that it's not any of the switches. :happy1:

I may even go ahead and wire in my electronic ignition harness.
 
Forgot to mention, do you have a shop manual? You can download a 66 manual here:

http://www.mymopar.com/downloads/servicemanuals/1966_Plymouth_Service_Manual.zip


The page no's are not the X-XX system of the Mopar original, so you'll have to "play" with the page no's With the viewer I use, the wiring index comes up on page 289, and the Valiant stuff is page 302, onwards

Part of the inst. panel is posted below. Locate the splice in the upper left corner, and the ammeter in the lower right corner

On the ammeter top terminal, "A1" is a no 12 red coming in from "Z" of the bulkhead, and this is the red battery feed shown in the MAD diagram, coming from the battery and fuse link. The other top wire feeds off to a dead end breaker. I don't know, accessory of some sort

On the bottom of the ammeter, "R6A" a no 12 BLACK feeds off and up to the splice at top left. R6A is just a wire no. NOT color. You have to look at the chart at the right to get color out of the wire no. On the MAD article this is the black on their diagram

Now the splice

R6A -- BLACK no 12, power coming from ammeter and battery

R6 -- BLACK no 12 goes to "B" of bulkhead connector, and off to alternator output

Q3 -- RED/ tracer no 14 feeds fuse panel "hot" buss

J1 --RED no 12 feeds power to BATT terminal of IGN switch

L1--BLACK/ tracer no16 feeds power to headlight switch for headlight power
 

Attachments

  • splice.jpg
    85.7 KB · Views: 313
What Redfish says carries a lot of weight

As I said GET A LAMP in series with battery ground. That is the ONLY easy/ cheap way to protect the harness from burnup while you find the short. IF the lamp lights, you have a load or a short. Unhook the dome light while you are troubleshooting.

THINK about all the loads in the car. Remove fuses one at a time, and see if the lamp goes out. As Red and I said, you must have the ammeter jumpered or hooked up to get power.

Here's what I'd do:

With your lamp in the circuit, ammeter jumpered, fuse link jumpered, the short should light your protective lamp

1 Pull the alternator output wire off, and see if the light goes out

2 Pull the headlight switch connector off.

3 Pull the IGN switch connector off.

4 Pull fuses one at a time, looking for the lamp at each "pull"

5 Unhook the cigarette lighter.

6 If the lamp is still lit, wiggle sections of the harness, starting at the alternator and working around the engine to the bulkhead, then go inside and do the same. wiggle "sections" at a time looking for the light to change/ go out.

7 Last have you or someone else ADDED or chopped up the harness?

8 PS what did I leave out???
 
Is there any way to test the switches and instrument panel for a short if there is no power running to them, like if I pulled each switch one by one and tested them?
 
Okay, so I've unplugged each switch one by one and the light still lights up.

I've unplugged each fuse one by one and the light still lights up as well.

That's if I'm doing this right. I'm touching the headlamp wires to where the splice is burnt in half.....if that's what I'm supposed to be doing??

The ignition switch is even unplugged.
 
Does everything have to be hooked up in order to function? Like does the headlight switch have to be plugged in in order for the wipers to work and so forth??

I unplugged the power wire (black) coming from the alternator and there isn't enough power coming through the burnt splice to light the bulb but there's enough to arc out on if grounded.
Could it be the alternator? What about the voltage regulator?
 
No here's what you do with the lamp

UNHOOK the battery ground cable from the block, and if there's a separate (small) ground pigtail to the body, unhook that. You should now have a ground cable hooked to the battery, with the end in your hand, and NO ground to the body or block

Now hook up (jumper) the fuse link

Next, hook your lamp I mentioned to ground, preferable to the body at this point

Hook the other terminal of the lamp to the ring terminal of the unhooked ground cable. Now if you have a short, all that happens is the lamp lights!!!
 
Ok got it. lol

Well, I did find one problem.

I took the alternator off and took it back to Autozone and had them test it. Their machine wouldn't even spin it and it would go straight to FAIL. After doing this several times they came to the conclusion that their tester adapter was faulty and that the alternator was good and that it looked fairly new anyways. So.....

I took it to another Autozone and they couldn't even find the specific adapter the machine recommends but we used another one that "I" said should work....same thing....went right to FAIL. Well, they said to take it across the street to Advanced and have them test it.....went to Advanced and their machine was completely broken down.

So, I went to NAPA. All their stuff was good. Put the alternator on.....FAIL....wouldn't even spin it. They checked a few times and sure enough..FAIL.

You can take the pulley and pull it back and forth a good 1/16"-1/8" and it sounds like a metal clunking up and against metal.

I think this may be where the short is. When you remove the power wire to it then I can actually join the splice back together without it doing anything but if I reattach the power wire to the alt then that's when it starts smoking and getting hot.

I'm still gonna use your advice 67Dart273, better be safe than sorry.
 
I plugged the new alt in, joined the two alt gauge wires, plugged the ign switch back in and jumped the fusible link. Turned the key on and turned the heater on and....it worked!!

So that must have been the prob.

Regardless though, I did pull the dash harness and the engine harness and am going to do the modifying that's recommended and check for any questionable items. Not to mention there's prob a dozen or more bare spots in the engine harness.

Got a question. Can you still run the single field alternator when wiring up electronic ignition or do you have to go to a dual field??
 
You can run the old style alternator, but I wish I'd been able to forewarn you. What you SHOULD have done is buy a later model "squareback" (isolated field) and just externally ground one of the field terminals, and you could then later convert to a 70/ later regulator if desired

MOST replacement 69/ earlier regulators ARE actually solid state. Turn the regulator over, or just look "back there" with a mirror. If there is two large resistors on the bottom, it's the old mechanical style If not it's solid state "in the old box"

Old style mechanical design:

97-396-thickbox.jpg


You can also buy a better quality 69/ earlier design which actually will work on either late or early models

Standard no VR-128. I forget the NAPA / Echlin no. offhand

41-aG0961CL._SL500_AA300_.jpg
 
Thank you sir.

I'm going to go ahead and rewire the engine harness for the later style regulator with a single ballast resister. The ECU plug is a 4 prong.

Have any recommendations for a good quality ECU and volt/reg I can get from a parts store?

Also, what about headlight relays? I might as well modify the lighting system while I'm at it. Wonder if any parts stores carry any relays that I can wire in?
 
/6 Dan claims to have the solution for headlight relays, but the fact is that so long as you use QUALITY relays you are OK, and mount them so they're out of road splash.

I no longer keep track of NAPA / Standard no's for the later VR, because so much stuff has "changed." What was once "great quality" may now be "not so much." One thing you might consider is Google around for NOS, that is, original, new, Mopar brand VR. You WILL pay more. If you have junkyards around, you might investigate them. Those VR's were used into the mid? late? 80s and are on TONS of Mopar cars and trucks.

I just junked out a 77 van for the engine, and yup---one good used Mopar original VR on 'er.
 
-
Back
Top