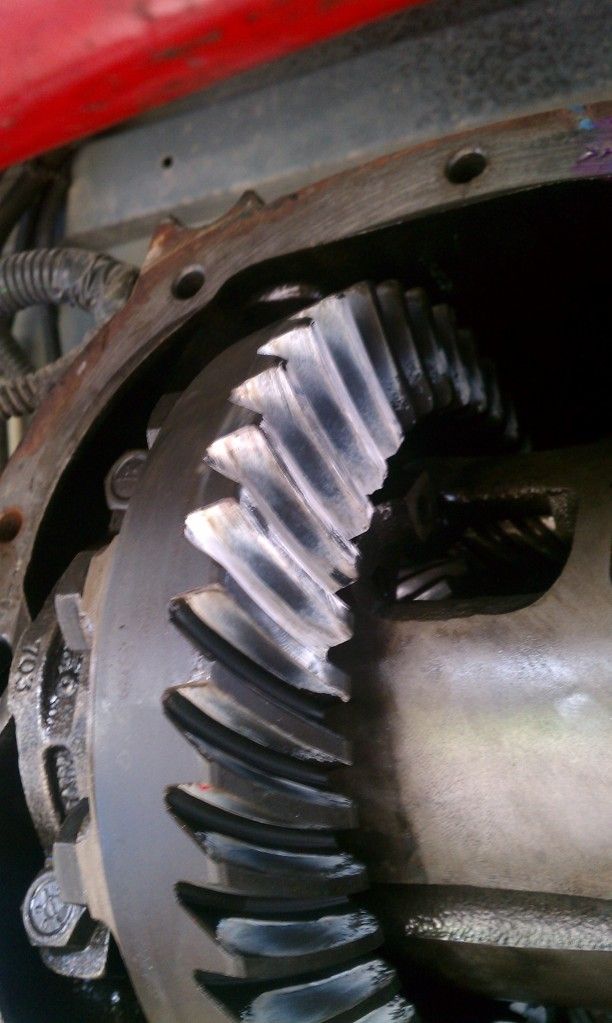
contact pattern

-

mopar head

Well-Known Member
Joined
Oct 21, 2008
Messages
6,078
Reaction score
5,479
Location
Country Roads- clue to where .
On used gearset, is it necessary? I know you need to test with new gears.
Some of you followed my chipped tooth on pinion thread and know I`m just replacing pinion bearings, well that solved the catchy part of that problem. I also installed the crush sleeve eliminator. Turns nice now with 19 in.lb. preload and .006 backlash.
I used prussian blue and see marking all the way across the teeth on drive and coast sides.
I reused the same pinion depth shim and hope this doggie will hunt?
Is this a normal pattern on used gears?
 

Attachments

  • dr.side 3 (Small).jpg
    54.9 KB · Views: 693
  • coast side 1 (Small).jpg
    77.5 KB · Views: 697
Your pattern looks good. I think you should check pattern any time you change anything (bearings, gears, punkin..), cheap insurance and not a lot of work. Better to find out up front than to have your gears howl at you and make you do it again..
 
Good to hear, thanks, I busted it back apart to install new seal, I`ll repeat the process again tomorrow and use a new pinion nut, and do a final pattern check and hopefully be good to go:prayer:
 
Your camera angle is terrible. I cannot really see a pattern.
 
couldn't tell you anything with that, and lose the machinists ink and get a oil paint because if i was making a guess from what i see on the drive side it's off.

.
 
This is worring me now, man I hope I don`t have to destroy a new bearing, and buy 2 new bearings one for mockup and one to replace the destroyed new bearing:sad5:
???????
 

Attachments

  • pattern 007 (Small).jpg
    65.8 KB · Views: 600
  • pattern 006 (Small).jpg
    63.4 KB · Views: 625
Is there any chance you could pattern chk it again and this time resist the ring gear while you are turning the pinion?
The first tooth in the top picture looks off to the outside, and the last one looks off to the inside of the ring gear.
Think it may be because the paint was keeping the teeth from making a good solid contact pattern.
I'd be happy with the pattern on the backs of the teeth though.
The idea is to keep the pressure of the pinion tooth face centered on the face of the ring gear tooth and I think the paint is tricking us a little.

The blue pattern looked pretty good, if maybe just a bit too far in but still runnable without issue.
JMO
 
Trailbeast, I tried loading it in those but its hard to do by myself. I`ve read to pry the ring toward the pin. but their`s really no place to do that execpt up at the center, putting a bar between the case and ring, and putting pressure against the ring. I`ve tried it again but looks to be the same results.
Does the compound have to be completely cleaned off each test?
 

Attachments

  • pattern 019 (Small).jpg
    65.8 KB · Views: 593
  • pattern 025 (Small).jpg
    77.8 KB · Views: 539
The drive side is deep, and i don't like how it's marking the coast side, marking heavy on the toe and then moving off it...

Something is wrong there.
 
Ok lets use this for the example, this shows the coast and drive.

The drive is just a little deep for a daily driver, i purposely set this particular use to be .0015 deep from being perfect

That is marking heavy at the root and it's not dead in center but very close and for the use this car is seeing this is where it will stay, but it will be quiet.

Yours is way on the root, actually all on the root and on the heel on the drive side, on the coast side it's on the toe and running off to center.

Was that ring clean and the carrier clean ?


Was that ring clean and the carrier clean ?

Yes sir, When I recieved it it was reasonably clean.
I coated the ring+pin. with never sieze cause I knew it would be setting for awhile. I removed it with a paint brush and brake clean/ rags.
 
The pinion gear is meshing too deep into the ring gear, i would take at least .005-.008 thou outta the shim pack behind the pinion bearing & take a look. On used gear sets pay the most att to the coast sid e as it has the least ammount of where on it. also i made a "test" pinion bearing that just slipps on & off the pinion with no press until pattern is good to go. Just use a die grinder & spin it around until it just slides on the pinion shaft. once pattern is where its soposta be press on new bearing & go hope it goes well for ya so there not noisy!:cheers:
 
On a used set of gears, I go with the original shim behind pinion bearing. What was the back lash set at above?
 
The drive side is deep, and i don't like how it's marking the coast side, marking heavy on the toe and then moving off it...

Something is wrong there.

Agreed.
At first I thought it looked ok but a little suspicious, and now that coast pattern looks too concentrated in one area.
Also it does seem like the contact area is too close to the edge of the gear teeth. (wondering now if that was what caused the chipped pinion tooth)
Before I just thought someone might have tried to use a chisle to remove an old bearing race.

Correct me if I am wrong, but it looks like the ring gear needs to be a little farther away and the pinion in closer to the carrier.
Or do I have that backwards?
 
I've never seen such a varied pattern on the 4 teeth (coast side).

That is why I asked if he could put a load on the ring gear when checking it.
I thought maybe the tooth was riding on the paint and not giving a true mark.
 
-
Back
Top