Family Fish on its 3rd life: 1967 F/B Resto

-
Thanks guys, color is Mopar Mango Tango (also called Toxic Orange, so let's go with that!) Code PVG

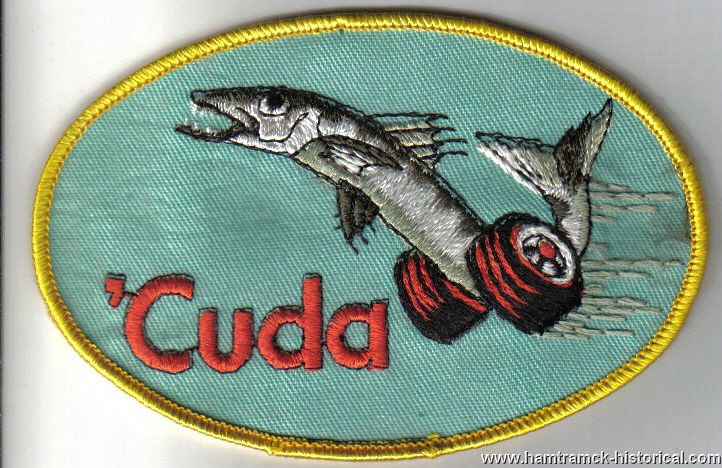
I am far from having a theme, but I enjoy the color name Toxic Orange, and I plan to incorporate Toxic in to my license plate, and some original art to use for headrest embroidery or dash insignia.

Here is the art that inspired me to the Toxic Fish element:
 

Attachments

  • 1969CudaPatch.jpg
    108.4 KB · Views: 539
Cool. Where did that come from?
 
I assumed from plymouth...I used to collect patches. I made a cool jacket with my collection and I had a similar one:

1970CudaPatch.jpg
 
some more pics with clear- it isn't perfect, but it is pretty good
Pardon the halogen lighting
 

Attachments

  • CIMG1937.JPG
    109.6 KB · Views: 505
  • CIMG1938.JPG
    105.6 KB · Views: 501
  • CIMG1939.JPG
    115 KB · Views: 505
vs stock

Member 38DODGE's beautifully painted firewall
 

Attachments

  • 38DODGE s abody.jpg
    67.2 KB · Views: 508
  • 38DODGE s abody with marks.jpg
    72.5 KB · Views: 507
Perfect, thats a nice comparison shot to actually notice the work involved.
 
Perfect, thats a nice comparison shot to actually notice the work involved.

Yep! Not only amazing work, but color choice too! Beautiful

Thank you guys!


After having the garage in "body and paint mode" for so long, I realized I needed a good cleaning and to tuck the car out of the way to finish up the suspension and start engine stuff. So I rearranged everything, and put the car sideways along the back wall to open up some floor space.

Here it is before putting the workbench and some other crap (motorcycle) back in:
 

Attachments

  • wintergarage.jpg
    43.6 KB · Views: 448
Made some decent progress this weekend while my wife was out of town :)

I found the spindles and a few other parts that I sandblasted, but had not yet coated with rustbullet, so that is what I did Friday night along with getting out all the other new moog and energy suspension poly parts.

I am doing the 73+ factory brake setup, and for now going with the oem orientation with the calipers towards the front of the car.

As you can see I still need to remove and refurbish the steering box and center link from the original 1967 setup.
 

Attachments

  • IMG_20131109_100919_797.jpg
    43.9 KB · Views: 393
  • IMG_20131109_100911_898.jpg
    41 KB · Views: 380
  • IMG_2805.jpg
    72.3 KB · Views: 402
  • IMG_2807.jpg
    69.7 KB · Views: 420
  • IMG_2809.jpg
    73.3 KB · Views: 402
  • IMG_2813.jpg
    67.2 KB · Views: 403
Looks great Chris, that's an awesome idea for a jig! Im gonna copy yours and make one outta wood. Those dust shields, are the L and R both the same or are they side specific?? Reason I ask is I need one but not sure which side.

Cheers
Steve
 
Looks great Chris, that's an awesome idea for a jig! Im gonna copy yours and make one outta wood. Those dust shields, are the L and R both the same or are they side specific?? Reason I ask is I need one but not sure which side.

Cheers
Steve

Thank you Steve. The jig my dad made when he reinforced the k member to prevent (control) warpage. It is made of very heavy plate steel, which is nice because it doesn't move around as I beat on it.

The dust shields are L & R I can identify them and snap a reference pic for ya.
 
Nice bike! My back just hurts looking at it!! Im at the "cruiser" age now LOL. Reference pics on the shields would be great!

Thanks
Steve
 
Pretty sweet color but then again I might like it because I used it to :D

Let's see some more pics of yours!


Reference pics on the shields would be great!

Here is a reference pic showing the right side (passenger side here in the US :) ) Second pic is to give you a better look at the lip I am talking about.

Let me know if this makes sense or not.
 

Attachments

  • Brake shield orientation identification.jpg
    36.6 KB · Views: 371
  • IMG_20131115_143816_999.jpg
    37.6 KB · Views: 357
After a day of getting the path clear to get the motor donor out, Not only did I get the motor out, but it was also transported from my dad's place to my garage! The details:

My dad purchased a Trailduster (plymouth's ramcharger) because it had a recently freshened up 340. The heads were redone,new seals, intake and carb. I ran the truck prior to it being parked a few years ago and knew this was the engine I wanted. Saturday I went out to turn it over and hear that sound again, but the starter wouldn't budge.

Oh, well, so I pull the motor with the help of my dad and my youngest brother. Rear cheap steel freeze plug had been seeping and is now compromised. Also the water pump seems to be seized up. Amazing how fast things deteriorate from lack of use.

Pics:
 

Attachments

  • CIMG2252.jpg
    81.5 KB · Views: 347
  • CIMG2254.jpg
    79 KB · Views: 348
  • CIMG2256.jpg
    84.8 KB · Views: 348
  • IMG_20131124_184203_102.jpg
    50.2 KB · Views: 344
I took the first whack at degreasing and removing some of the spray on engine paint.

I thought the waterpump was wasted, but after shooting some water through it it moved just fine.

The engine came with edelbrock performer intake, 750 carb with manual choke, and street waterpump. In the truck the fuel was setup with an electric fuel pump, I prefer mechanical so I will probably pick up the edelbrock one.

Since I am sanding and painting the block, I went to the hardware store and picked up some rubber plugs for the distributor hole and the front water passages. All other holes are covered in gorilla tape for now since it can stand up to a wire wheel nick.
 

Attachments

  • CIMG2312.jpg
    55.2 KB · Views: 332
  • CIMG2311.jpg
    77.5 KB · Views: 332
  • CIMG2310.jpg
    71.6 KB · Views: 337
  • CIMG2309.jpg
    72.3 KB · Views: 316
  • CIMG2308.jpg
    65.3 KB · Views: 351
  • CIMG2307.jpg
    60.2 KB · Views: 316
  • CIMG2306.jpg
    75.7 KB · Views: 309
  • CIMG2313.jpg
    47.7 KB · Views: 323
-
Back
Top