You are using an out of date browser. It may not display this or other websites correctly.
You should upgrade or use an alternative browser.
You should upgrade or use an alternative browser.
My 6.1 retrofit thread
- Thread starter Rat Patrol
- Start date
-
Rat Patrol
Well-Known Member
PARTS
- Did I plan on degreeing it?
- Did I plan on checking Piston to Valve clearance?
Now on both these counts, I started out happy to accept the cam suppliers word..….but mine WAS ground on a tighter LSA (110) which reduces P-V……….so I figured “what the heck?”
Then the hassle started……I’d have to swap out the Hyd lifter for a solid to do this right.
I got a new set of Torque to Yield head bolts and gasket from East Coast Moparts..arrived within 10 days…..and we set to it.
My buddy modified the lifter and after a couple of trials we worked out the exact plunger height that allowed the valve to seat.

Applied modelling clay to the piston and replaced #1 Intake and Exhaust lifters for our converted pieces.


RESULT
The cam installed exactly where it was supposed to – at 114 ICL.
But……..Intake came in at .068th and the exhaust came in at 115th.
Now any gear head will tell you that according to the engine builders bible - .068th is too close for comfort for a street car…..but…
….since I first became aware that the intake clearance with most aftermarket cams in Gen3s is close…I’ve been researching the matter and trying to figure out how plenty of owners get away with it.
There seems to be three parts to the answer –

To be truthful, I don’t think anyone should be happy running such tight clearances on cams in any motor, especially with cast pistons –
HOWEVER………… there seems to be very few recorded incidents of valve strike on start up due to these close tolerances.
The troubles seem to start when relying on weakened factory springs to control cams with lifts exceeding .540 lift.
Valve float occurs, shortly followed by spring breakage and catastrophic failure!!
PART ALERT
So my first resolution is to buy some decent valve springs – I’m told the PSI LS1511ML spring is a straight drop in and ideally rated for the cam I am running.
- SRT MAX PLUS - 218/227 @ .50, .565/.555 lift, 110LSA, 114 ICL
- 2 x Hyd Lifters converted to solid through removal of internal valve and washer spacing the plunger
- Modelling Clay
- 10 x M12 Head bolts - P# 6506694AA
- 1 x Head Gasket - P# 05037592AC
- Did I plan on degreeing it?
- Did I plan on checking Piston to Valve clearance?
Now on both these counts, I started out happy to accept the cam suppliers word..….but mine WAS ground on a tighter LSA (110) which reduces P-V……….so I figured “what the heck?”
Then the hassle started……I’d have to swap out the Hyd lifter for a solid to do this right.
- - I needed a solid lifter to accurately measure the valve travel to check P-V,
- - I’d need new head bolts
- - I’d need a new gasket if I planned on swapping the lifter…because I had to lift the head to swap the lifters.
I got a new set of Torque to Yield head bolts and gasket from East Coast Moparts..arrived within 10 days…..and we set to it.
My buddy modified the lifter and after a couple of trials we worked out the exact plunger height that allowed the valve to seat.
Applied modelling clay to the piston and replaced #1 Intake and Exhaust lifters for our converted pieces.
RESULT
The cam installed exactly where it was supposed to – at 114 ICL.
But……..Intake came in at .068th and the exhaust came in at 115th.
Now any gear head will tell you that according to the engine builders bible - .068th is too close for comfort for a street car…..but…
….since I first became aware that the intake clearance with most aftermarket cams in Gen3s is close…I’ve been researching the matter and trying to figure out how plenty of owners get away with it.
There seems to be three parts to the answer –
- - Rev limiters (so the incidence of over rev is almost nil),
- - Superior valve train technology (better lifters and springs, less slop in the geometry – all so the instance of valve float is generally less), and
- - Decent valve springs – meaning its crucial to run fresh good quality valve springs that won’t “sack” and cause premature valve float which can result in valve strike.
To be truthful, I don’t think anyone should be happy running such tight clearances on cams in any motor, especially with cast pistons –
HOWEVER………… there seems to be very few recorded incidents of valve strike on start up due to these close tolerances.
The troubles seem to start when relying on weakened factory springs to control cams with lifts exceeding .540 lift.
Valve float occurs, shortly followed by spring breakage and catastrophic failure!!
PART ALERT
So my first resolution is to buy some decent valve springs – I’m told the PSI LS1511ML spring is a straight drop in and ideally rated for the cam I am running.
Rat Patrol
Well-Known Member
One small frustration was finding something suitable to press the balancer back on with -
Even if I wanted to, I couldn't use the crank bolt to press the balancer on because the interference fit was too snug to engage the bolt.
The other hassle was that the crank bolt is M14 - 1.5 Fine pitch thread...so getting a long full thread bolt from the hardware wasn't an option.
Eventually I settled on some M14 threaded rod, two washers, a gudgeon pin as a spacer and a hardened steel plate.
It worked a treat!

Finally finished re-assembling the engine today - all set for a trial install tomorrow - this will be when I find out how the TTI adapter mounts will set the motor up, and if I need to clearance the inner guard for the alternator.

Even if I wanted to, I couldn't use the crank bolt to press the balancer on because the interference fit was too snug to engage the bolt.
The other hassle was that the crank bolt is M14 - 1.5 Fine pitch thread...so getting a long full thread bolt from the hardware wasn't an option.
Eventually I settled on some M14 threaded rod, two washers, a gudgeon pin as a spacer and a hardened steel plate.
It worked a treat!
Finally finished re-assembling the engine today - all set for a trial install tomorrow - this will be when I find out how the TTI adapter mounts will set the motor up, and if I need to clearance the inner guard for the alternator.
jeffneal66
Well-Known Member
One thing to think about with the piston to valve clearance. The rev limiter only works when accelerating, it will not protect against missed shifts, or bad down shifts. I think one of the reasons you don't hear about a problem with this tight of a clearance is because most of today's cars run with automatic tranny's, so there is some buffer there just from how they work.
Keep up the great work, I am enjoying your project.
Keep up the great work, I am enjoying your project.
Rat Patrol
Well-Known Member
Good info - I'm thankful I fitted a neutral lock out gate then!
Rat Patrol
Well-Known Member
We installed the motor today:
- alternator clearance OK (Partly because I used a Cherokee SRT alt which has a slightly higher mounting point.
- Valve cover inner guard clearance - Not ideal but nothing that cant be fixed by trimming the lower valve cover studs
- TTI mounts - pretty average, the motor is on significant "tilt" and there's not enough clearance between the firewall and the block.
I can get my local shop to re-fabricate them...- but what I don't get is how a company like TTI can "push" such a croc of sh1t and pretend they are fit for use? :finga:
They are not.
Especially if you are the slightest bit worried about pinion angle!
BTW - We run the US K frame and our engine Bays are almost identical in size to a Duster or Demon - so its got nothing to do with the car - These mount adapters just haven't been thought through properly. rotest:
Exhaust - Here's the real bear....the rear pipe on our drivers side fouls on the steering box - so # 6 and 8 header tubes will have to be refabricated.
For you US guys this is a non issue - but for us Right steer guys its a bummer.
Otherwise - the install was pretty smooth.

- alternator clearance OK (Partly because I used a Cherokee SRT alt which has a slightly higher mounting point.
- Valve cover inner guard clearance - Not ideal but nothing that cant be fixed by trimming the lower valve cover studs
- TTI mounts - pretty average, the motor is on significant "tilt" and there's not enough clearance between the firewall and the block.
I can get my local shop to re-fabricate them...- but what I don't get is how a company like TTI can "push" such a croc of sh1t and pretend they are fit for use? :finga:
They are not.
Especially if you are the slightest bit worried about pinion angle!
BTW - We run the US K frame and our engine Bays are almost identical in size to a Duster or Demon - so its got nothing to do with the car - These mount adapters just haven't been thought through properly.
rotest:Exhaust - Here's the real bear....the rear pipe on our drivers side fouls on the steering box - so # 6 and 8 header tubes will have to be refabricated.
For you US guys this is a non issue - but for us Right steer guys its a bummer.
Otherwise - the install was pretty smooth.
Riddler
Project EH-Body
Isn't the alternator the same from car to jeep? Isn't it just the bracket that's different? Anyone got a picture of the two to compair?
Riddler
Riddler
Rat Patrol
Well-Known Member
Isn't the alternator the same from car to jeep? Isn't it just the bracket that's different? Anyone got a picture of the two to compair?
Riddler
No they're not
The cherokee srt bolts from the front, the car from the side and lower.
Check Ebay cherokee srt alternator, and then ebay 300c srt alternator.....You'll get all the pics you need to compare them....thats what I did.
Rat Patrol
Well-Known Member
PARTS
MSD - 6013 HEMI6 ECU
MSD - 88864 - Harness (2005-2008 5.7)
Got stuck into the wiring - figured I may as well do something positive.
Harness was a snap to connect up - Fortunately I hadn't bolted down the intake as it was much easier to install with the intake off.
Wiring on the firewall still needs "stowing" properly - can't do that until the mounts are re-fabricated
 and there's a bit more clearance.
Before we installed the engine, I installed the MSD Hemi6 ECU on the passenger side kick panel - dremelled a hole through the firewall and got a suitable grommet.
(Ignore the white wire, its the alternator shunt - the shunt splits the load so I can run the factory ammeter) - I haven't inserted into conduit yet. I'm leaving it un-enclosed until I'm certain how much length will be required.)
You could lose a small car down those intake ports!


PART ALERT
Remember - if you're running a 6.1, you MUST swap the cam and crank sensors to a 2005 or later 5.7 sensor for it to fit the harness.
(Next - we discuss Indy Cylinder heads INSANE concept of what reasonable bolt clearance IS...Stay tuned Folks!!)
MSD - 6013 HEMI6 ECU
MSD - 88864 - Harness (2005-2008 5.7)
Got stuck into the wiring - figured I may as well do something positive.
Harness was a snap to connect up - Fortunately I hadn't bolted down the intake as it was much easier to install with the intake off.
Wiring on the firewall still needs "stowing" properly - can't do that until the mounts are re-fabricated
Before we installed the engine, I installed the MSD Hemi6 ECU on the passenger side kick panel - dremelled a hole through the firewall and got a suitable grommet.
(Ignore the white wire, its the alternator shunt - the shunt splits the load so I can run the factory ammeter) - I haven't inserted into conduit yet. I'm leaving it un-enclosed until I'm certain how much length will be required.)
You could lose a small car down those intake ports!
PART ALERT
Remember - if you're running a 6.1, you MUST swap the cam and crank sensors to a 2005 or later 5.7 sensor for it to fit the harness.
(Next - we discuss Indy Cylinder heads INSANE concept of what reasonable bolt clearance IS...Stay tuned Folks!!)
Rat Patrol
Well-Known Member
- The harness install was easy, the ECU is straight fwd programmeable.
- I am running a Reverse manual valve body so no kickdown rod or cable mounting issues
- Lokar accelerator cable and throttle springs resolve any issues there.
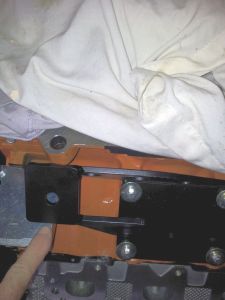
- The intake went on like a dream except that the casting of the runners is a little too close to the bolts - so I had to "crescent" the washers.
Here's a pic of a manifold bolt.

The real issue is the pipes on the drivers side - and to a lesser extent the TTI mounts.
BTW - I found out after calling Bob Mazzolini why the clearance on mine is less than a lot of these "magazine conversions -
TTI sell the same mount adapters for both the 6.1 and the 5.7................and the 6.1 is .5" higher and also the heads are noticeably wider than the 5.7..........hence the snug fit on our passenger side and also the height issues.
- I am running a Reverse manual valve body so no kickdown rod or cable mounting issues
- Lokar accelerator cable and throttle springs resolve any issues there.
- The intake went on like a dream except that the casting of the runners is a little too close to the bolts - so I had to "crescent" the washers.
Here's a pic of a manifold bolt.
The real issue is the pipes on the drivers side - and to a lesser extent the TTI mounts.
BTW - I found out after calling Bob Mazzolini why the clearance on mine is less than a lot of these "magazine conversions -
TTI sell the same mount adapters for both the 6.1 and the 5.7................and the 6.1 is .5" higher and also the heads are noticeably wider than the 5.7..........hence the snug fit on our passenger side and also the height issues.
This pic shows the TTI block off plate partially attached - its a perfect fit and uses O rings to seal to the boss.
The TTI engine mount adapter requires a small amount of trimming to clear the plate - not sure how TTI could have missed this pretty basic issue.....
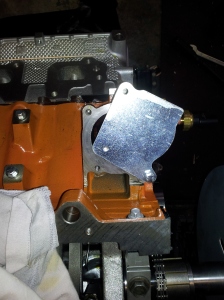
Because the block off plate was designed by someone else (not TTI) after the fact, and the mount was probably never modified to accomodate this. The original TTI design for a block off plate also did not include the O-rings and would have probably leaked. One of the first customers to get a TTI block off plate for his '67 A-body Barracuda Convertible had an engineer friend of his design a block off plate that included the O-rings. He e-mailed the drawing to TTI and they sent him the first article free.
True story!
Rat Patrol
Well-Known Member
Very interesting!
Im going to call TTI about the fitment issues I've had - its nothing that can't be fixed - but when you pay $180 for two steel brackets, you don't expect to have to re-fabricate them to provide firewall, right front guard and hood clearance.
Something else I've noticed is that the motor is sitting slightly "askew" - front pointing more towards the right front corner than central - along with it being close to the right guard overall.
It looks like its been put in by a drunken sailor! LOL!
Jasonmiester
Well-Known Member
I'm sure you were cursing like a drunken sailor when you put it in! Haha
Very good/nice build thread =D>=D> with a tun of good info with pictures and taking the time to
explain everything as you move forward Rat Outstanding job with the camera :glasses7:
Thank you for a great thread I just went threw, do you have any idea
what the hp will be and how heavy/lite is this 6.1 ?
I hope you can get it setting in there straight :coffee2:
I am confident you will :thumleft:
After 2008, the sensor connectors were changed by Chrysler, so it looks like 2005-2008 are OK but not later. On my 2010 hemi, I've had to order new cam and crank sensors to fit my harness.PART ALERT
Remember - if you're running a 6.1, you MUST swap the cam and crank sensors to a 2005 or later 5.7 sensor for it to fit the harness.
Joe Dokes
Well-Known Member
The New Hemi with stock induction, flexplate, exhaust manifolds, and induction weights 485 pounds.
http://www.allpar.com/mopar/new-mopar-hemi.html
This is less than a slant six @ 525 Lbs.
This is also less than a LA/Magnum motor @550 Lbs.
And a LOT less than a GEN II Hemi a@750 Lbs.
If you combine a Gen III Hemi and an Alter-K-tion, you can take 150 Lbs off the front end of your car.
Of Course Rat is going to add a bit of weight with the turbos but it will still probably weight less than a fully dressed small block.
Regards,
Joe Dokes
Very interesting!
Im going to call TTI about the fitment issues I've had - its nothing that can't be fixed - but when you pay $180 for two steel brackets, you don't expect to have to re-fabricate them to provide firewall, right front guard and hood clearance.
Something else I've noticed is that the motor is sitting slightly "askew" - front pointing more towards the right front corner than central - along with it being close to the right guard overall.
It looks like its been put in by a drunken sailor! LOL!
Are you aware that Mopar engines are intentionally offset something like 1-1/2" to 2" toward the passenger side? This was to allow more clearance for the steering system. In other words, the centerline of the engine is NOT on the centerline of the car. (that would be the driver side down there) Unless TTI makes an Aussie version of the mounts, this only makes the steering clearance worse for you.
Sounds like you are coming along well with your project. Can't see the pictures here at work.
Rat Patrol
Well-Known Member
MeMike - Im hoping for at least 390 at the wheels - or around 460 at the crank.
Kosmic - Yes Im aware of that. our sb Mopars ran the US K Frame and clearance was tight, even with the LA engines.
What makes matters worse with these is the width of the 6.1, the fact that its elevated too high at the front, and that its skewed ( meaning the front and rear of the motor are not in a direct line with each other)
- Joined
- Apr 18, 2009
- Messages
- 4,306
- Reaction score
- 4,897
That also helps with the u-joints, being offset, to keep vibration down and the grease inside the caps to move around (lubricate). Keep in mind, these parts are made for the U.S. market, and being a rh drive vehicle only adds to "fabrication" factor, even I had some trouble (had to use a 68 b body k-frame instead of my 64 b body k frame) at that time. I feel for ya, but you do have the skills to overcome the obstacles that are in front of ya and you doing a kick *** job. Now, go get a Fosters and get back to it, lol!!!
Rat Patrol
Well-Known Member
Couple of last minute mods before the car was taken to the workshop for work on the mounts and pipes -
First was clearancing the brake booster bracket. I intend to run a remote booster eventually - but this is an adequate short term measure to get the car on the road.

2nd pic shows the clearance available through using the Cherokee front bolt alternator - there's about 1/4" between the guard seam and the alternator. Once the mounts are re-jigged, this will increase a little...
The oil lines will be relocated shortly - I need some 90 deg elbows.

And its on the trailer for the pros to nut out the pipes and the mounts........
The Tow car is one of our Valiant Utes (Utility) or "pick ups"


First was clearancing the brake booster bracket. I intend to run a remote booster eventually - but this is an adequate short term measure to get the car on the road.
2nd pic shows the clearance available through using the Cherokee front bolt alternator - there's about 1/4" between the guard seam and the alternator. Once the mounts are re-jigged, this will increase a little...
The oil lines will be relocated shortly - I need some 90 deg elbows.
And its on the trailer for the pros to nut out the pipes and the mounts........
The Tow car is one of our Valiant Utes (Utility) or "pick ups"
Very interesting!
Im going to call TTI about the fitment issues I've had - its nothing that can't be fixed - but when you pay $180 for two steel brackets, you don't expect to have to re-fabricate them to provide firewall, right front guard and hood clearance.
Something else I've noticed is that the motor is sitting slightly "askew" - front pointing more towards the right front corner than central - along with it being close to the right guard overall.
It looks like its been put in by a drunken sailor! LOL!
Rat - There was a lot of slop (AKA extra tolerance) in the original build of these cars. Add to that the many years of things "settling" and being knocked about it does not surprise me that generally aftermarket parts fit poorly. When designing these parts they usually have a test vehicle or part of a car that is used. With all the tolerances the test vehicle could easily be 1/8 inch off in one direction, and your car 1/8 inch off in the other. Really good design allows for some degree of tolerance stack. Designing parts or kits for vehicles that are 40 years old that fit perfectly is nearly impossible. The best one could do is design a kit that allows the installer to make adjustments.
One example for me is when installing my engine in a '75 k member I had to lengthen the slot in the mount ear on the drivers side about 3/16 inch to get the engine to sit far enough down to be level. Prior to elongating the slot a 3 foot level on the carb flange had to be lifted by almost 1/2 on the passenger side end to put the bubble in the center. Now was that a problem with the manufacture or design of the aftermarket mount? Was it a problem with the fabrication of my K-member? The 4 door valiant taxi that I removed the K from was in a junkyard and one of the lower control arms was bent badly. Could it have been this impact moved the mount? I can only guess, but it was easiest just to grind the slot in the mount and let it sit down farther... even though I had to pull the K-member twice to get it all sitting right.
Another little adventure I went through was my radiator. I have the first 27 inch core 32.5 inch wide radiator built by Be Cool for an A-body. Be Cool does not list it as a catalog part because you have to trim the pinch weld on the frame to get it to fit and open the radiator support to 27 inches, it is not a bolt in by any means. When I received the radiator it was too wide to fit between the frame rails - by a lot. The tanks kick in for clearance at the bottom. I called them and discussed. The measurements I made did not match what they said it should be. I had them send me the print. It was very crude and not dimensioned properly. By that I mean the drawing left too many items open to interpretation by the fabricator. I made some edits and suggestions and sent the drawing and the radiator back. They built me a new one and it fit perfectly.
Now the mount interfering with the block off plate - I agree, no excuse, this fitment should have been accounted for. Is the 5.7 and 6.1 dimensionally the same in this area?
Rat Patrol
Well-Known Member
Now the mount interfering with the block off plate - I agree, no excuse, this fitment should have been accounted for. Is the 5.7 and 6.1 dimensionally the same in this area?
Not sure...but I'd have swallowed the block off plate issue if these mounts had located the motor better. LOL!
Rat Patrol
Well-Known Member
One of the considerations with this conversion is the swap from a belt driven fan and the factory radiator to the more modern electric fan cooling system.
1st issue is the radiator.
The G3 hemi runs the inlet and outlet on our drivers side, so the A body rad. is not really viable without a cross over pipe.
The problem is made worse by the inlet/outlet being a much larger diameter than the A body hoses - the G3 runs a 1.75" top hose and a 1.5" bottom hose.
I ended up deciding to run the following radiator - itll require some bracket and outlet modification but will work well when fitted.
Its marketed as a "6.1 b body radiator" - p# cc1643
.......AND B4 anyone says anything....I ran a Champion A body radiator with no issues for 18 mths.....so I have no problem with their quality or fit

· Core Dimensions: 16 1/4" high x 25 3/4" wide
· Overall Dimensions: 22 5/8" high x 29" wide
· Upper inlet: 1 1/2"
· Lower outlet: 1 3/4"
(This is an issue as the diameters are reversed to the 6.1)
· Bracket mount system (Hor - 27 1/2")
· OEM style brass petcock drain.
· Billet style fill neck construction (Not Stamped)
· Radiator cap included
· Trans Cooler included
1st issue is the radiator.
The G3 hemi runs the inlet and outlet on our drivers side, so the A body rad. is not really viable without a cross over pipe.
The problem is made worse by the inlet/outlet being a much larger diameter than the A body hoses - the G3 runs a 1.75" top hose and a 1.5" bottom hose.
I ended up deciding to run the following radiator - itll require some bracket and outlet modification but will work well when fitted.
Its marketed as a "6.1 b body radiator" - p# cc1643
.......AND B4 anyone says anything....I ran a Champion A body radiator with no issues for 18 mths.....so I have no problem with their quality or fit
· Core Dimensions: 16 1/4" high x 25 3/4" wide
· Overall Dimensions: 22 5/8" high x 29" wide
· Upper inlet: 1 1/2"
· Lower outlet: 1 3/4"
(This is an issue as the diameters are reversed to the 6.1)
· Bracket mount system (Hor - 27 1/2")
· OEM style brass petcock drain.
· Billet style fill neck construction (Not Stamped)
· Radiator cap included
· Trans Cooler included
Joe Dokes
Well-Known Member
So you widened the opening for this 26" radiator. Other than cutting and drilling, how much other fabrication was necessary?
Thanks,
Joe Dokes
Thanks,
Joe Dokes
-


