What Are You Doing To/With Your Car Today?

-
Folks r in town this weekend. No car work this weekend. Will prob be respraying the dashboard frame in the middle of the week. Prob will re reassembling the dash next weekend.

I will supply pix then.

Matt
 
Over the weekend, okay in the few hours before it got unbearably hot...

Cleaned most of the nasty road grime off my new 904 trans, and got rid of the spiders.

Cleaned the dirt and surface rust out of the trunk. Most of the surface rust is over on the left side, and there's a little in the spare tire well.

The rear seat isn't wanting to fold down without a lot of sticking fingers into the hinge/latching mechanisms and lifting the hook, so I pulled it all out. When I removed the bottom of the rear seat, I found a build sheet, a recipt for Jack in the Box dating back to 1995, eight cents, a mouse nest, a mummified mouse, and a steel pin which managed to work it's way out of the seat back hinge mechanism. I took apart the hinge/latching mechanisms (P/N 2802522 and 2802523) on both the left and right sides where it bolts to the car body. There is a little cam with a plastic bushing. The cam is held onto the square rotating rod which sticks out of the sides of the rear seat with tiny little allen screws. They will need to be tightened upon reassembly. I will need to either buy some bushings, or get new bushings made. Does anyone have access to a 3d printer or a lathe?

I forgot to get pictures of the back seat, but it's in fantastic condition for 47 years old. I only took one picture where you can see any of the seat, and it's not very much. I'll get some more pics of the seat when it goes back in. It's white, and unmarked. I'm going to have to change it to black or black and red once I paint the car. Some of the stitching is coming out in one spot, about 1 inch in length. Better than the rear seat seatback in my black 2001 year model 540i, that I sold to get this badass fish. (By the way, I am NEVER owning another black car). And the rear seat back carpet, and rear deck carpet is faded and needs replacing.
 

Attachments

  • clean_a904_small.jpg
    85.4 KB · Views: 368
  • trunk_surface_rust_small.jpg
    44.7 KB · Views: 330
  • Buildsheet_mouse_money_small.jpg
    60.3 KB · Views: 363
  • mouse_small.jpg
    54.9 KB · Views: 344
  • rear_seat_hinge_bolt_size.jpg
    53.9 KB · Views: 333
ring and pinion broke on race car. Going to buy a Dana 60 complete axle and put it in as soon as I can find one. Broke one is 8 3/4.
 
Checking it over making sure its good to go racing this weekend..
 
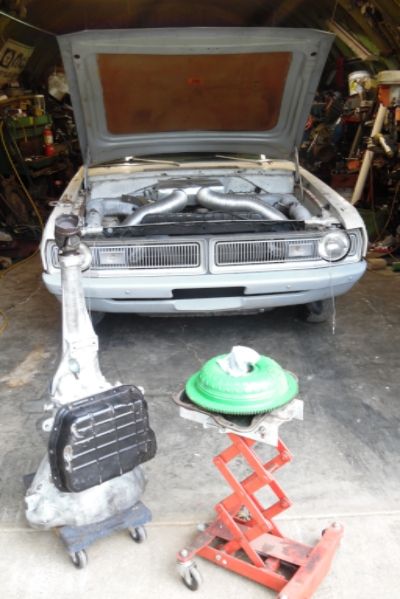
a converter swap, and a fresh trans

011_zps7wnmwejx.jpg
 
Headers leaked water on 360 break in runs. Tried silicone, ARP threat sealant, Etc. Kept leaking. Decided I had to get studs in to seal the water jackets. Fun times. Headman headers. A body. Power brake booster. Etc. Decide I better change the header gaskets now after all that torqueing (to the point of fear of breaking a bolt off in the block). I really wanted to put 20 minutes consecutive time on my hydraulic cam.
Drivers side. New gasket in. Only possible way to put rear stud in is after header is on. Can get the tips of 2 fingers on the top half of the end of the stud to place it in hole. Only way. Arm in a horrible contorted position. Especially relative to the way I have to contort my hand around to finger F the stud in. Get it threading in after about 3 hours of effort. Going as at it as long as I can stand the pain in my arm and hand. Then going at it again. And again. And so on. Get stud threaded in far enough to (only way possible) put a nut on the circle tip of my middle finger and drop my finger in in a way that I can stab it onto the stud and hold it there. Try to turn. Go through a stack of nuts trying. Work at as long as I can stand the pain. Again and again and so on. Then get a second nut tightened to the first on the stud to walk the stud into the head. 6 hours later. Glory. Its far enough in there to actually get a cut in half box end on it and finish the job. Drivers side done. Gask a sinch (spelling) on the threads. Getting headers on required. Whole nuther story. Jack under header. blocks of wood.and so on. Passengers sides a breeze. Had these on and off a couple times. FUN.
 
Pulled the floor out of a 4 door Belvedere to put in a 2 door Savoy. That's a lot of work! But the 2 door was way easier and quicker due to the fact I wasn't trying to be careful with it.
 

Attachments

  • IMG_2783.jpg
    52.8 KB · Views: 317
  • IMG_2780.jpg
    49.1 KB · Views: 290
Dang, I was working on vehicles all day (I am beat). I replaced the alternator on my tool truck as well as a idler pulley and a ball valve heater hose shut off. Things were going so well I texted my son and had him drop off his rusty 2000 Dakota that had a broken fuel tank strap. Well 6 hours later and fighting it every step of the way, I finally got it bolted together. You really need to remove the tank to install the straps. Tough to do on the driveway with a floor jack. Long story short, the rear strap I had to tweak to get it installed and I must have poked a hole in the plastic tank. Leaks. Sucks. I'll have a friends shop fix this one. My new motto: Make the call............write the check! lOL
 
I finally sprayed the textured black on my bare dashboard frame, and started reassembly of my dash. Still have lots to do, but how it looks make me feel its worth the wait.

Maybe a moderator can turn my #2 & #3 pix right side up. I dunno why it does this.

Matt
 

Attachments

  • 20150926_165956.jpg
    21.4 KB · Views: 283
  • 20150926_165949.jpg
    35.6 KB · Views: 279
  • 20150926_165940.jpg
    35.5 KB · Views: 286
Here ya go.
Looks nice.
 

Attachments

  • dash1.jpg
    35.5 KB · Views: 298
  • dash2.jpg
    35.8 KB · Views: 258
  • dash3.jpg
    21.8 KB · Views: 279
just finished loading up the Dart. Headed to the track tomorrow.
 

Attachments

  • 001.jpg
    67 KB · Views: 275
Thanks for rotating the pix, and the kudos trailbeast.

I added in the light package option to my 67 cuda even though it wasnt available. Even put the illuminated ignition switch setup from 69 up. My 4 speed doesnt have a reverse lockout. So i added in the reverse warning light even though it wasnt available in 67.
 
Today I cut & buffed my doors. I am also installing the package tray speakers. Tomorrow I will attempt to hang the doors and complete the rear speaker and package tray install.
Will Advise:)
Got my exhaust manifolds back from coating, will post to by build thread tomorrow.
Cheers all----Dr:cheers:
 
Today

I painted my pulleys and fan, after bead blasting and priming. I also put my back seat latch mechanisms and put the seat back in the car, then I put my son's child saftey seat in. Thank you California and all your damned nanny state laws.
 
Finally welded in the subframe connectors I fabbed up a few weeks ago. Tomorrow I lay in some sound deadener and test fit the new carpet. I've been dragging this out for waaay too long
 
Mounted rear bumper brackets to bumper,started detailing tail light lenses (4) . That includes scraping /sanding magenta base coat spilled on one. Slow,but sure.
 
Here is part of what I did today. Cut & buffed yesterday, installed on car today.
Sore & tired, Done for a while-------
DRO:)
 

Attachments

  • Dooron2.jpg
    40.7 KB · Views: 287
  • Dooron1.jpg
    44.7 KB · Views: 264
I didn't get any pictures today.
I *did* get a sunburn though.

1) Installed the radiator that I got from tmcc15t. Pure awsomeness, thank you! The radiator is set up for a slant six, but I am making it work for my 318. I'm probably going to go with an electric fan. If I don't go with an electric fan, I'll have to make a template and cut down the blades on my belt driven fan. I am going to have to figure the hose routing for the bottom connection so I can get around the power steering belt, and then over to the right side.

2) Changed the oil and filter.

3) Prepped and ready to drop and replace my a904 trans for next weekend. I am looking forwards to that so I can get back on the road! :burnout:
 
Well, after 2 years of talking about it, I'm starting a number of thing's beginning this coming week. First is the mini tub, and spring relocation kit's from U S cartool should be here today, then the narrowing of a B body housing, which is already in the jig, then the US cartool subframe connectors go in! Finally last but not least install the new 275/60/15 Nitto drag radials, then it's off to storage for a long winter nap. I will post pic's as I go !

Jeff
 
'67 Dart GT w/ '69 charger 383/TF. Changed my 8.25 2.45 open diff. (housing and all) to an 8.25 3.55 SG. Put new springs 'n things leaf springs in as well as changing out the fuel tank sending unit. New shocks, new U-Bolts and good to go. Waiting on a power brake booster. Hooking up a manual choke, for now. I know, old school. That's me Class of '69.
 
Almost finished this............
 

Attachments

  • IMG_2832.jpg
    43.2 KB · Views: 224
  • IMG_2833.jpg
    46.7 KB · Views: 220
Well some of my part's have arrived, now you can all watch me cut up a rust free car and make it look the way the factory should have built it to start with lol! Thanks to Chris at U.S. cartool for the mini tub kit, looks awesome!! The spring relocation kit came from Mancini racing. just waiting for the frame connectors from U.S. cartool, which ive used before and are awesome!!! Let the cutting begin :burnout:View attachment IMG_1250.jpg

View attachment IMG_1249.jpg

View attachment IMG_1248.jpg
 
-
Back
Top