**73 Scamp Mini Pro-Street Engine Swap**

-
Just spray glue some fabric onto it.

Like this:

Large_EL-566.jpg
 
that hard board headliner is one big piece. it has to long creases one on each side that let it contour to the roof line. i had on in a duster. it was all screwed up. i ended up painting it. i primed it first to seal it then shot it with some spray bombs and it turned out pretty damn nice. did it in a matte finish. it was blue that i had color matched at the local auto body supply shop. cost me like $50 and looked new.


or you could just hit it with some spray glue and flock it.
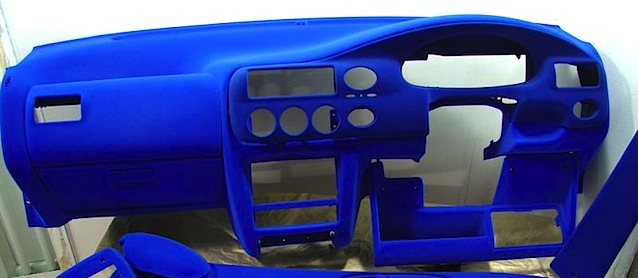
The-Hog-Ring-Auto-Upholstery-Community-Car-Dashboard-Flocking.jpg

i was messing around with the headliner today. I think it might be 3 pieces. The rear looks like it comes apart at one of the seems on both sides.

If I do an overlay it will be later. I need to get this thing running and driving again before summer is over.
 
No no, I do.

Just think it would be funny to accentuate the hippyness with some paisley :flower:

I hear ya.

One thing about Mopar is they had some seriously LOUD color combinations. I figured I would keep the theme going. Wait until you see the carpet installed. It is LOUD without a doubt and should set it all off.
 
Front speaker enclosures are all done & painted satin black. Dash is all put back together, cluster, wiring, fuse box, switch panel, Tack & shift light etc. I have had the cluster in & out of this car several times. For some reason this time was a pain in the ***. I started the Stereo pre wirng & it should be all done tomorrow.

Before I cut in the carpet, I am going to put the bench seat back in for mocking up & fabricating a floor shifter provision. I will be making up a shifter mounting pad that comes off the floor with a 1" slip tube & Kwik Pin hold down that goes up and around the bench seat. The shifter cable will be rear exit and it will route between the seats doing a U Turn and going through the floor then entering the Trans at the rear. I will be going with a Performance Products Kwik Shift 2 when I make that move.

Here are some Pics of the Shift mounting plate I will be making up and the shifter. You can get the idea now how the mounting plate will mount to the floor and go up and around the seat.

View attachment 1343-l.jpg

View attachment kshiftbig.jpg
 
i got a set of dimple dies! if you wanna use em to make those side plates in the shifter pics. you can borrow em or i could stamp the holes for you and send em to ya.

 
i got a set of dimple dies! if you wanna use em to make those side plates in the shifter pics. you can borrow em or i could stamp the holes for you and send em to ya.


I appreciate the offer! :cheers:

The side plates are only $30.00 so I will just order the shifter with them when I do it.
 
Finished up most of the stereo wiring, I just got to zip tie up a few places is all an mount the amp with 4 screws. I got sound! The rear speakers and the Dash speakers are on as of now. The sound is very Loud, Crisp and Clean and that is without the 6.5's installed and the windows front and rear are still out! Once the windows go back in it should sound even better. You sure can't beat this $300.00 Budget Stereo System. It sounds like a hell of a lot more than a $300.00 system I can tell you that without a doubt! The 6.5's go in after the carpet is installed which should be this week.

Next up is the bench seat goes back so I can fab up the floor shift provision. After that it is a walk in the park to finish it.

Windows will go back in early this week. The new rear window gasket just got here on Friday evening.
 
I had to order the Qwik Shift 1 , reason is the Qwik Shift 2 does not allow for rear entry reverse pattern shifts. It is a cheaper version of the Qwik Shift 1 he was telling me for them to compete with B&M etc. The shifter looks exactly the same.

Anyway it is on order. It has a built in Button on the shifter for Line Lock, NOS, T brake, Rev Control etc. Depending on how you wire it all 4 can be used at the same time off same button with the use of switches to control what gets triggered by the button when pushing it..

The seat is back in and I will be installing the shifter provision tomorrow.

OH, and I fired the car this morning...... Primed the fuel pump/carb with a couple on and offs of the FP switch. The POS fired right up instantly and went straight to an idle...... I have not fired the car in 5 Months or so!

I WILL be driving the POS to Grand this Friday no matter what!
 
I just landed all of the wiring to the O2 Sensor, T-Brake, Line Lock & Launch Retard. The floor shift provision is in and painted. When the seat was in the car I tacked the sliding tracks so it won't move anymore and when I took it out I buzzed 2 - 1" welds with the mig on both tracks in a spot where they can be ground off just in case. I started putting the carpet in and have the back half almost all cut in. The front half I am waiting for the paint to dry on the shifter provision before I install it. Tomorrow all of the carpet should be in along with most of the seat belts. The window guy should be here tomorrow or Thursday if all goes well.
 
Carpet is in, Sill plates are in. Front speaker enclosures are in.

The window guy comes out tomorrow around 12 Noon. After that I put the seats in and finish up the trunk area..... Re Install the NOS Bottle etc.

That video is a total cold start up. Was running for about 10 Seconds or so just to make sure the o2 Sensor was getting to the gauge.

It is so close now I can taste it! Lol

[ame]http://youtu.be/9LxHWee3Zho[/ame]

This is with the Rear Speakers and the 2 4" in the dash. 6.5's are MIA, I will be putting in a FALSE Door in the back of the glove box in order to service the wiring, you will never tell when I am done

[ame]http://youtu.be/JiaaJOHx4DY[/ame]

[ame]http://youtu.be/OYtzo5Iipyg[/ame]

View attachment phpMPj0xSPM.jpg

View attachment phpyzmJlJPM.jpg

View attachment phptmSa6QPM.jpg

View attachment phpXi5fuvPM.jpg

View attachment phpbepoDyPM.jpg

View attachment phpeoWC9cPM.jpg

View attachment phpWI8DjbPM.jpg

View attachment php3S7curPM.jpg

View attachment phpCbyXViPM.jpg

View attachment php7hXNTsPM.jpg
 
Def Leppard... LOL

Geez, align the glove box door you hack. :)

Looks like you are almost ready to roll!
 
Def Leppard... LOL

Geez, align the glove box door you hack. :)

Looks like you are almost ready to roll!

You know what is funny. I think someone used the glove box door as a crutch to get in the seat. I have tweaked on the hinge a lot with a BFS ' big screw driver " and that is the best I got so far..... but will do more later. When I think I am about to break something I walk away for a bit.. haa:banghead:
 
Windows are back in. All trim is back on everywhere. Trunk is 3/4 back together, NOS bottle is mounted again and hooked up.

Things to do before take off.....

1) Make up amp rack and clean up wiring at amp a bit. "Zip Ties etc"
2) Make up Rear package tray.... I got the material this morning to do an overlay.
3) Put rear seat belts in
4) Put all seats back in.
5) Wash it............

6) :burnout:
 
I absolutely hate how you are able to get things done so quickly. Excellent job man!
 
-
Back
Top