65 Dart Wagon Conversion to a Sedan Delivery

-
I have a home cooked version of this kit. It works really well. If I had it to do over I'd just buy the kit.

Cley
 
Today i took my blasted and painted upper control arms and pressed in my Moog offset bushings I’ve had for at least 10 years now. Good chance they are genuine Moogs and not Chinese repops. Finished up the control arms with more genuine Moog large ball joints. I will finish torquing them to specs after I install the control arms to the car.

View attachment 1715923056

View attachment 1715923058
Looking great and the feeling while out driving it.
 
I was doing some mock-ups of my auxiliary transmission cooler and power steering cooler before my wife and I left on a 17 day excursion to Europe. With time running short, I never did post any commentary or pics. Now that I’m back I figured It was time to bring my progress up-to-date.

i decided to add an auxiliary transmission cooler in addition to the cooler in the radiator. I decided in a Tru Cool model LPD4711 model that used a 3/8 inverted flair fitting. I can use 3/8 tube (same SIZE as the stock 42RH coolant lines) with the male fitting to screw in directly ti the cooler. I don’t particularly care for the barb and hose clamp style, so i chose this model. It’s a stacked plate design measuring 8 & 1/4 by 11 by 3.4 in thick. I wanted it to look like it was a factory installation, i fabricated a bracket that used a factory hole in the upper core support on the left side (I did need to add the lower mounting hole at the bottom) and a smaller bracket that shared its mounting hole with the upper horn bolt. It’s all very sturdy and looks factory. Satisfied with the fit and appearance, it got painted black so it would blend in behind the grill

E315238D-AD8B-4384-80E0-D07F668A761B.jpeg


In 65 the Power steering box and pump used 5/8 in hydraulic hose. A Mopar friend offered me a power steering cooler out of a Dodge big car. These were finned and U-shaped. First thing was to clean the cooler and brackets and de rust everything in a tub of Evaporust, then give everything a coat of black pain to help it blend in behind the grill.

A6AF4EF2-EEB0-44FA-A449-7B996A908ECE.jpeg


The U shaped bracket has 2 mounting holes which match perfectly with the bolts securing the AC condenser. With the brackets assembled to the cooler and mounted in place it looks like a factory installation.

9C0599DA-FA84-4338-BD37-90C3B81871E3.jpeg


I started bending the transmission cooler lines. After drilling a pair of holes in the lower core support, the top line will go to the transmission temperature sensor block which is mounted on the side of the frame rail. I forgot to get a picture of that.. the bottom line will go to the left side port of the radiator cooler.
A4B1870A-4558-4ED9-9C93-36A119D99E9D.jpeg


And the transmission temperature sensor block I forgot to add a picture of. It’s mounted on the shde of the driver’s side frame rail just before and velow tge batter tray

AA9DF345-1231-4ACA-A153-EEF0C763B844.jpeg

Here is a better idea of how it’ll look - pic take during mock up. I will be working on the power steering hoses the bext couple of days

DBA7420F-47ED-4D19-99A3-7F7EEB2DEB7F.jpeg
 
Last edited:
Don. I know that my 65 had a transmission cooler, but the car had a 225 with a 904, it was from Arizona, and it had a trailer hitch. Were transmission and PS coolers an option back in the day? You certainly thought your project from beginning to end. Very Nice. sgrip 65
 
For the A Body I’m not aware of any factory options for an external transmission cooler. I would guess any such coolers were add-ons. Later A’s/B’s and others had that little PS cooler that mounted to the pump. Up through 65 some C Bodies and Imperials got the power steering cooler that I’m using. IDK if they had an auxiliary trans cooler
 
Last edited:
I am just about finished with crimping and soldering the remaining terminals for my custom wiring harness. No pics since you’d have to give more than a cursory look to see all the modifications. It looks like a wrapped harness
 
Nice work Don! The last few cars I've done, I made all hard lines for the transmission like you are doing. I used bulkhead fittings in the radiator support to make it have a little more support right there. Then I ran the hard lines down the frame rail behind the steering box and then turned them a few inches towards where they hook to the transmission, and made steel braided lines to add the needed flex and make it easier to route over the exhaust. It costs a little more to do them that way, but they are slicker'n cat poop on linoleum......lol.
 
My plan is to break the engine in on a test stand using a known good carburetor then install the engine into the car. I plan on switching to the Sniper or FiTech afterwards. To that end I have already installed the Holley in-tank returnless pump system for the A Body - written up earlier in this thread. I am also on several Sniper/FiTech Internet forums and hear the good, bad and ugly stories about how they’re crap, the ECU’s fail in a short time, components fail in a short time as well as the some of success stories. A lot of the problems seen to be wiring issues. Yes, components do fail; however, It seems the alternator/coil emits a great deal of RFI through the wiring. I had routed my alternator wiring along the firewall as per stock and thought how I could improve my chances of avoiding the dreaded RFI since the wiring from the unit is in close proximity to the firewall harness. I decided to unwrap the harness and move the main alternator harness including the regulator field wire to the core support with the headlight and horn wire. So I got the alternator wires moved along side the other wires and did get all the core support wiring rewrapped up to the regulator. Now I get to rewrap the wiring across the firewall (again!)

Please note that it appears everything is installed as far as the engine and accessories are concerned. Nope - it’s an empty block with tthe coil and dizzy in pkace to mock up the wuring

5447D66A-CCE2-4D1F-8313-0FCF4EEEF3A6.jpeg


357300CD-4D74-49DD-B869-2D622A6FC27E.jpeg


ACB36583-FF10-4221-87E1-CCB4B418B38C.jpeg
 
I'll be interested to read your thoughts on the EFI when you get to that stage. I'm considering the Sniper with in tank pump for my Dodge ute. I've met and read about a lot of users that say they just bolted it on and everything has been fine. Then others have all sorts of problems and failed parts. Many have gone back to a carb and say never again to EFI!! Got the felling many problems are installer issues rather than product issue!
 
Thanks for your comments. I’ve read that the earlier production units had better quality control over the later built units. IDK if that contributes to more component failures ir not. You’d think later units would have Better quality control procedures. They’re both wired just about the same so it’ll be easy to swAp from one to the other if necessary
 
I am pretty much done with the engine compartment wiring with everything now wrapped with the non-sticky harness tape. I need to add a HD terminal to my alternator output harness but that can wait till i pick up a terminal.

I decided the next project (and there’s a ton still to do) would be to use the tint kit I bought for the vent and door glass. I decided on the Motoshield Pro kit and bought the 20 in x 10 ft kit from Amazon. Virginia’s legal limit is 50% tint so that’s what I’m using.

722C1B48-3E88-4304-BF01-D4E78878BEA2.jpeg


Rather than disassemble the vent window assemblies

79524D11-AECB-4E87-90D0-9AFDCF481E2B.jpeg


i used a pair of really nice vent window glass I bought from another member (can’t remember who)

14BCF6CC-560C-40E0-AB3D-4D0E7076B779.jpeg

i did mess up the first 2 i tried but with that practice, I got both vent glasses done snd trimmed. The instructions say don’t roll up or down the windows for at least 6 says to let it cure! It’s liable to be 6 weeks or more before i get ariund to installing it.

F0DE63AF-27ED-43DC-9D21-08B88EA3ECEB.jpeg


777EA12C-24B9-4E09-AD7B-9CF96EF6713E.jpeg


next up is each door glass - looks like that’s gonna be fun!

DE097F0E-C26A-417B-94E9-FE1D1E5F6380.jpeg
 
Last edited:
Door glass is done! After scraping both sides of what I will call the passenger glass, i cleaned both sides with Windex. Then did the scraping and Windex again. After removing the adhesive protective plastic, I Then applied the tinting solution (Dawn detergent and water lol!) to the glass and tint. Squeegee it till no solution between the glass and tint, trim the edges and done. Follow the same procedure fir the other glass and let then cure. Ready to install in a few weeks!

next will be the tailgate glass!

DE4E6930-F8B3-4E8C-9585-DB45F924F319.jpeg
FBF26639-2BCE-4E9A-B63B-21EB0C861873.jpeg
 
Last edited:
A little project I needed to get done - a home for a cupholder assembly and the power window switch.

I found this cupholder on Amazon and is for a Honda Pilot or similar. I liked it because it was flat and had a thin top plate
BE80D62C-5E13-43AE-9409-EDDBEE9BAF37.jpeg


I had ordered the switch and wiring harness from A1 Electric some time ago
2DC7DD74-8154-434F-9832-ECFC055F7D44.jpeg


I am using the front half of a 66 Charger console and the top plate would be perfect to mount the cupholder and switch after it was modified.
A9F2791B-FF29-4296-B47A-53D67FD1CD54.jpeg


Alk I can say is the metal of the plate is some tough stuff. A jigsaw with a metal cutting blade didn’t make a dent in it! A cutoff wheel did but it was slow going. I also had to use a grinder so the end result isn’t pretty at all, but it’ll all be hidden.
796F4AA8-FE63-4C43-AD0A-D98C03239B2A.jpeg


With the switch and cupholder installed, it will be perfect to hold a cup of coffee or soda and the power window switch is convenient for either of us

View attachment 1715982219

56AD9B28-74E3-4163-AA02-E87A61A0FFB8.jpeg
 
Last edited:
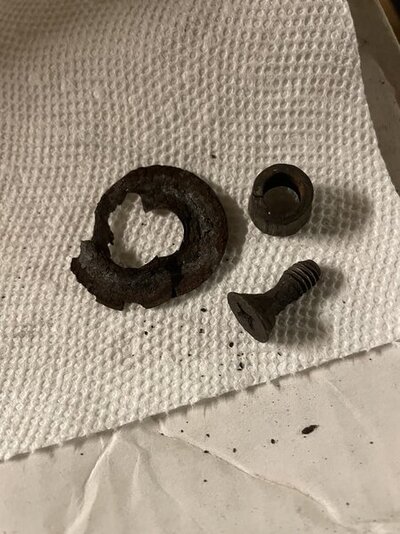
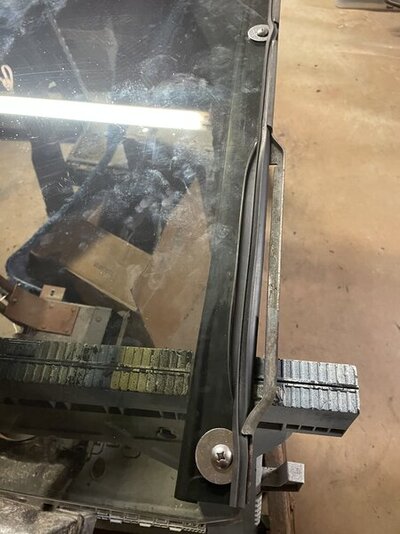
Now that I have all the door glass tinted, it was time to tackle the tailgate glass. If I was just doing the tint, i could have just done it. I need to replace the outer seal so the glass needs to be removed from the frame. So I’ve been soaking everything in PB Blaster for a couple of days now. On the left side the washer was rusted awayand the head of a very rusty machine bolt went right through the hole in the glass
9C1A7010-BF85-438A-95C4-20BA3F9818D2.jpeg


i was able ti remove the screw from the right side but the washer basically disintegrated
88D4466C-6535-4DC0-95AB-F7611256398E.jpeg


after having no success removing the center screw, i decided to take my cutoff and carefully cut the head of the screw and the raised area of the washer. The glass then lifted off the frame. I will need to remove The left and center mounting screws (or what’s left of them) before installing the seal and glass to the frame
0F218B3C-5919-4ABD-AAEA-B2F475A86BF1.jpeg


E32502FD-8258-4068-A955-F8DA315A2229.jpeg


it will be so much easier working with just the frame rather than frame AND glass!
 
Last edited:
Now that I have all the door glass tinted, it was time to tackle the tailgate glass. If I was just doing the tint, i could have just done it. I need to replace the outer seal so the glass needs to be removed from the frame. So I’ve been soaking everything in PB Blaster for a couple of days now. On the left side the washer was rusted awayand the head of a very rusty machine bolt went right through the hole in the glass
View attachment 1715986052

i was able ti remove the screw from the right side but the washer basically disintegrated View attachment 1715986051

after having no success removing the center screw, i decided to take my cutoff and carefully cut the head of the screw and the raised area of the washer. The glass then lifted off the frame. I will need to remove The left and center mounting screws (or what’s left of them) before installing the seal and glass to the frameView attachment 1715986050

View attachment 1715986053

Very cool Don. I need to get down there some time and see the progress in person
 
I will need to remove The left and center mounting screws (or what’s left of them) from the frame before installing the seal and glass to it View attachment 1715986050

View attachment 1715986053

it will be so much easier working with just the frame rather than frame AND glass!

i needed to use the heat wrench and liberal amounts if PB Blaster several times in order to remove the 2 seized machine screws from the tailgate glass frame. I used a 1/4 in tap to chase all three built-in mounting holes

D7CDD84E-A11E-4F21-AE63-058E3A667313.jpeg


I applied the tint to the tailgate glass. I’m undecided whether to keep or remove it as the glass is already factory tinted

F2319D88-7D41-417F-8372-DCCDA17D79F4.jpeg


The tailgate outer seal from Quiery Quality fits like a glove to the frame

9F5F2532-1C3D-4306-8DF9-F9941CE6BF45.jpeg


278ACCDC-F2D6-43DD-8AF7-ACAD5E239D18.jpeg


this part of the seal is what yiu see when the window is closed and supposed to keep water out of the inside of the tailgate

Still to do is cut the holes in the seal so the new machine screws will pass through the seal to the frame to secure the glass

Besides the outer seal, Quiery’s kit includes the inner catwhiskers which is installed to the tailgate.
 
Last edited:
Door glass is done! After scraping both sides of what I will call the passenger glass, i cleaned both sides with Windex. Then did the scraping and Windex again. After removing the adhesive protective plastic, I Then applied the tinting solution (Dawn detergent and water lol!) to the glass and tint. Squeegee it till no solution between the glass and tint, trim the edges and done. Follow the same procedure fir the other glass and let then cure. Ready to install in a few weeks!

next will be the tailgate glass!

View attachment 1715981709 View attachment 1715981710
That turned out great. Will you do the front glass too? Here in Sweden that is a no no!
 
I’ve got a brand new windshield with factory style tint at the top. I’ve had it at least 20-25 years now
 
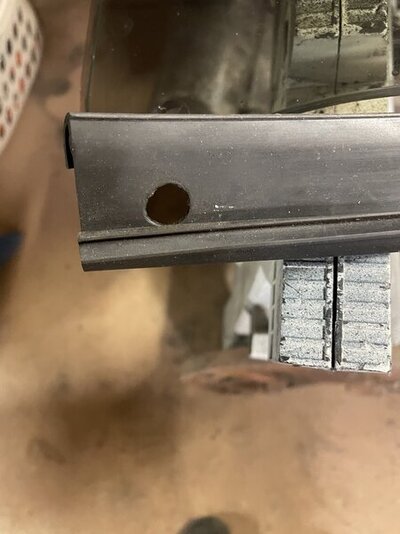
The OEM seal had 3 holes for the machine screw to pass through to the frame

97A1AE06-6054-4FFA-A17A-3676EC49EAA0.jpeg


I used my gasket maker kit (various size punches) and punched the access holes in the rubber seal.

FA2412CB-F151-4499-A733-C7D38CC02653.jpeg

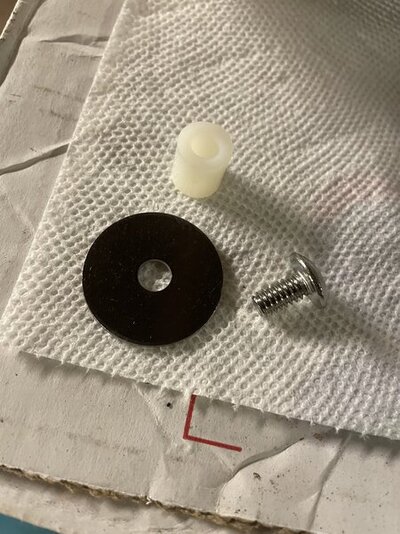
The old hardware

A0EA76E2-D36B-46A7-AE1C-E7A206B34BBD.jpeg

The new stainless steel fender washer and pan head 1/4 inch machine screw. They’re nowhere identical to the origibal hardware but will do the trick!

DB1E8299-BD09-4001-8D7D-0324E2216222.jpeg

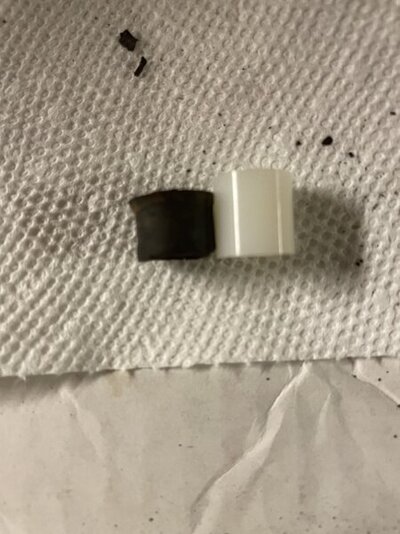
The OEM rubber bushing fit in the hole in the glass, probably to make sure the machine screw doesn’t touch the glass. The white plastic spacer should do the same job. It is longer than the rubber spacer so I cut all three down

9F3E9610-D922-4F2D-AD79-24A25DEBE049.jpeg

And after fighting with the glass, new seal and frame. It is all assembled ready to install into the tailgate

1DE0288F-9F8B-4B57-8204-76AF0E7203A0.jpeg
 
The OEM seal had 3 holes for the machine screw to pass through to the frame

View attachment 1715990743

I used my gasket maker kit (various size punches) and punched the access holes in the rubber seal.

View attachment 1715990742

The old hardware

View attachment 1715990744

The new stainless steel fender washer and pan head 1/4 inch machine screw. They’re nowhere identical to the origibal hardware but will do the trick!

View attachment 1715990745

The OEM rubber bushing fit in the hole in the glass, probably to make sure the machine screw doesn’t touch the glass. The white plastic spacer should do the same job. It is longer than the rubber spacer so I cut all three down

View attachment 1715990746

And after fighting with the glass, new seal and frame. It is all assembled ready to install into the tailgate

View attachment 1715990747
Excellent work Don!
 
Thanks! By chance have you been able to complete the template for the quarter panel letters. I now have a set for one side
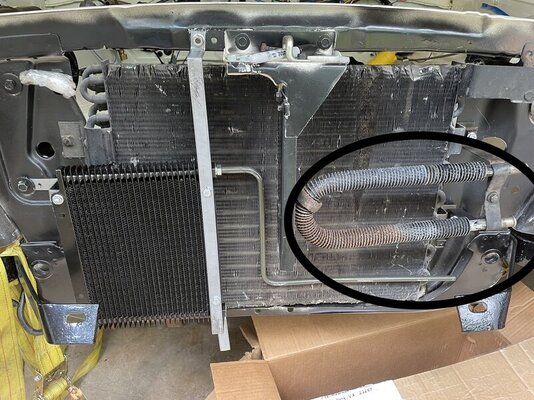
 
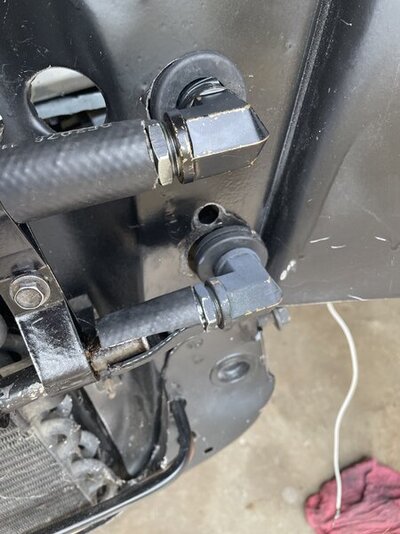
I have been very undecided about the Power Steering cooler lines. The early A’s just ran the hydraulic hose from the pump to the box since they didn’t use a cooler. The big C Bodies snd Imperials used a U-shaped finned cooler with the hydraulic hoses routed through the core support to the pump and steering box. So I’m using one of those C Body coolers (in the circle) compliments of a Mopar buddy.

40C06C62-4C3C-45F3-A6E7-B3599A1977AE.jpeg

I had thought about running the hydraulic hose like they did with the C Bodies; however, the more I thought about it, the less I liked that idea as space is pretty limited. Since I wanted a neat installation I found some 90 degree female NPT fittings that took 5/8 heater hose fittings that matched the size of the cooler lines and incidentally matched the size of the pump and steering box fittings (65’s used 5/8 hydraulic hose)

262A6E44-4334-4F66-8C33-6808F910ABE5.jpeg

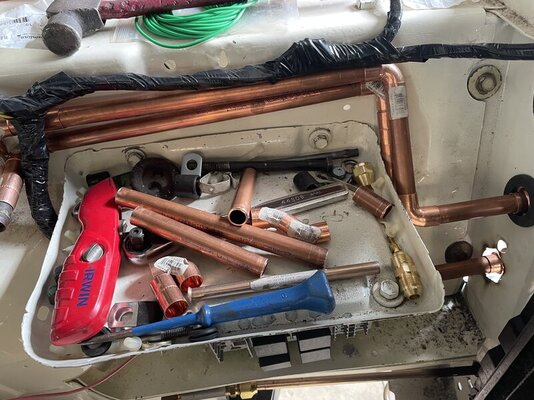
I was at Lowes and the plumbing guy suggested using 1/2 in copper fittings with straight like as needed and even found me a NTP fitting that threaded into my 90 degree fitting and would take the 1/2 in copper pipe or fittings as needed. My first attempt was to route one of the lines right in front of the battery box

8B1DF8EB-FD9C-4EFD-9C3A-B8AC02349BBC.jpeg

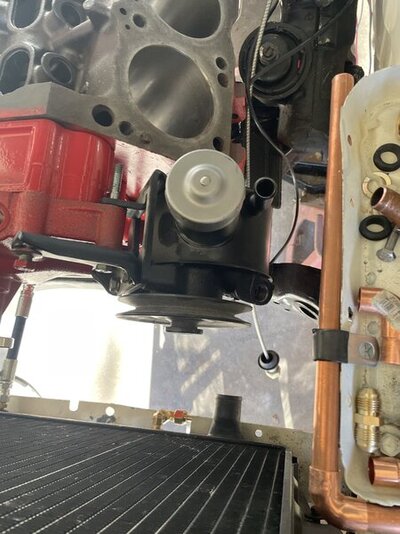
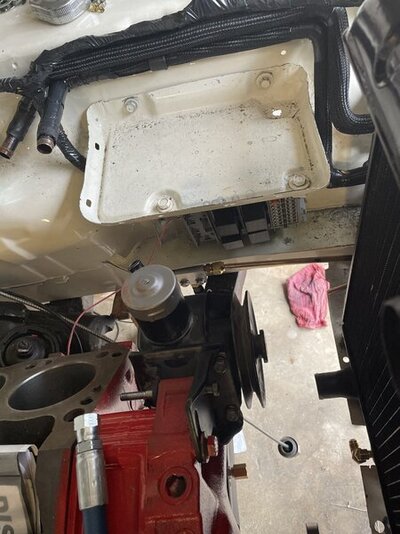
That might work for the line to the steering box but not to the pump with it’s vertical hose connection so back to the drawing board. I finally came up with the idea of routing both hard lines up against the inner fender behind the battery with the wiring.

AA3E20ED-C1C8-4077-887C-11C59EE85D10.jpeg

After numerous trying 90 and 45 copper fittings and straight pipe and sweating various combos together, I was able to come up with a combination I liked that didn’t involve sharp bends to the hydraulic hose that’s still required In case there’s any engine movement side to side. I used the ends from an old heater core that is the same size as the pump and steering box fittings. Then I found some black mesh covering that gives the pipes a finished look. All that remains is add the 5/8 hydraulic hose from the pipes to the pump and steering box during final engine installation

8AA42795-1EAA-4549-81CA-BB9F3B1E8809.jpeg
 
Last edited:
-
Back
Top