Shift Kit

-
Sounds good thanks.
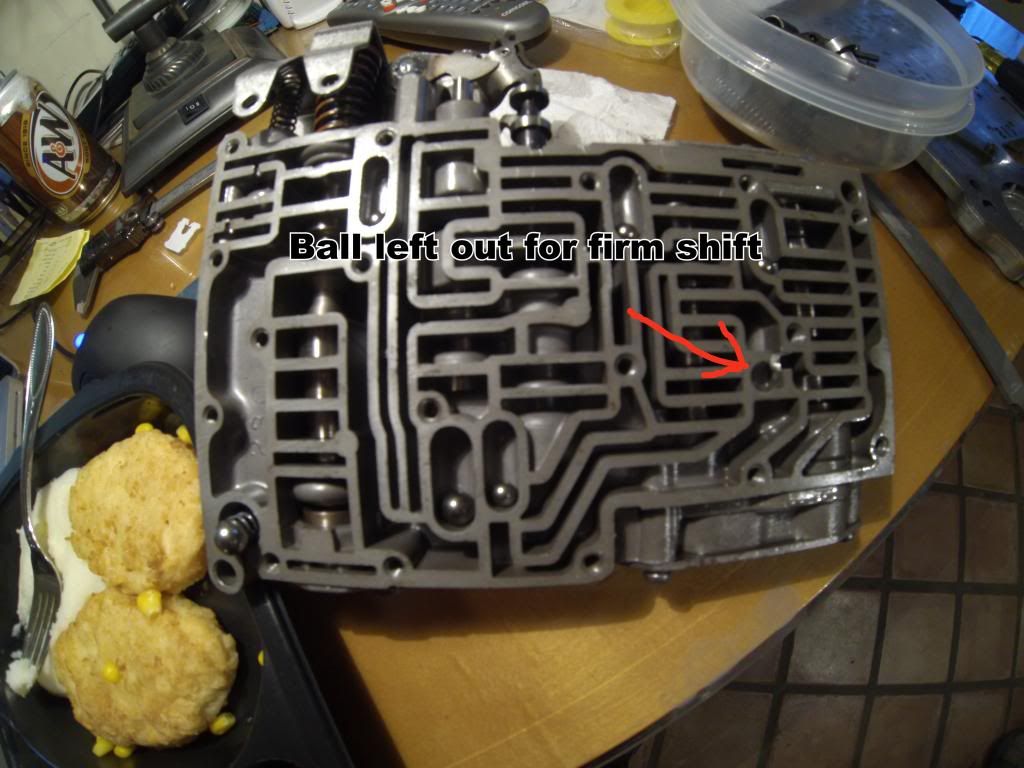
I'm going to adjust the front band tomorrow and check the linkage, finish the valve body and hopefully get it installed and test drive it and see if anything changes. Hopefully it'll all go well but maybe not.
 
Alright, so the spring on the far left is the one that I have installed in the 1-2 shift valve, the one in the middle is the one from the lockup VB I believe from the 1-2 shift valve, one on the farthest right idk what it goes too but it's got red on it and it's the same as the one in the middle.
If you look at an exploded view of the VB of this area (none lockup w/ 3-2 downshift and limit valve assembly) you'll notice that the spring for the 1-2 shift valve is as long as 2-3 shift valve spring. The one I installed is much longer thus much stiffer. If the diagram I'm going by (from the book fishy suggested) I am to believe I have a stiffer spring installed on the 1-2 shift valve. Hurah if I'm right haha

GOPR0034_zpsc686b973.jpg


Also I've adjust the front band, checked for loose bushings on the shift linkage and once I get everything installed I will check the throttle pressure linkage.

I could only guess which one of those goes in the 1-2
Maybe find something that tells you the length of the spring that does.
The only clue I can think of is if the kit instructions say anything about the red spring.
 
I looked but no luck on the instructions.
Fishy's taking a look at a valve body he has laying around for me thankfully, that'll answer weather or not I got them mixed up. I put the smaller one in to see how it feels and it does feel better, not crazy stiff like the last one but I can only guess too.

It's all put back together and every things moving freely
 
Sorry 7D I didn't get time to take that VB apart today. Took a lot longer at the hospital than I expected and was so wore out when I got home I crashed until 3 pm then had errands to run and work on the vacuum cleaners at church. I'm caught up now so I'll get on it first thing in the morning and take some pics and post them.

BTW: this is just a guess going from memory but I don't think the 1-2 valve spring is supposed to be nearly that long so that might be the problem.
 
So,,,it might have shifted afterall?

at 26,000 RPM's ? :)

Every time I open this thread now I'm hoping to see a YAHOO! it's fixed.
 
maybe at 26,000 but I think my poor little 318 would be in a few pieces way before then lol. Now if I stuck an F1 engine in....hmmmmm

As do I, in due time though. Once I can cross check my springs with Fishy's VB I think it'll all be good unless I royally messed up some where
 
I believe you may have the 1-2 shift valve spring and the torque converter control valve springs swapped. I took apart 3 valve bodies I have and all had nearly identical 1-2 shift valve springs that measure approx. .40 o.d. by .950 long. That is nearly the same length as the 2-3 shift valve spring but a lot smaller diameter just like the pics on the book show. The torque converter control valve spring is nearly the same diameter but a lot longer. Depending on the year it's either 1.25 long or 1.5 long.

On your last post where you showed the 3 springs and said you aren't sure what the red spring is, it's possible it's the original bypass spring that's located in the valve body pocket where you drilled the 3/16 hole through the body, all my valve bodies all have a red spring there. My Trans-go papers say that spring should be replaced with a white one they provide in the kit.

Here's a couple pics of things. First the valve body with parts laid out and text explaining the springs I'm talking about. The next 2 pics are of the 1-2 shift valve spring laid out next to the old style and new style torque converter control springs to show the diff. in size. As you can see the old style converter spring isn't a lot longer but I guarantee it's enough to cause it not to shift. At least till about 26,000 rpm like TB said, LOL...
 

Attachments

  • Valve body springs.jpg
    105.6 KB · Views: 91
  • Old TC control and 1-2 shift valve springs.JPG
    45.3 KB · Views: 105
  • New TC control and 1-2 shift valve springs.JPG
    39 KB · Views: 100
Alright that's definite, I had the wrong spring in the 1-2 shift valve, I had the correct one in the torque converter valve though. Mine are measuring a little bit different then yours,
1-2 shift valve is .93 and the torque converter is off by .10 at .36 and at 1.25 long for the old style.

GOPR0036_zps6721f1f4.jpg


Far right is the 1-2 shift valve, middle one is the old style torque converter spring and the far left is the new style. I should use the old style correct?
Again thanks for taking that apart for me!
 
All right balls are in, left the one out for a firm shift.
07ac74d2-8c60-423e-ac88-caaf7a159121_zps2252ec5e.jpg


Will throw it in Friday and burn some rubber (hopefully lol)

^ no worries, I believe that I do used the old style TC spring.
 
Alright that's definite, I had the wrong spring in the 1-2 shift valve, I had the correct one in the torque converter valve though. Mine are measuring a little bit different then yours,
1-2 shift valve is .93 and the torque converter is off by .10 at .36 and at 1.25 long for the old style.

My valve bodies are from 727's, which are very similar, but maybe Mopar changed the springs slightly.

Far right is the 1-2 shift valve, middle one is the old style torque converter spring and the far left is the new style. I should use the old style correct?
Again thanks for taking that apart for me!

Depends on what style converter valve is in the valve body. Here's a pic showing the 3 different converter valves. The upper one is the old style and it takes a shorter spring. Two of my valve bodies were that style and one I had from a 77 trans. was like the middle valve. If yours is like the upper one use the shorter spring that's approx. 1.2" long. If it's either the middle or bottom style it needs a spring that's approx. 1.5" long.

No problem. I was planning on doing it anyway.
 

Attachments

  • VB converter valves.jpg
    45 KB · Views: 98
alright, it's the top one. So that settles it, everything should be in order than. The 1-2 shift valve feels better, not set to shift at 26,000 rpm :smile:
 
alright, it's the top one. So that settles it, everything should be in order than. The 1-2 shift valve feels better, not set to shift at 26,000 rpm :smile:

Cool, hope it sets you back in the seat and barks the tires.:D
 
I'll bet it was really stiff with that long spring in it, LOL... Good luck and let us know how it turns out.

It was VERY still haha

Cool, hope it sets you back in the seat and barks the tires.:D

Oh I will, if it all works out I'll take my gopro out since I just the new one :blob:

Thanks for the help you two, couldn't have gotten this far
 
So, put everything back together got it started and took it for a test drive and smoke started pouring out of rear of the car cause I couldn't stop spinning the tires :burnout: lol

all gears are there, 1-2 is nice and firm, would like it a little firmer but not bad, 2-3 is better but nothing like 1-2 is. Is this normal? I was hoping 2-3 was going to be firm like 1-2.
 
Glad to hear it's working. It's pretty much normal for the 1-2 shift to be firmer than the 2-3. The throttle pressure rod adjustment affects not only shift speed but firmness on both shifts. Do you have it maxed out, or at least real close? If so the only thing left would be to drop the valve body again and install a blocker rod under the accumulator. It'll really firm up the 1-2 shift and help slightly with the 2-3 shift. To firm up the 2-3 shift you will have to drill out the 2-3 port in the valve body spacer plate but before you do that you need to see what ratio shift lever is on the the front band. If it's 3.8 or less you can drill out the port to the max of 3/16". If it's a 4.2 or higher don't go bigger than .150" or it may overlap going into 3rd.

BTW: what did you drill out the 2-3 shift port too? Did the accumulator have 1 spring or 2? Some only have 1 spring on the top of the accumulator (the side against the valve body) while others have one on each side. The ones with 2 springs shift the softest
 
Woo Hoo!
Glad to hear it, now let me give you my oppinion on the 2-3 shift and possible further modifications.

It's pretty much normal for the 1-2 shift to be firmer than the 2-3. The throttle pressure rod adjustment affects not only shift speed but firmness on both shifts. Do you have it maxed out, or at least real close? If so the only thing left would be to drop the valve body again and install a blocker rod under the accumulator. It'll really firm up the 1-2 shift and help slightly with the 2-3 shift. To firm up the 2-3 shift you will have to drill out the 2-3 port in the valve body spacer plate but before you do that you need to see what ratio shift lever is on the the front band. If it's 3.8 or less you can drill out the port to the max of 3/16". If it's a 4.2 or higher don't go bigger than .150" or it may overlap going into 3rd. :D

NICE job Tracy, and 7dswinger both.
Even if you can tell someone how to do something most people can't hang in there long enough to finish the job. Nice work guys.

Ah, another one down the road. :prayer:
 
I read both of them and then noticed that lol

Uh I drilled the hole to .140 I believe, no where close to 3/16 and not over .150, I believe I didn't make a not (should have though). When I drop the pan off again, since I have to since the drain plug I installed leaks a bit so I'm gonna silver solder it to the pan, I'll check what I drilled them too but I believe .142 (9/64). I looked at what ration the lever was but I couldn't find any markings on it.

I'll look at the throttle pressure, I was gonna check it anyways, haven't in awhile.

The accumulator had one spring as far as I know, I didn't pull it out of the bore it was in. Should I make the rod as long as the spring is so it's held up to the farthest position?
 
-
Back
Top